> ## Documentation Index
> Fetch the complete documentation index at: https://sonamu.cartanova.ai/llms.txt
> Use this file to discover all available pages before exploring further.
# Creating Your First Entity
> Create your first entity with Sonamu UI and build an API
In this guide, you'll learn how to create a `Post` entity using Sonamu UI, create a database table, and auto-generate Model files through scaffolding.
## Prerequisites
* You must have completed the [Quick Start](/en/getting-started/quick-start) guide and have the development server running.
* The API server must be running at [http://localhost:34900](http://localhost:34900).
When the API server (`pnpm dev`) is running, Sonamu UI is automatically served
at [http://localhost:34900/sonamu-ui](http://localhost:34900/sonamu-ui).
## Step 1: Access Sonamu UI
Open [http://localhost:34900/sonamu-ui](http://localhost:34900/sonamu-ui) in your browser.
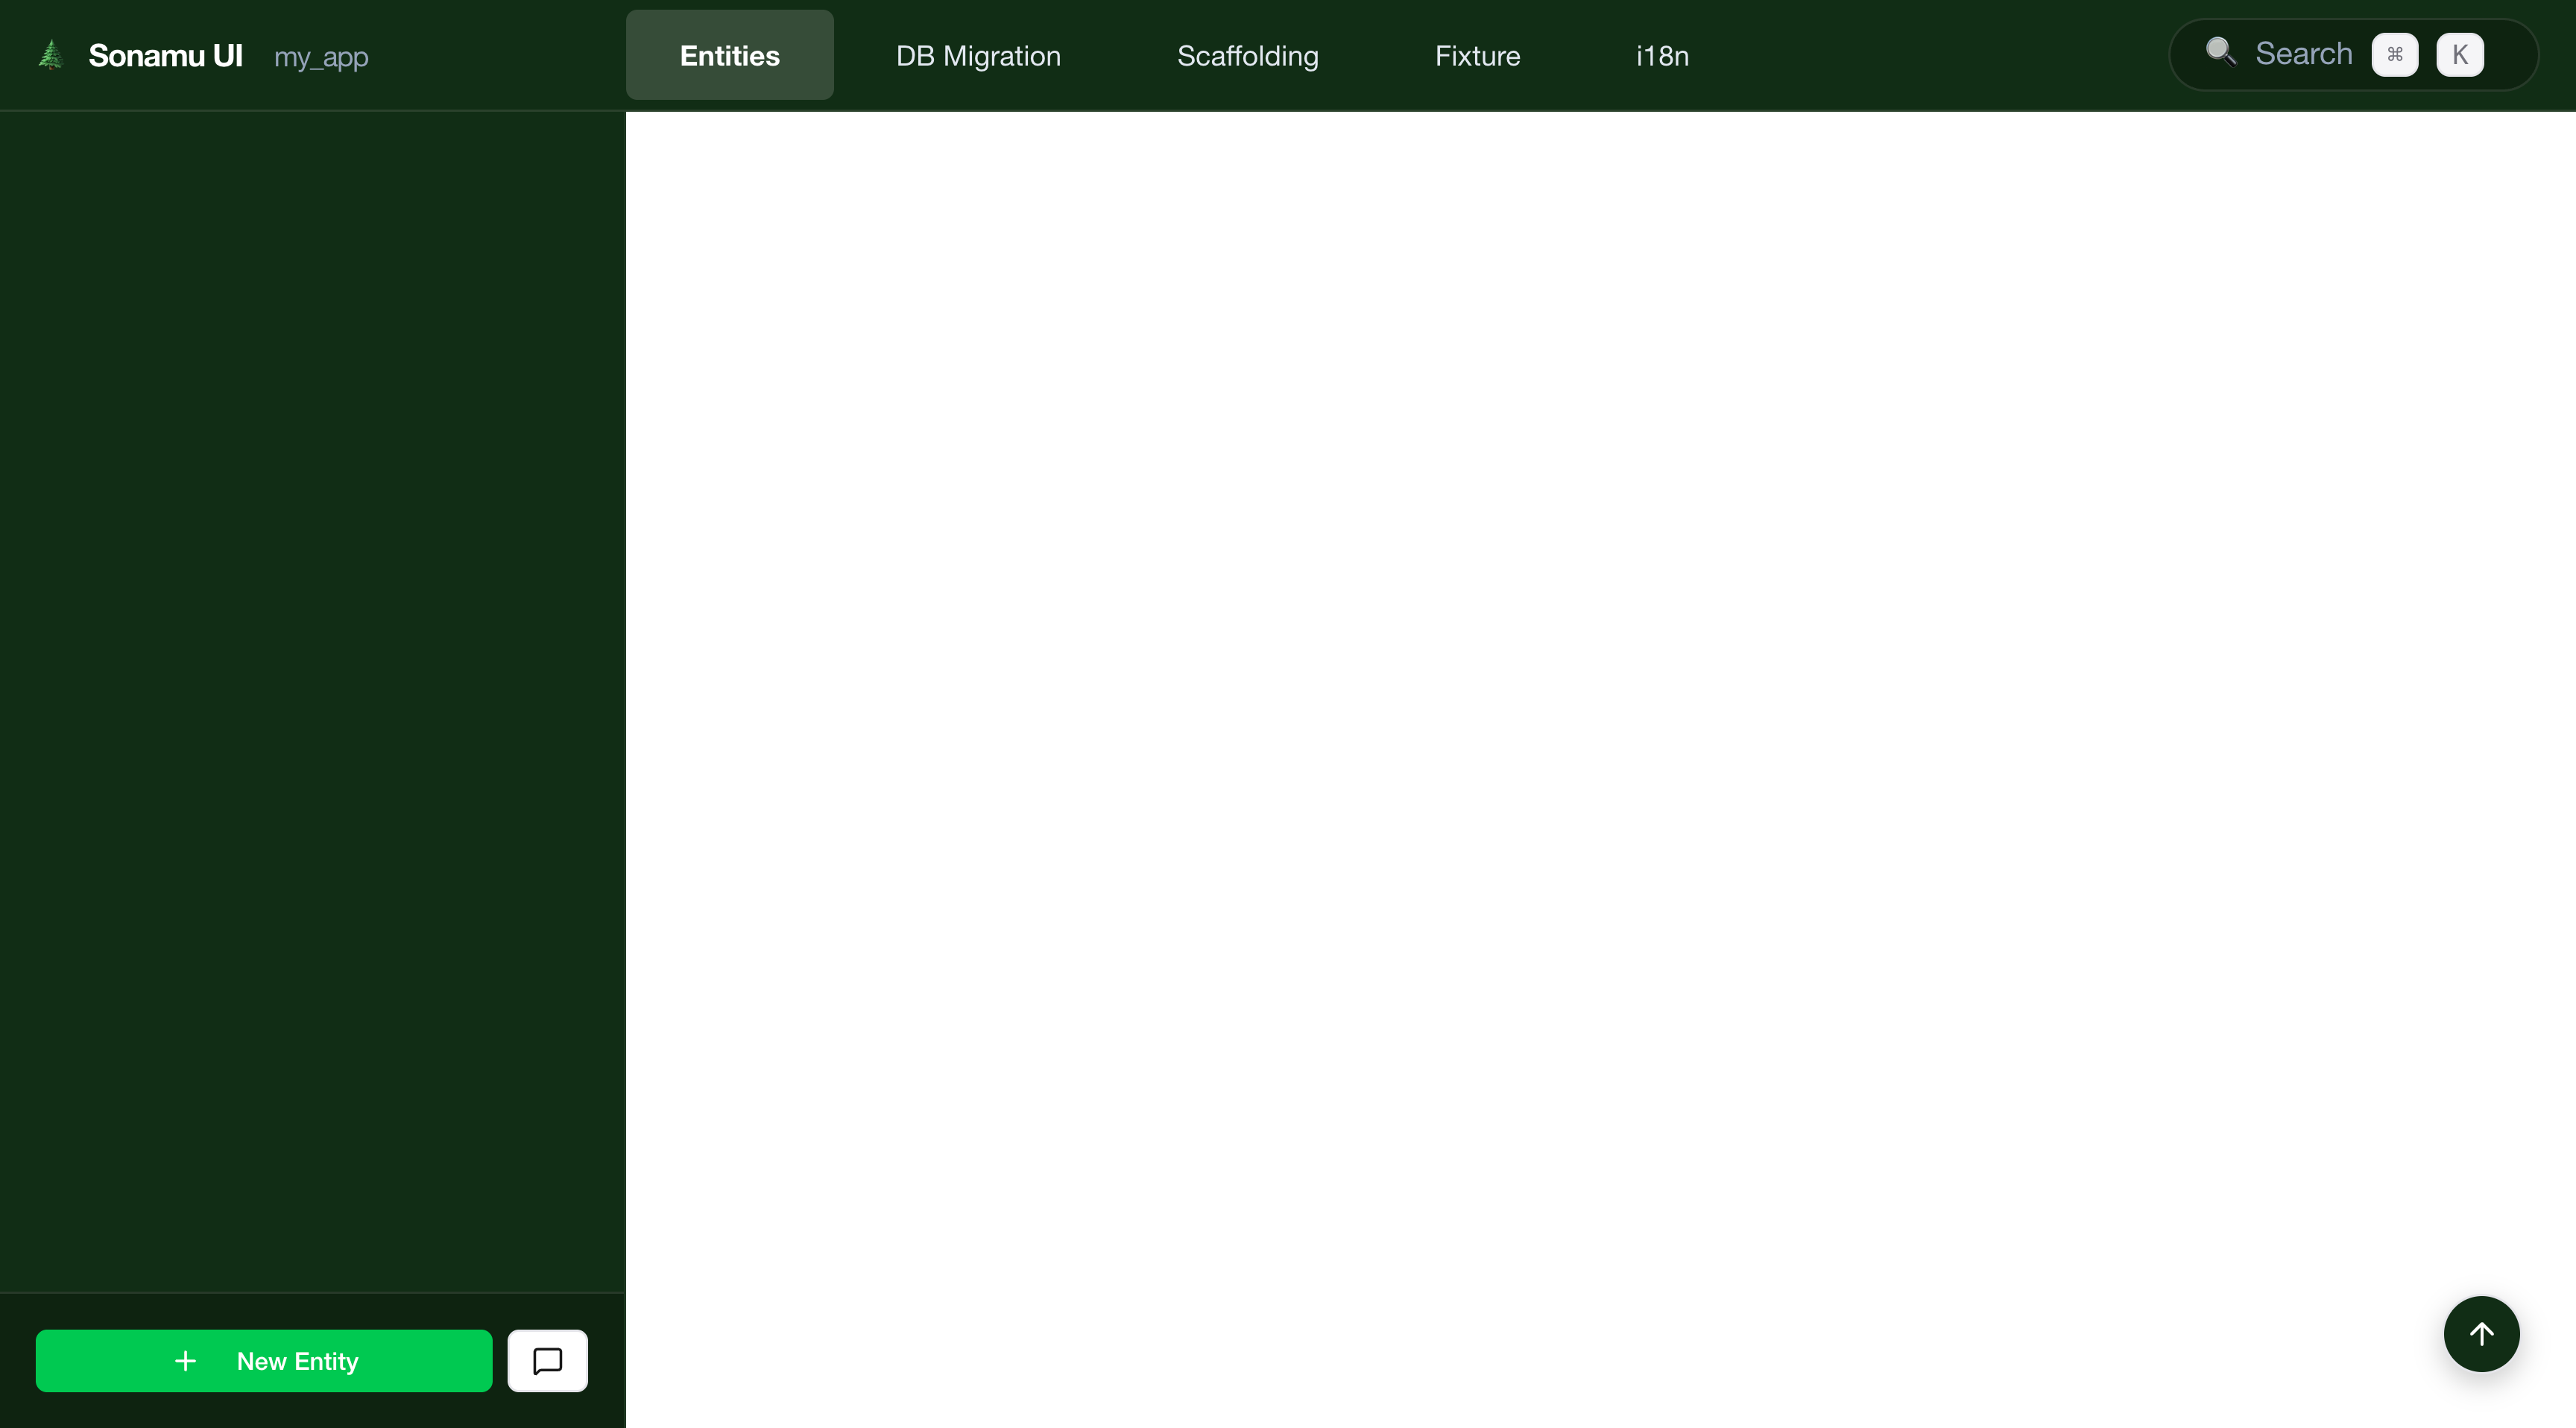 Sonamu UI is a web interface for visually managing entities. Here you can:
* Create and edit entities
* Add/modify/delete props
* Define relations
* Manage Enum types
* Define Subsets
* Create and run migrations
* Scaffolding (auto-generate Model files)
## Step 2: Create a New Entity
Click the **Entity** tab in the Sonamu UI top menu to see existing entities.
Click the **New Entity** button at the bottom of the left sidebar.
Sonamu UI is a web interface for visually managing entities. Here you can:
* Create and edit entities
* Add/modify/delete props
* Define relations
* Manage Enum types
* Define Subsets
* Create and run migrations
* Scaffolding (auto-generate Model files)
## Step 2: Create a New Entity
Click the **Entity** tab in the Sonamu UI top menu to see existing entities.
Click the **New Entity** button at the bottom of the left sidebar.
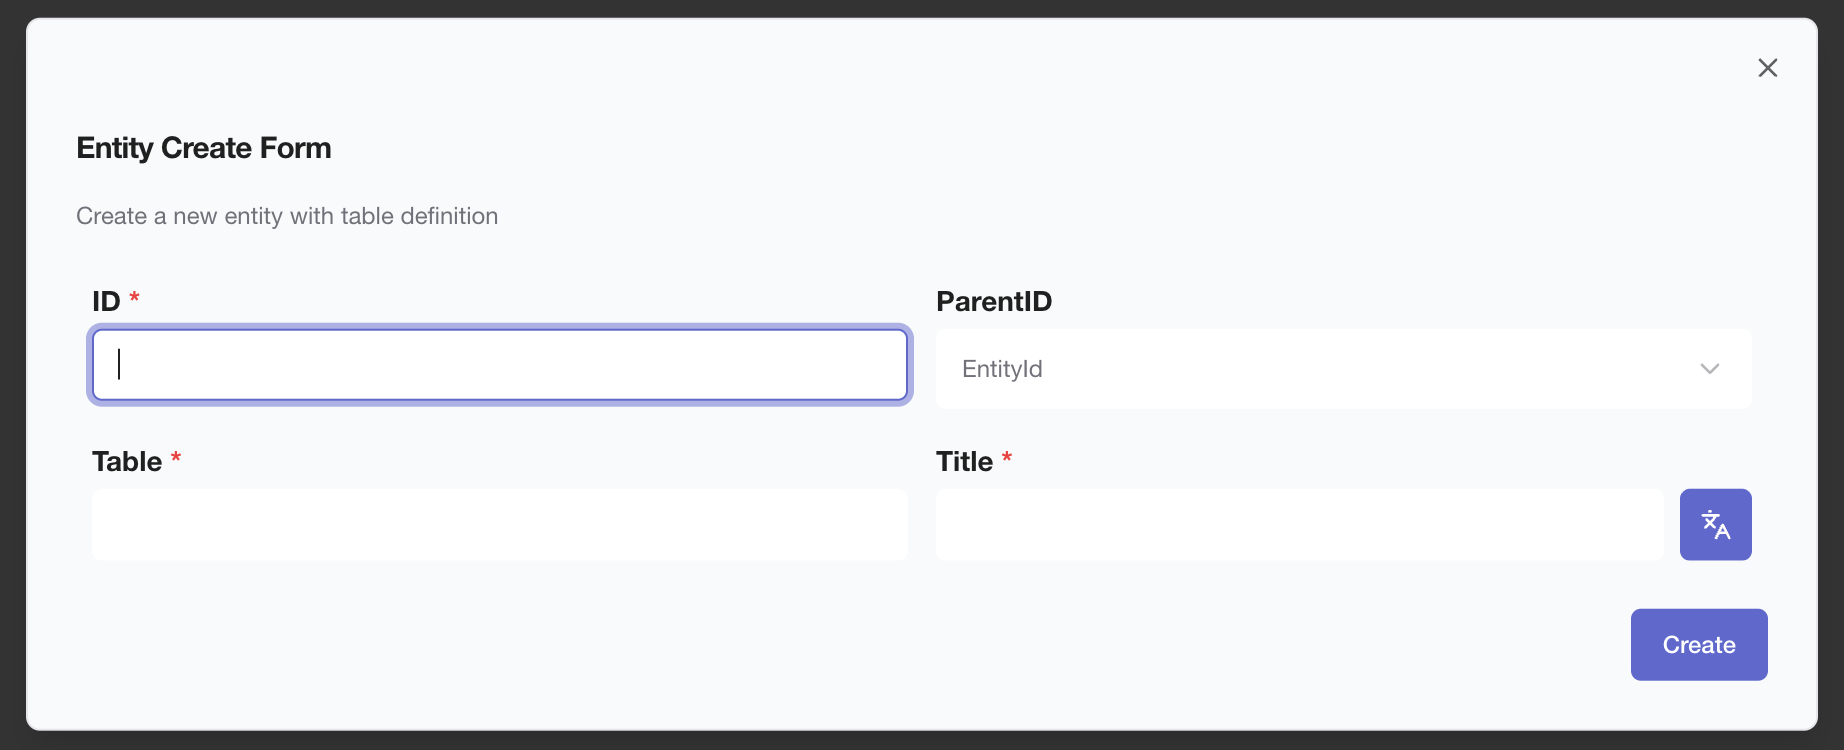 Enter the basic information for the new entity and click the **Create** button:
* **Entity ID**: `Post` (starts with uppercase, singular)
* **Table Name**: `posts` (lowercase, plural)
* **Title**: `Post`
Enter the basic information for the new entity and click the **Create** button:
* **Entity ID**: `Post` (starts with uppercase, singular)
* **Table Name**: `posts` (lowercase, plural)
* **Title**: `Post`
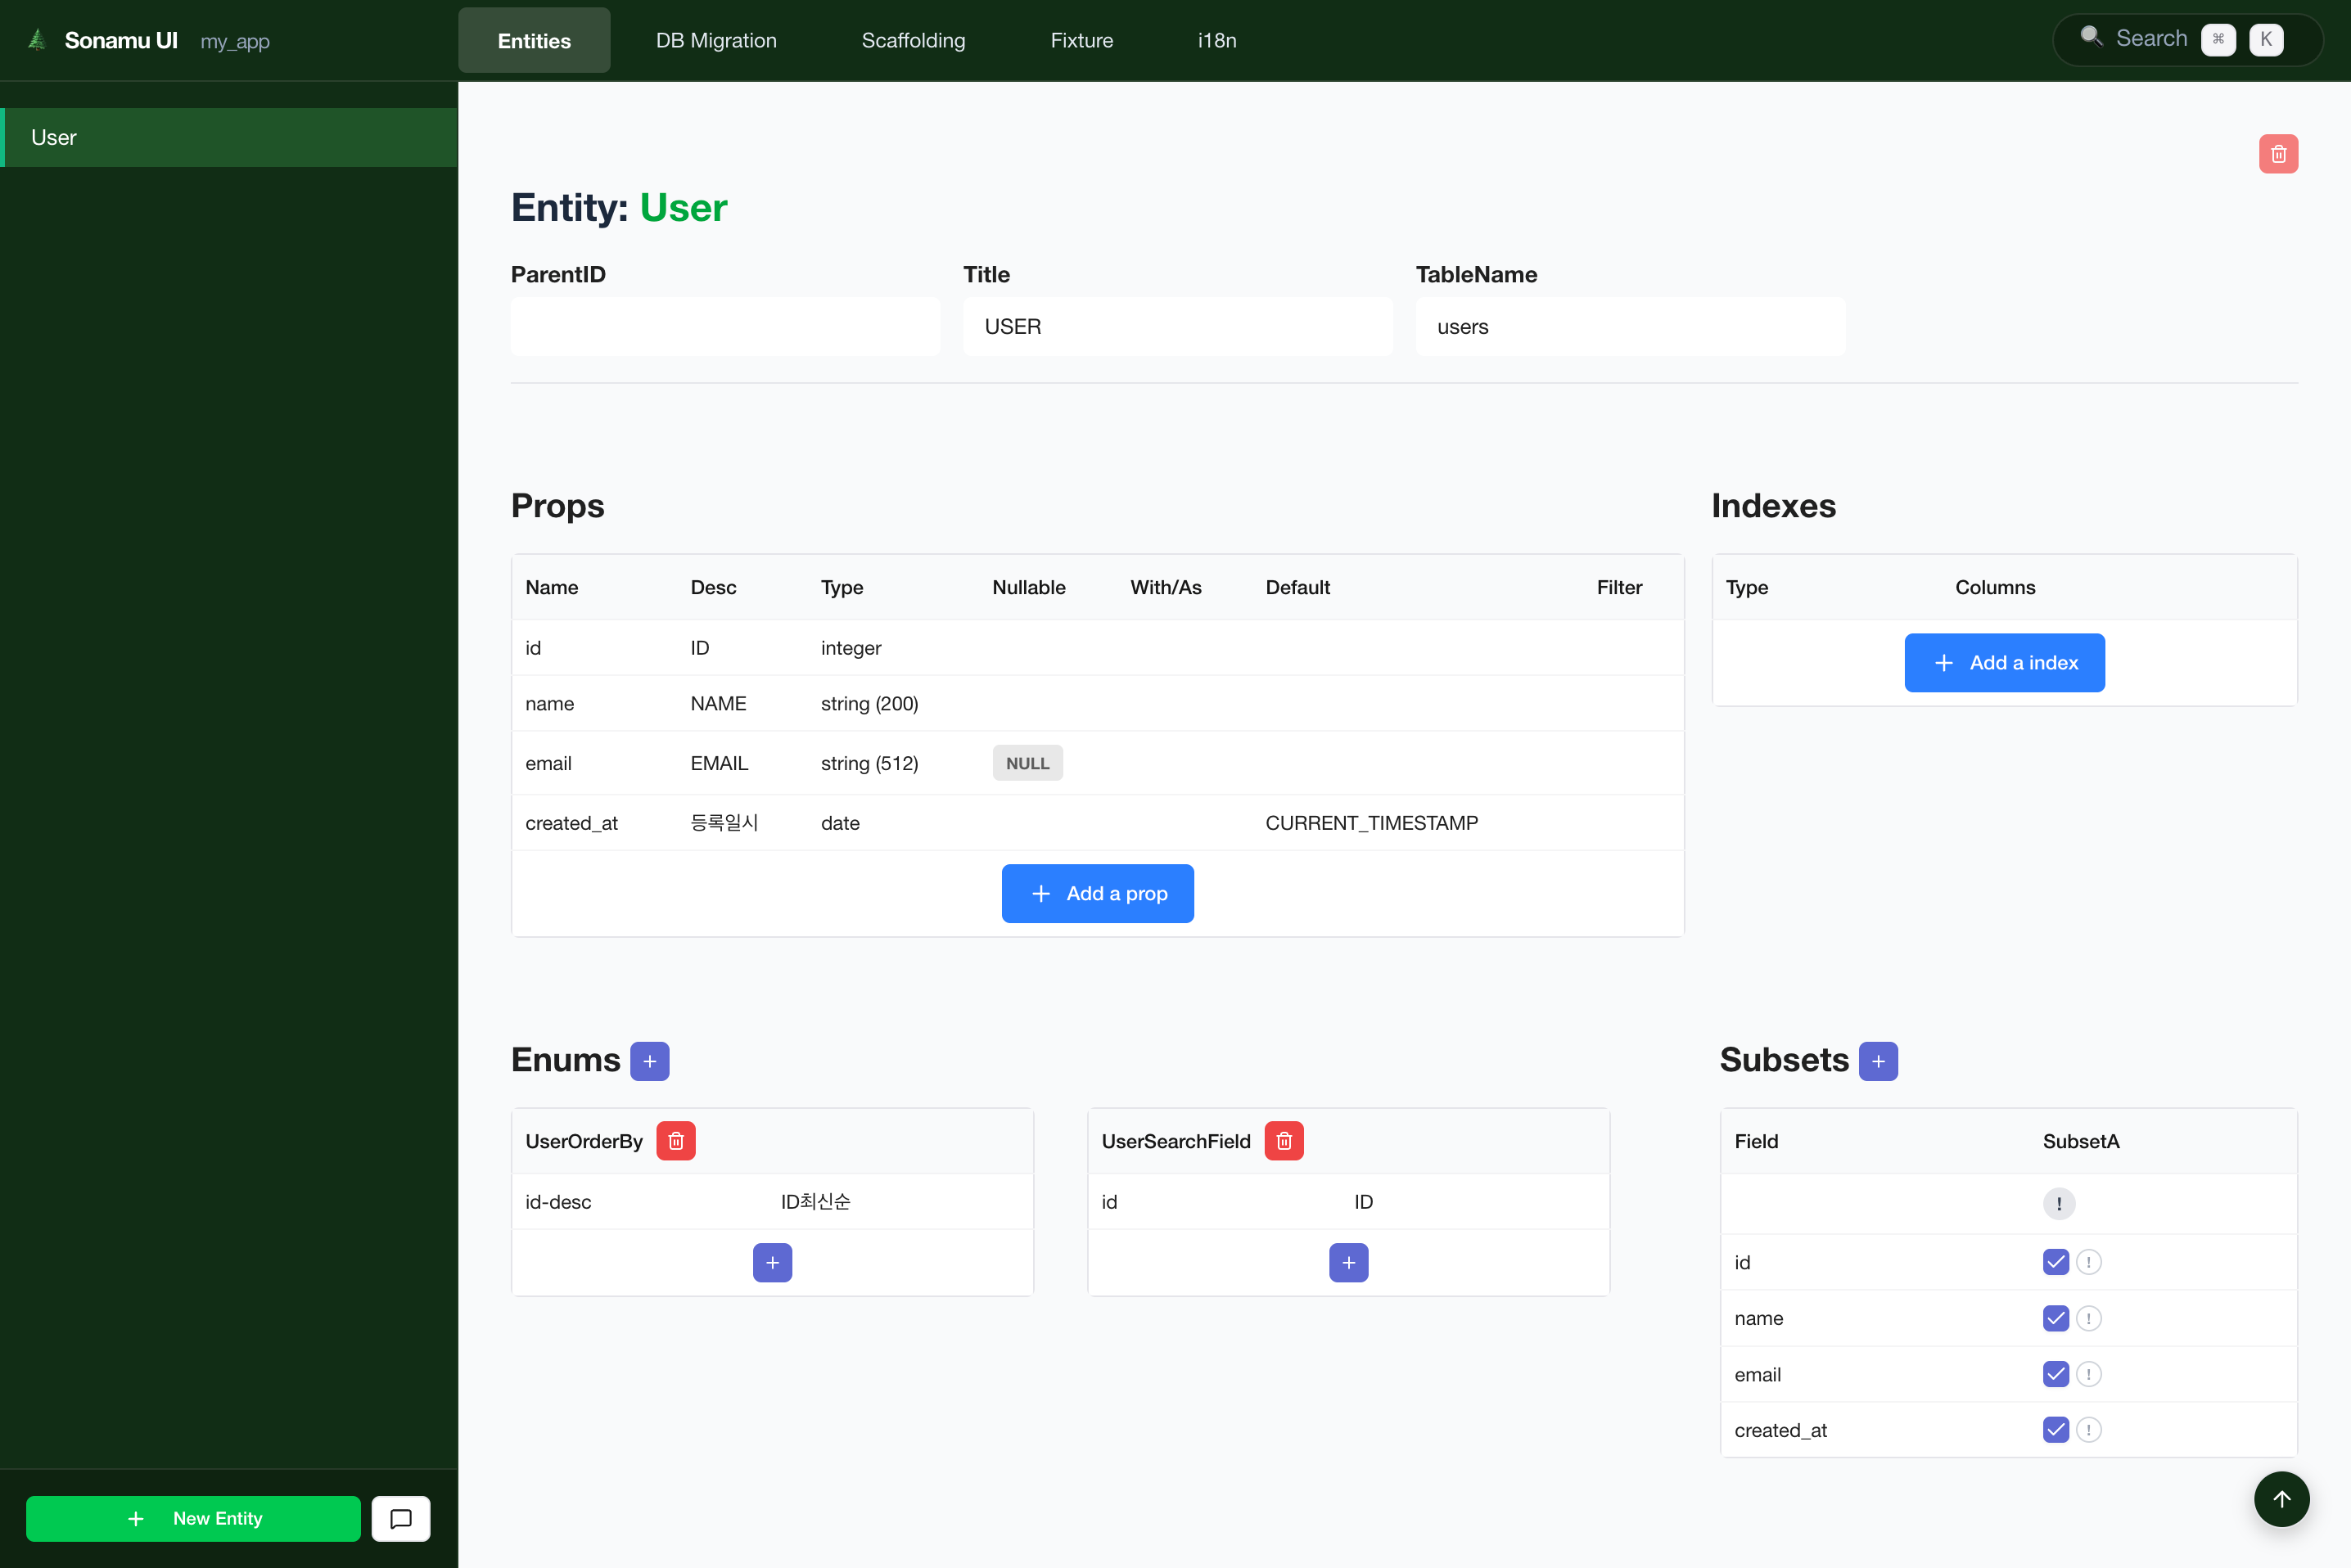 **Entity ID** is used as the TypeScript class name, and **Table Name** is the actual database table name.
## Step 3: Define Props
Now add props to the `Post` entity:
Click the **Add a prop** button to add the following props:
| Prop Name | Type | Description | Options |
| ------------ | ------- | ----------- | ------------------------------- |
| `id` | integer | ID | Primary Key |
| `created_at` | date | Created At | DB Default: `CURRENT_TIMESTAMP` |
| `title` | string | Title | Length: 255 |
| `content` | string | Content | - |
| `author` | string | Author | Length: 100 |
| `view_count` | integer | View Count | DB Default: `0` |
**id prop**
* Name: `id`
* Type: `integer`
* Description: `ID`
**created\_at prop**
* Name: `created_at`
* Type: `date`
* Description: `Created At`
* DB Default: `CURRENT_TIMESTAMP`
**title prop**
* Name: `title`
* Type: `string`
* Description: `Title`
* Length: `255`
**content prop**
* Name: `content`
* Type: `string`
* Description: `Content`
* Length: empty (creates TEXT type)
**author prop**
* Name: `author`
* Type: `string`
* Description: `Author`
* Length: `100`
**view\_count prop**
* Name: `view_count`
* Type: `integer`
* Description: `View Count`
* DB Default: `0`
**Entity ID** is used as the TypeScript class name, and **Table Name** is the actual database table name.
## Step 3: Define Props
Now add props to the `Post` entity:
Click the **Add a prop** button to add the following props:
| Prop Name | Type | Description | Options |
| ------------ | ------- | ----------- | ------------------------------- |
| `id` | integer | ID | Primary Key |
| `created_at` | date | Created At | DB Default: `CURRENT_TIMESTAMP` |
| `title` | string | Title | Length: 255 |
| `content` | string | Content | - |
| `author` | string | Author | Length: 100 |
| `view_count` | integer | View Count | DB Default: `0` |
**id prop**
* Name: `id`
* Type: `integer`
* Description: `ID`
**created\_at prop**
* Name: `created_at`
* Type: `date`
* Description: `Created At`
* DB Default: `CURRENT_TIMESTAMP`
**title prop**
* Name: `title`
* Type: `string`
* Description: `Title`
* Length: `255`
**content prop**
* Name: `content`
* Type: `string`
* Description: `Content`
* Length: empty (creates TEXT type)
**author prop**
* Name: `author`
* Type: `string`
* Description: `Author`
* Length: `100`
**view\_count prop**
* Name: `view_count`
* Type: `integer`
* Description: `View Count`
* DB Default: `0`
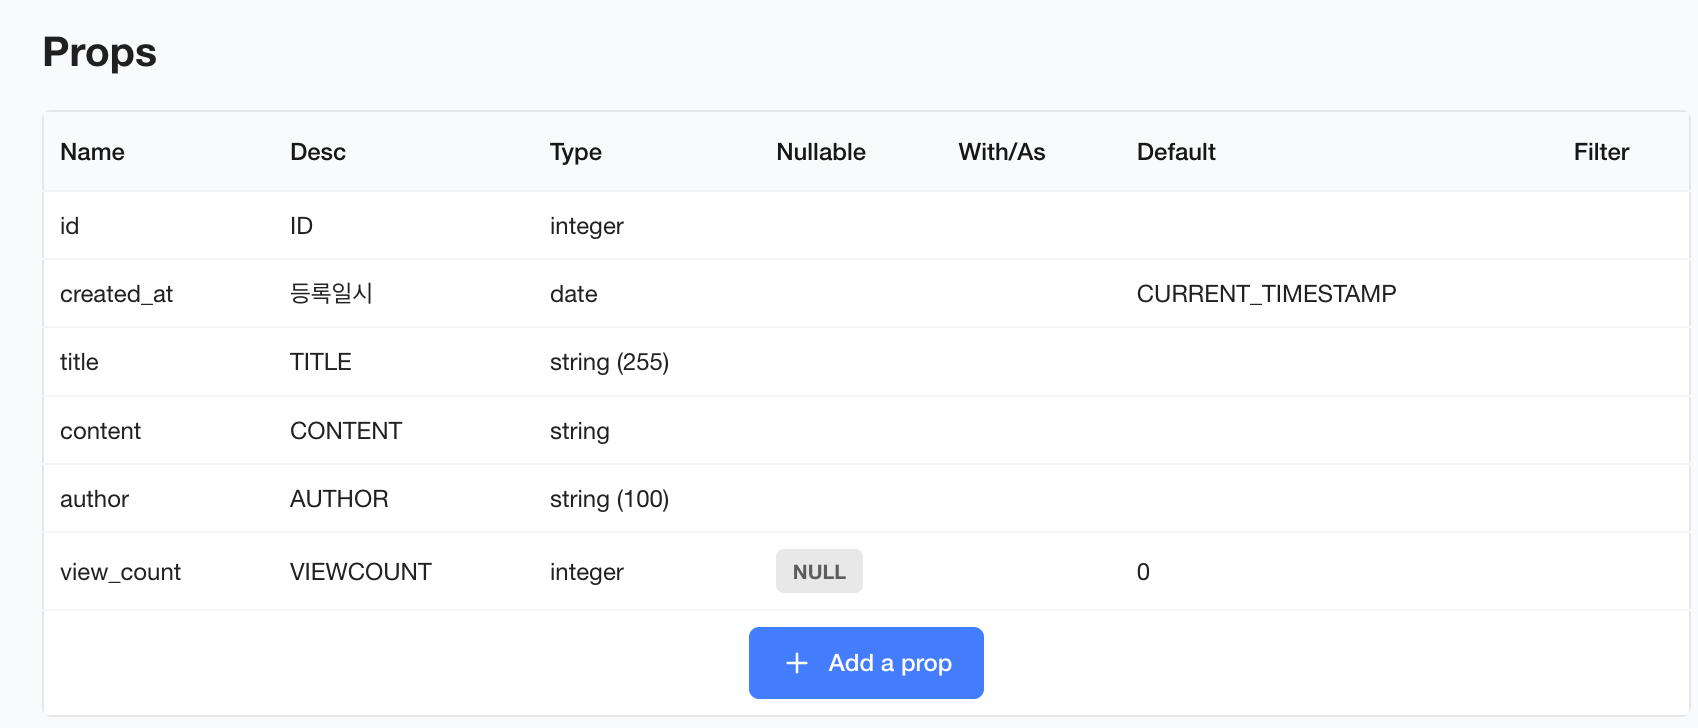 In the **Subsets** section, define data query forms:
* **Subset A** (Admin): `id`, `created_at`, `title`, `content`, `author`, `view_count` - Full information
* **Subset P** (Public): `id`, `title`, `author`, `created_at` - Public information
* **Subset SS** (Secure Short): `id`, `title`, `author` - Summary information
In the **Subsets** section, define data query forms:
* **Subset A** (Admin): `id`, `created_at`, `title`, `content`, `author`, `view_count` - Full information
* **Subset P** (Public): `id`, `title`, `author`, `created_at` - Public information
* **Subset SS** (Secure Short): `id`, `title`, `author` - Summary information
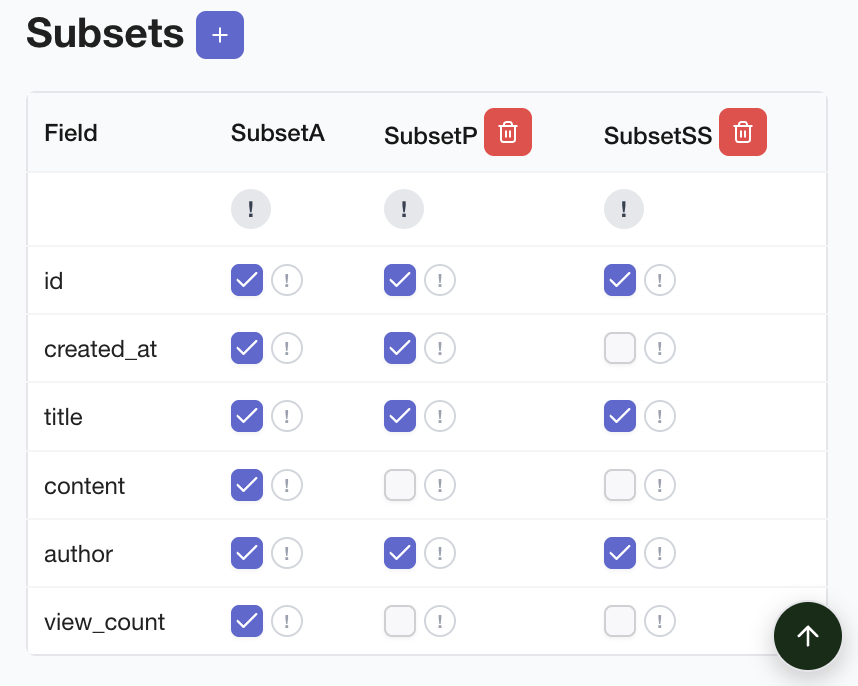 Subsets pre-define which props to include when querying data through APIs.
For details, see the [Subset Guide](/en/database/subsets/what-are-subsets).
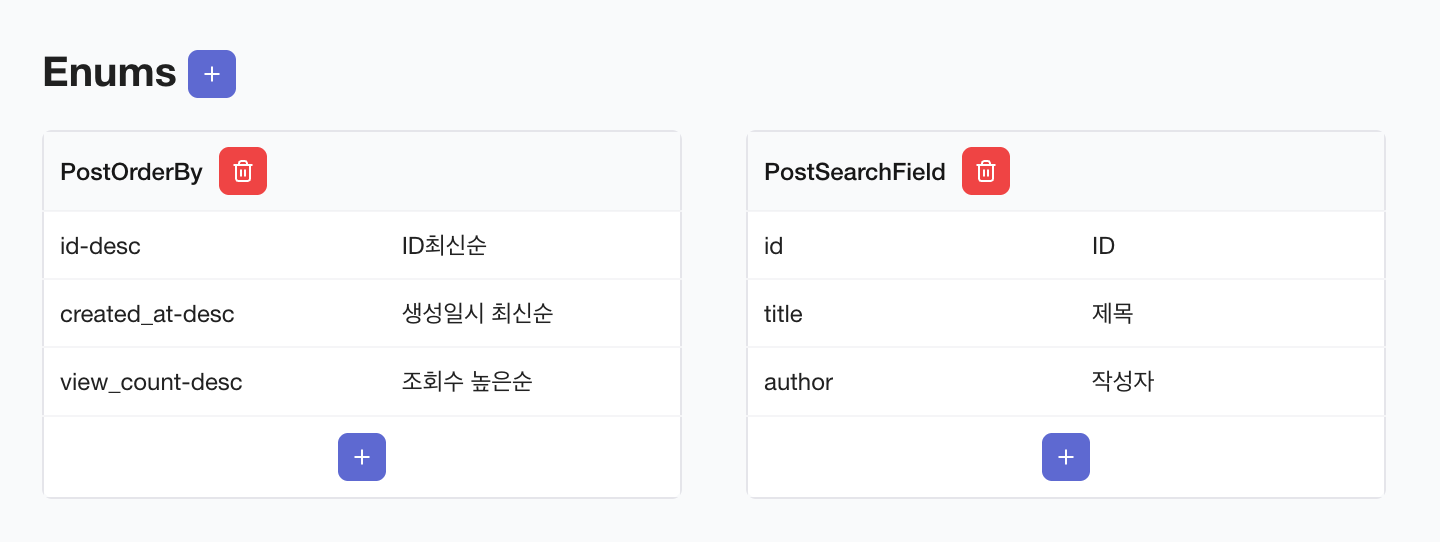
In the **Enums** section, define sorting and search options:
**PostOrderBy**
* `id-desc`: ID newest first
* `created_at-desc`: Created at newest first
* `view_count-desc`: Highest view count first
**PostSearchField**
* `id`: ID
* `title`: Title
* `author`: Author
Subsets pre-define which props to include when querying data through APIs.
For details, see the [Subset Guide](/en/database/subsets/what-are-subsets).
In the **Enums** section, define sorting and search options:
**PostOrderBy**
* `id-desc`: ID newest first
* `created_at-desc`: Created at newest first
* `view_count-desc`: Highest view count first
**PostSearchField**
* `id`: ID
* `title`: Title
* `author`: Author
 ## Step 4: Database Migration
Now you need to apply the entity definition to the database.
Click the **Migration** tab in Sonamu UI.
## Step 4: Database Migration
Now you need to apply the entity definition to the database.
Click the **Migration** tab in Sonamu UI.
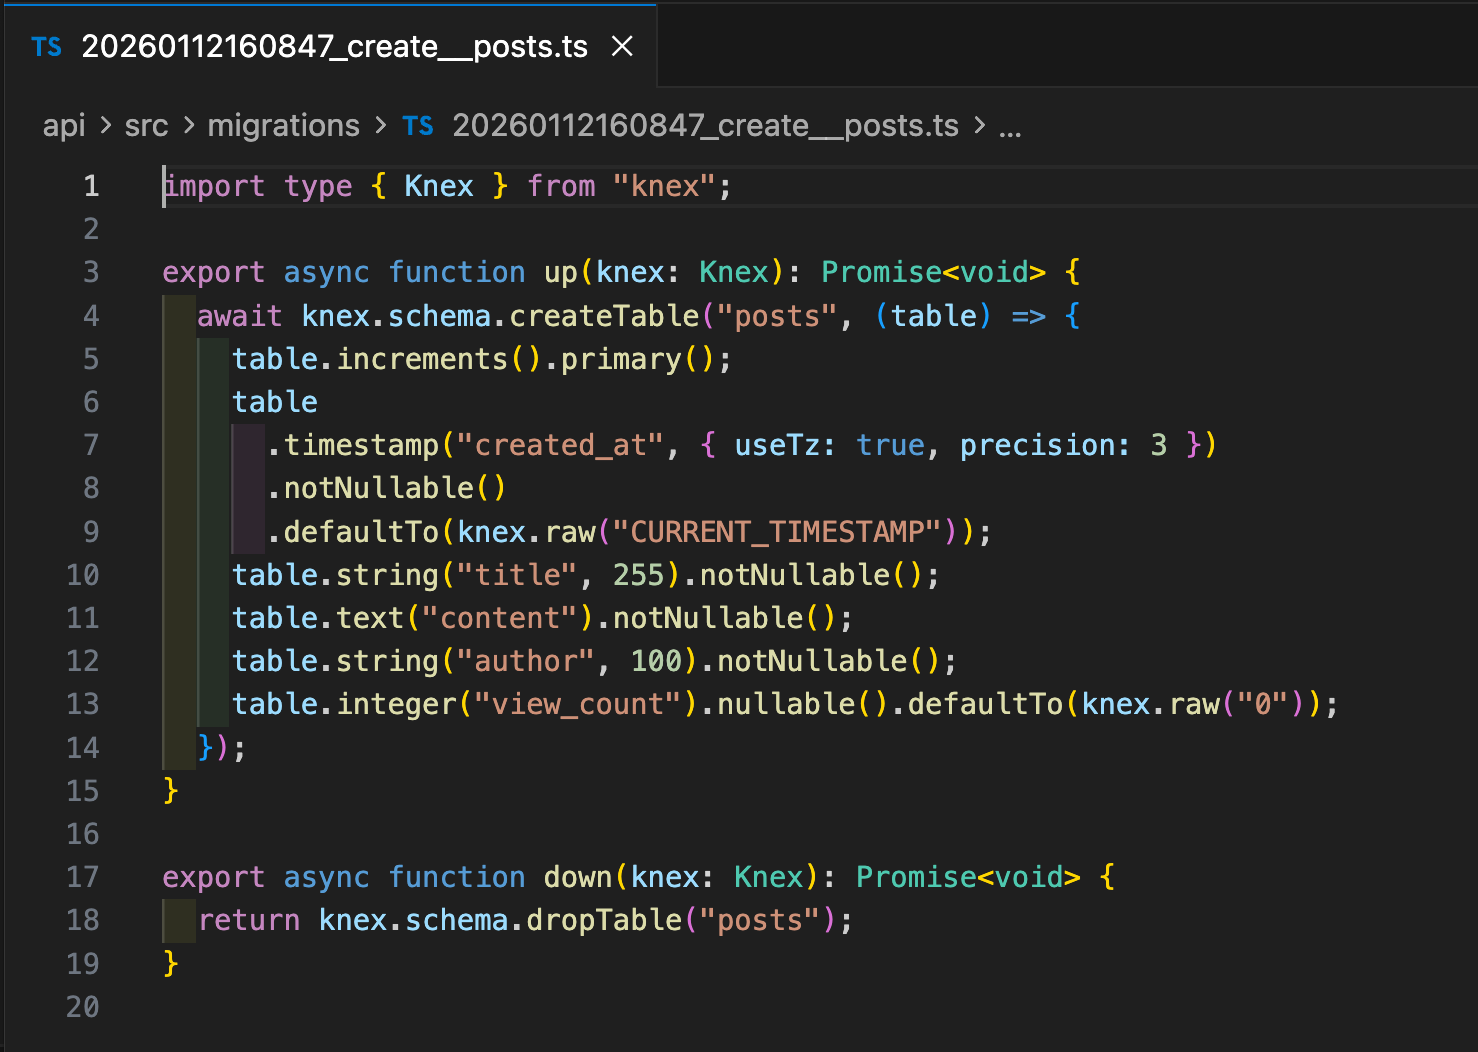
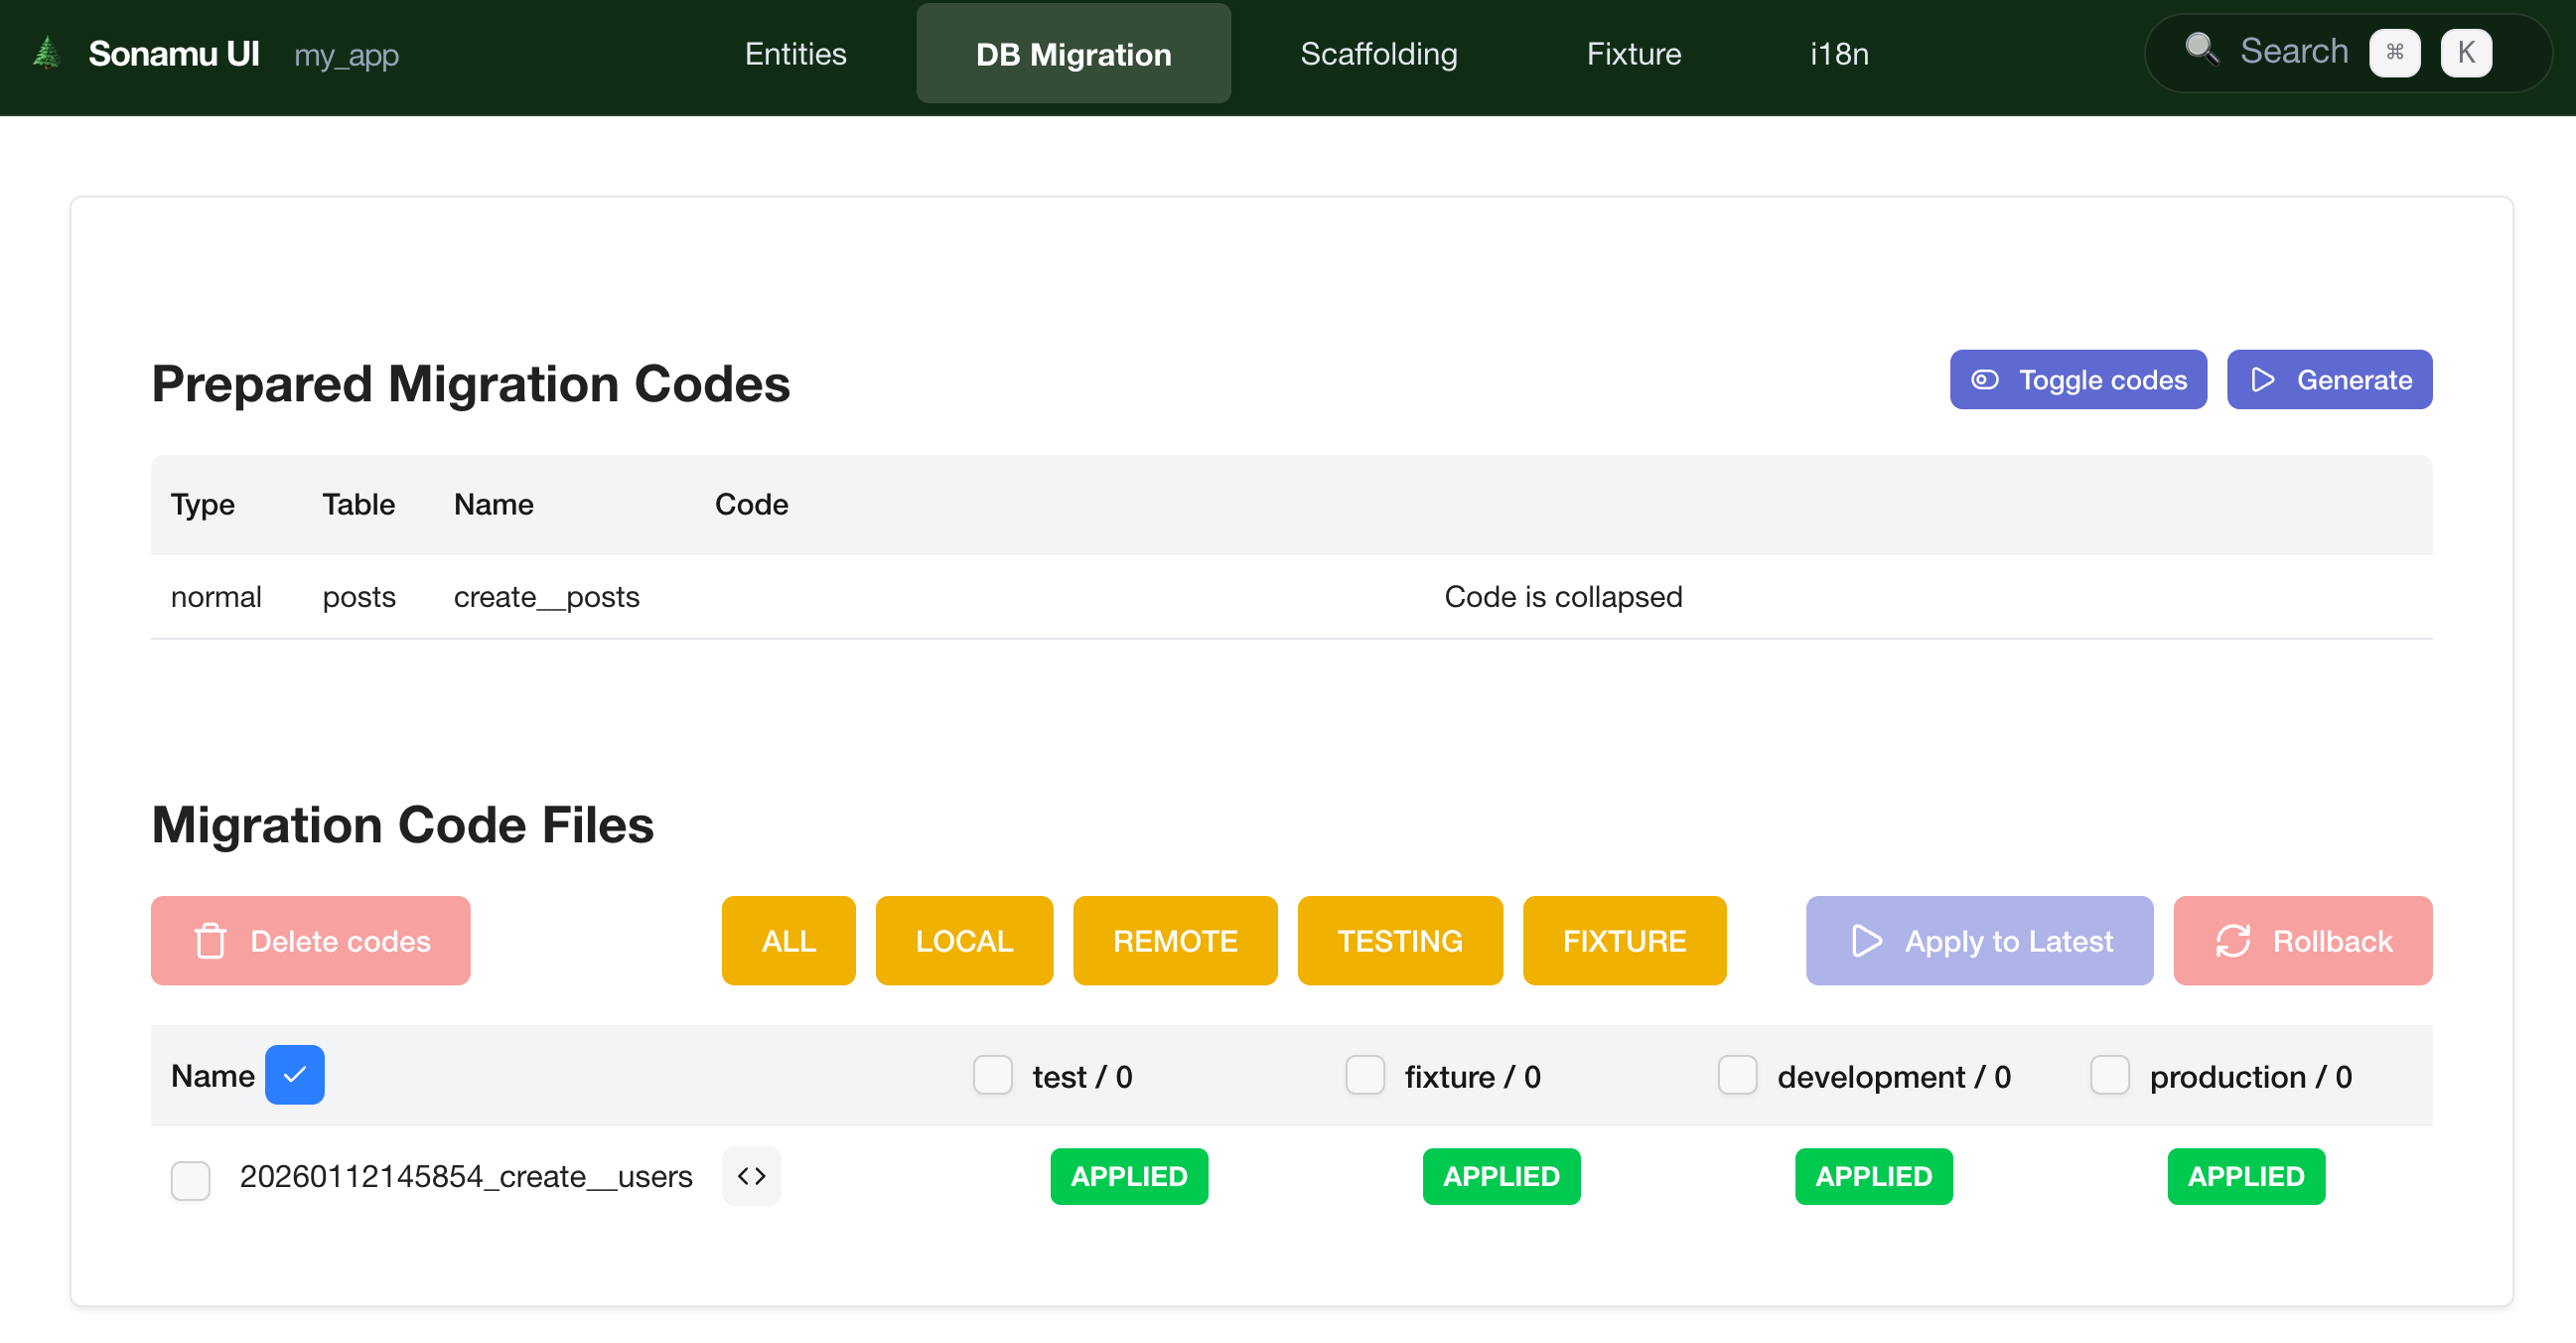 Click the **Generate** button to auto-generate a new migration Code File.
Click the `<>` button in the generated file list to open the migration file page in Cursor. The file content looks like this:
Click the **Generate** button to auto-generate a new migration Code File.
Click the `<>` button in the generated file list to open the migration file page in Cursor. The file content looks like this:
 You can see pending migrations in the Migration tab.
Click the **all** button, then click **Apply to Latest** to see migration targets in the modal.
Select **Shadow DB Testing** and click the **commit** button to create the database table.
Connect to the database using a PostgreSQL client or pgAdmin to verify the `posts` table was created.
## Step 5: Scaffolding (Auto-Generate Model Files)
After migration is complete, you can auto-generate Model files using Sonamu's scaffolding feature.
Click the **Scaffolding** tab in Sonamu UI.
You can see pending migrations in the Migration tab.
Click the **all** button, then click **Apply to Latest** to see migration targets in the modal.
Select **Shadow DB Testing** and click the **commit** button to create the database table.
Connect to the database using a PostgreSQL client or pgAdmin to verify the `posts` table was created.
## Step 5: Scaffolding (Auto-Generate Model Files)
After migration is complete, you can auto-generate Model files using Sonamu's scaffolding feature.
Click the **Scaffolding** tab in Sonamu UI.
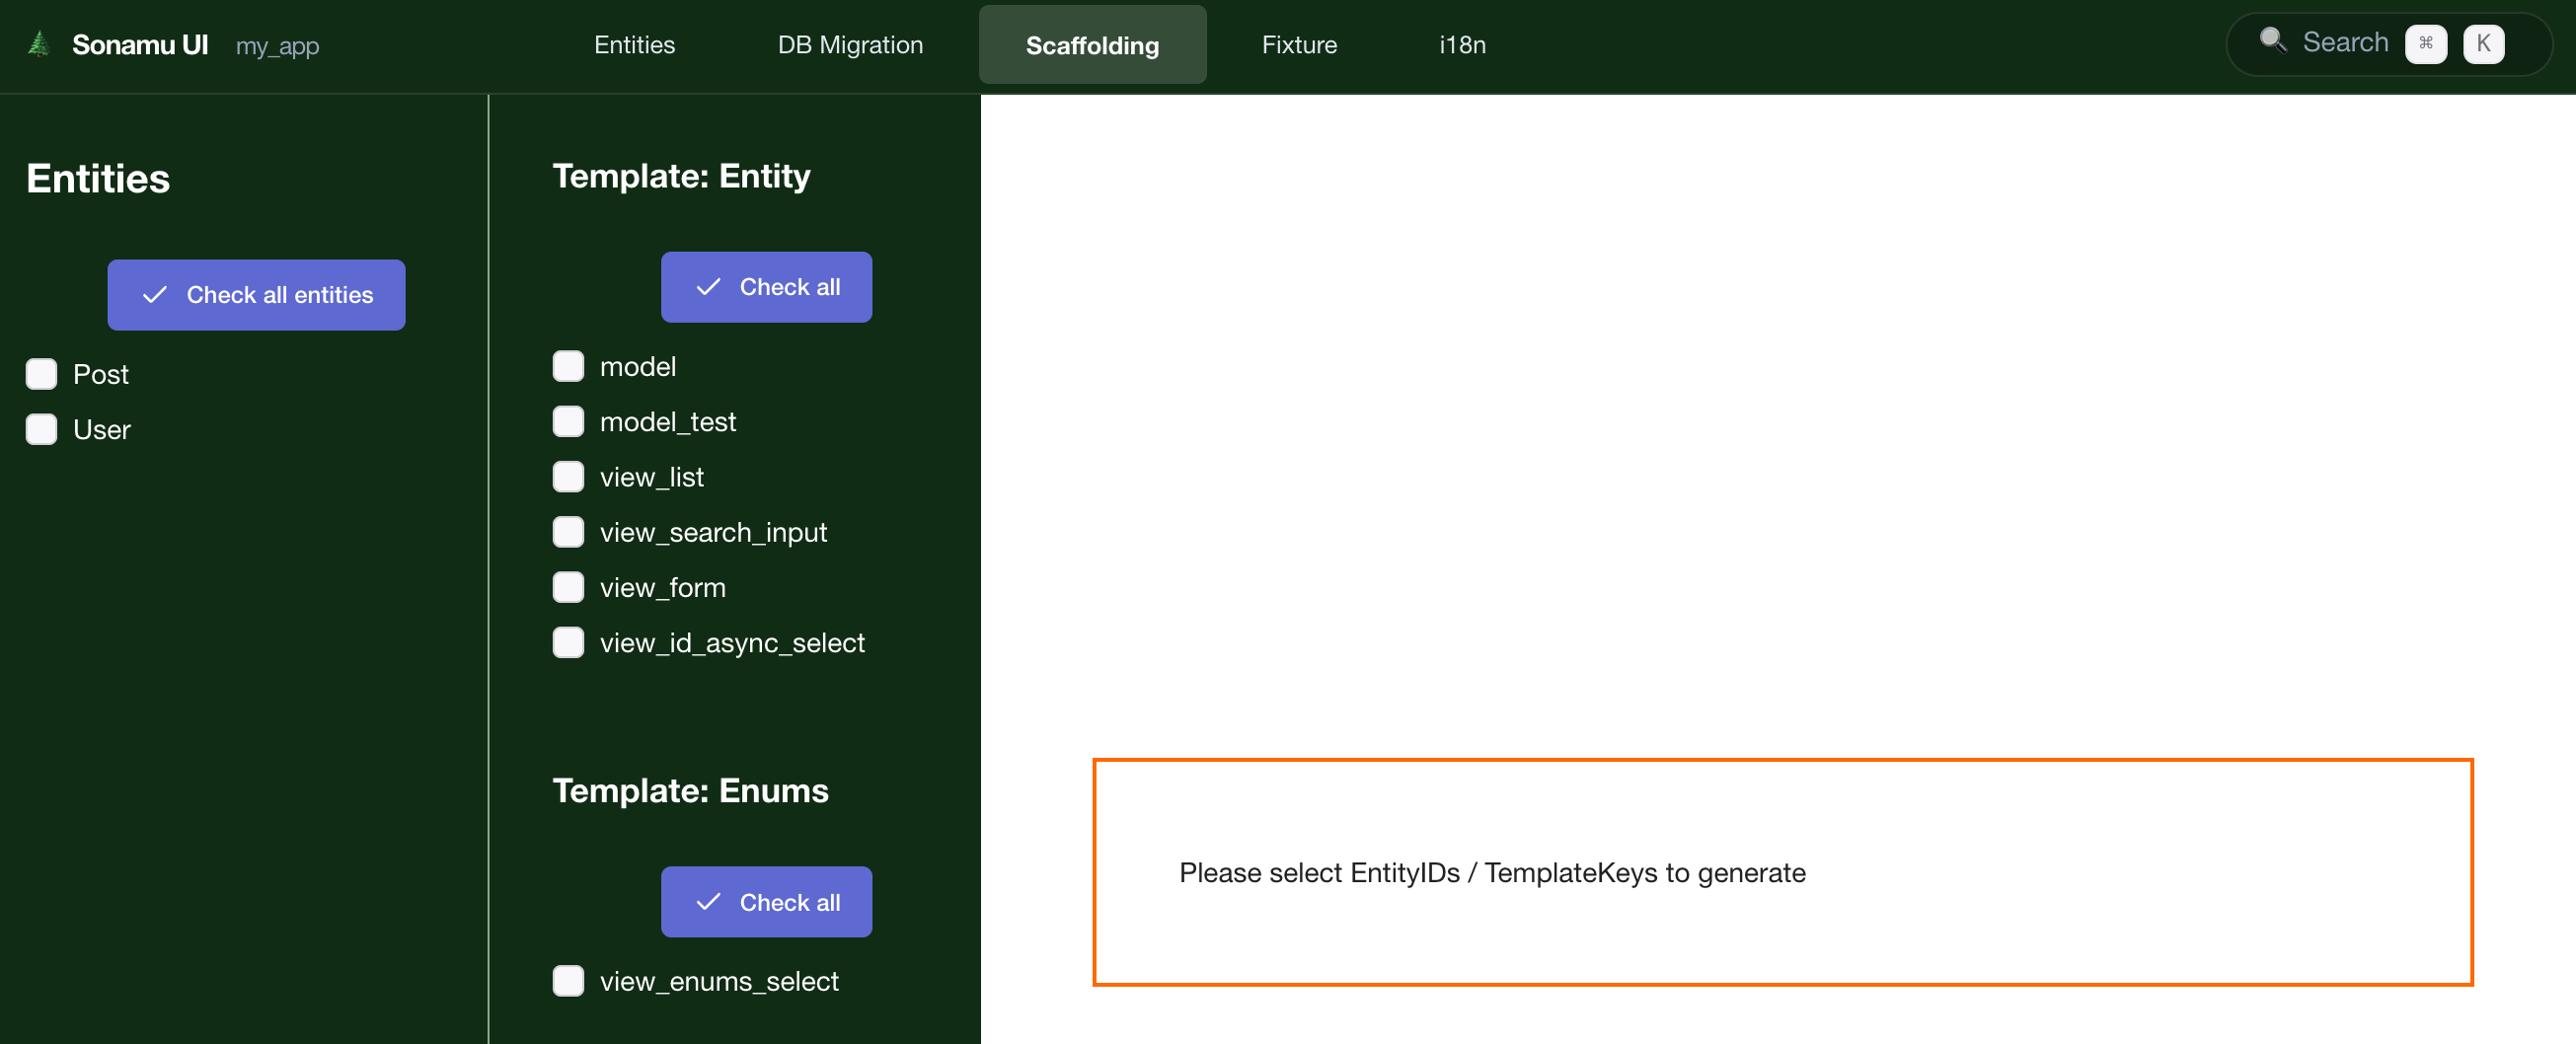 Select **Post** as the entity to scaffold.
Select templates to generate:
* ✅ **Model** - `post.model.ts` (business logic and API endpoints)
* ✅ **Model Test** - `post.model.test.ts` (test file)
Select **Post** as the entity to scaffold.
Select templates to generate:
* ✅ **Model** - `post.model.ts` (business logic and API endpoints)
* ✅ **Model Test** - `post.model.test.ts` (test file)
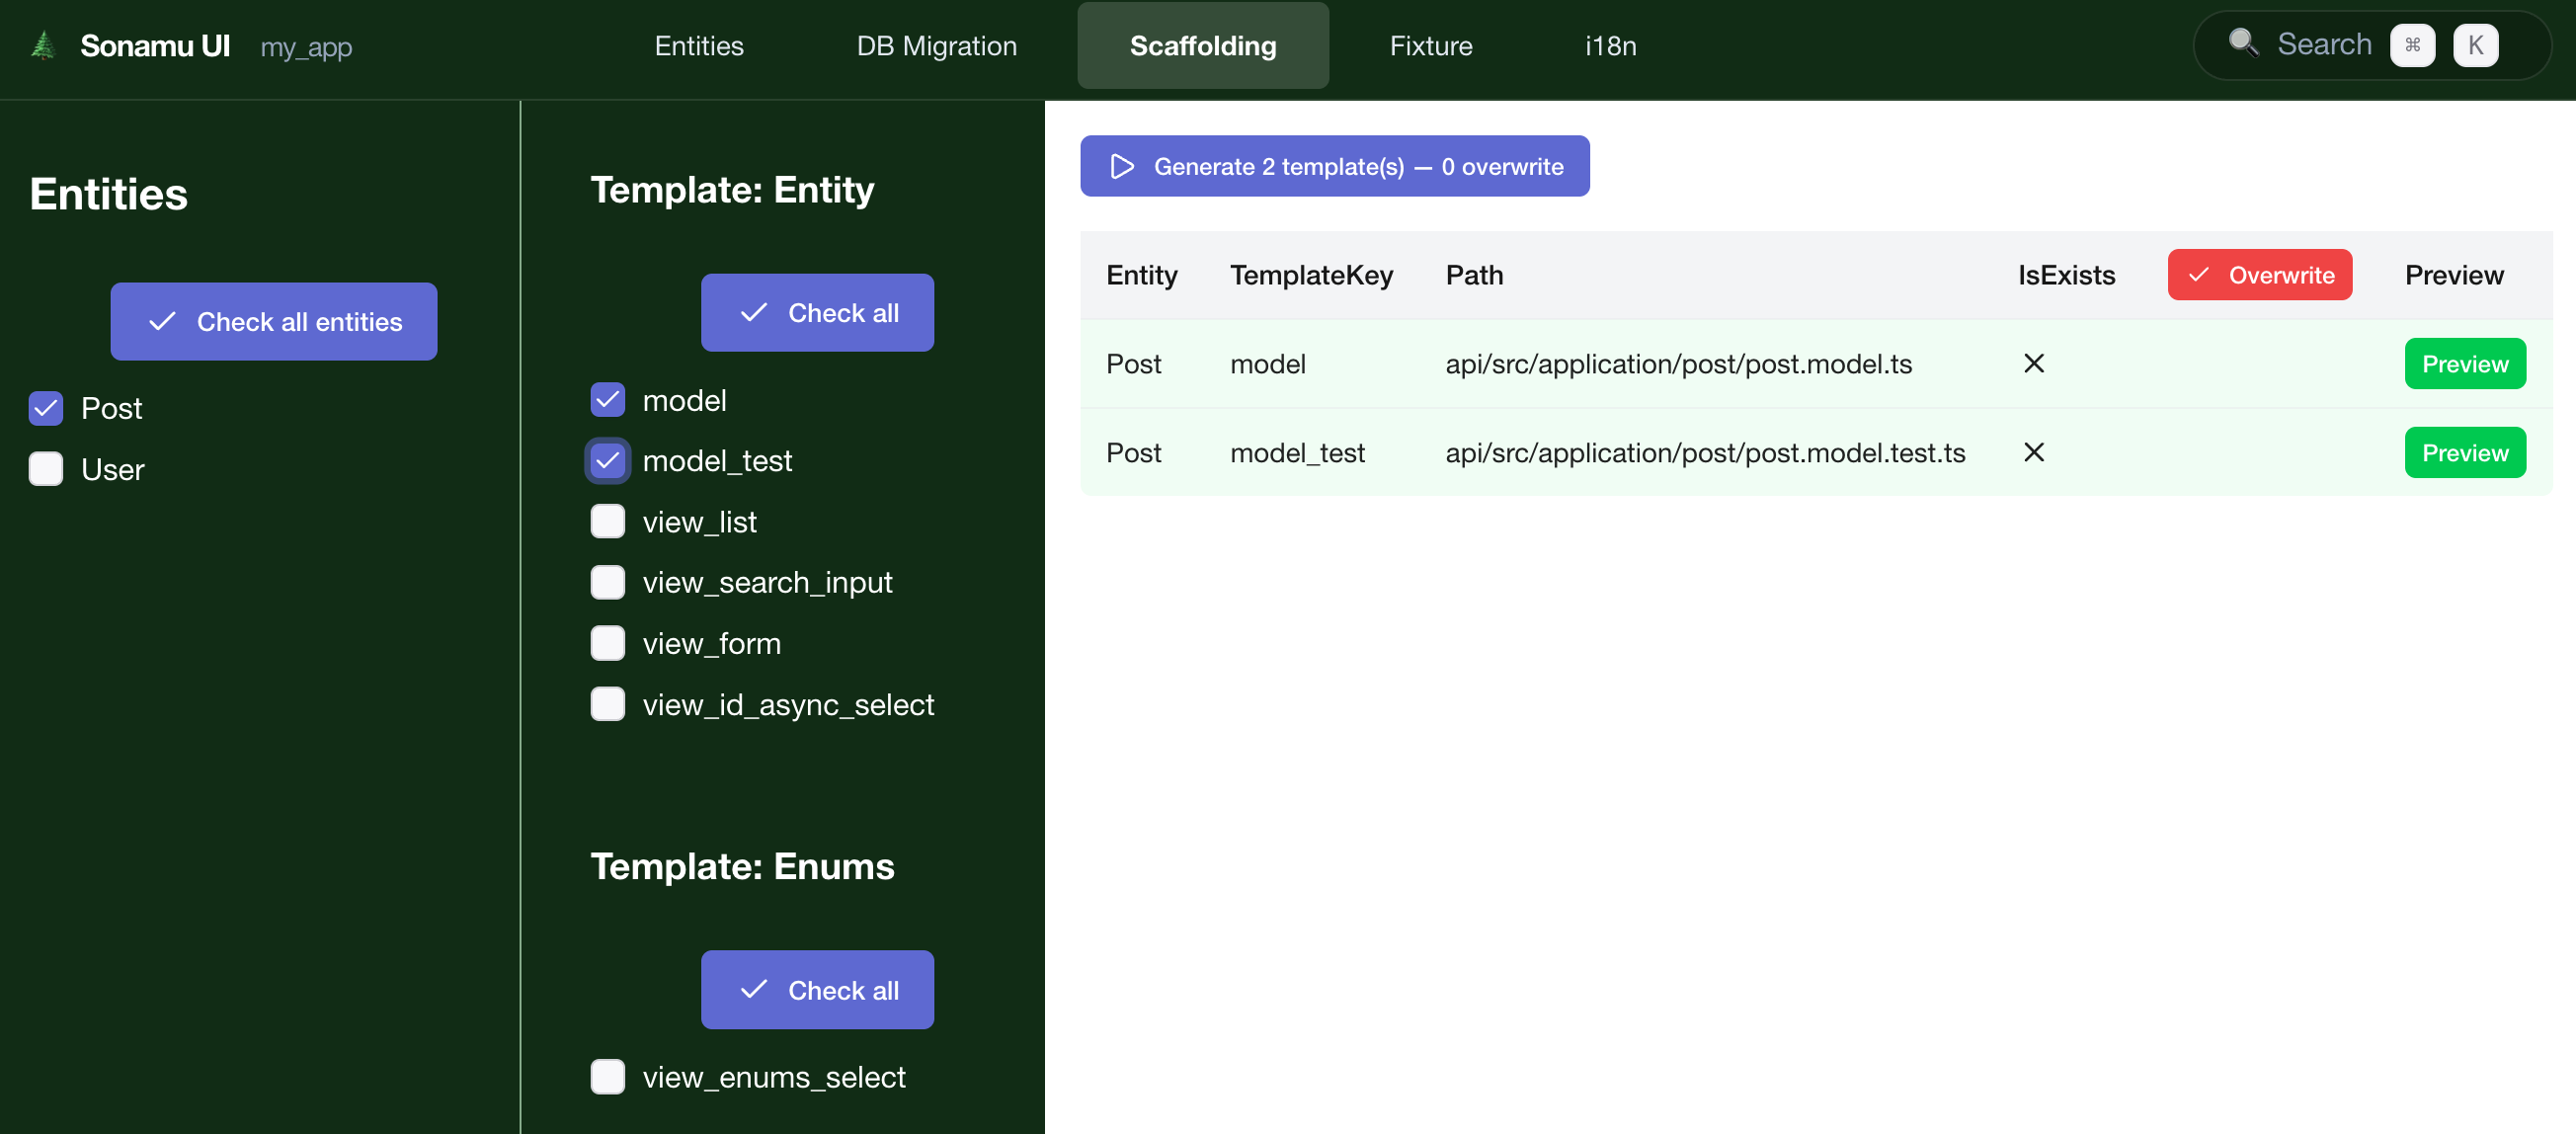 Scaffolding auto-generates template files, so you don't need to write code from scratch. Generated files can be modified to fit your project.
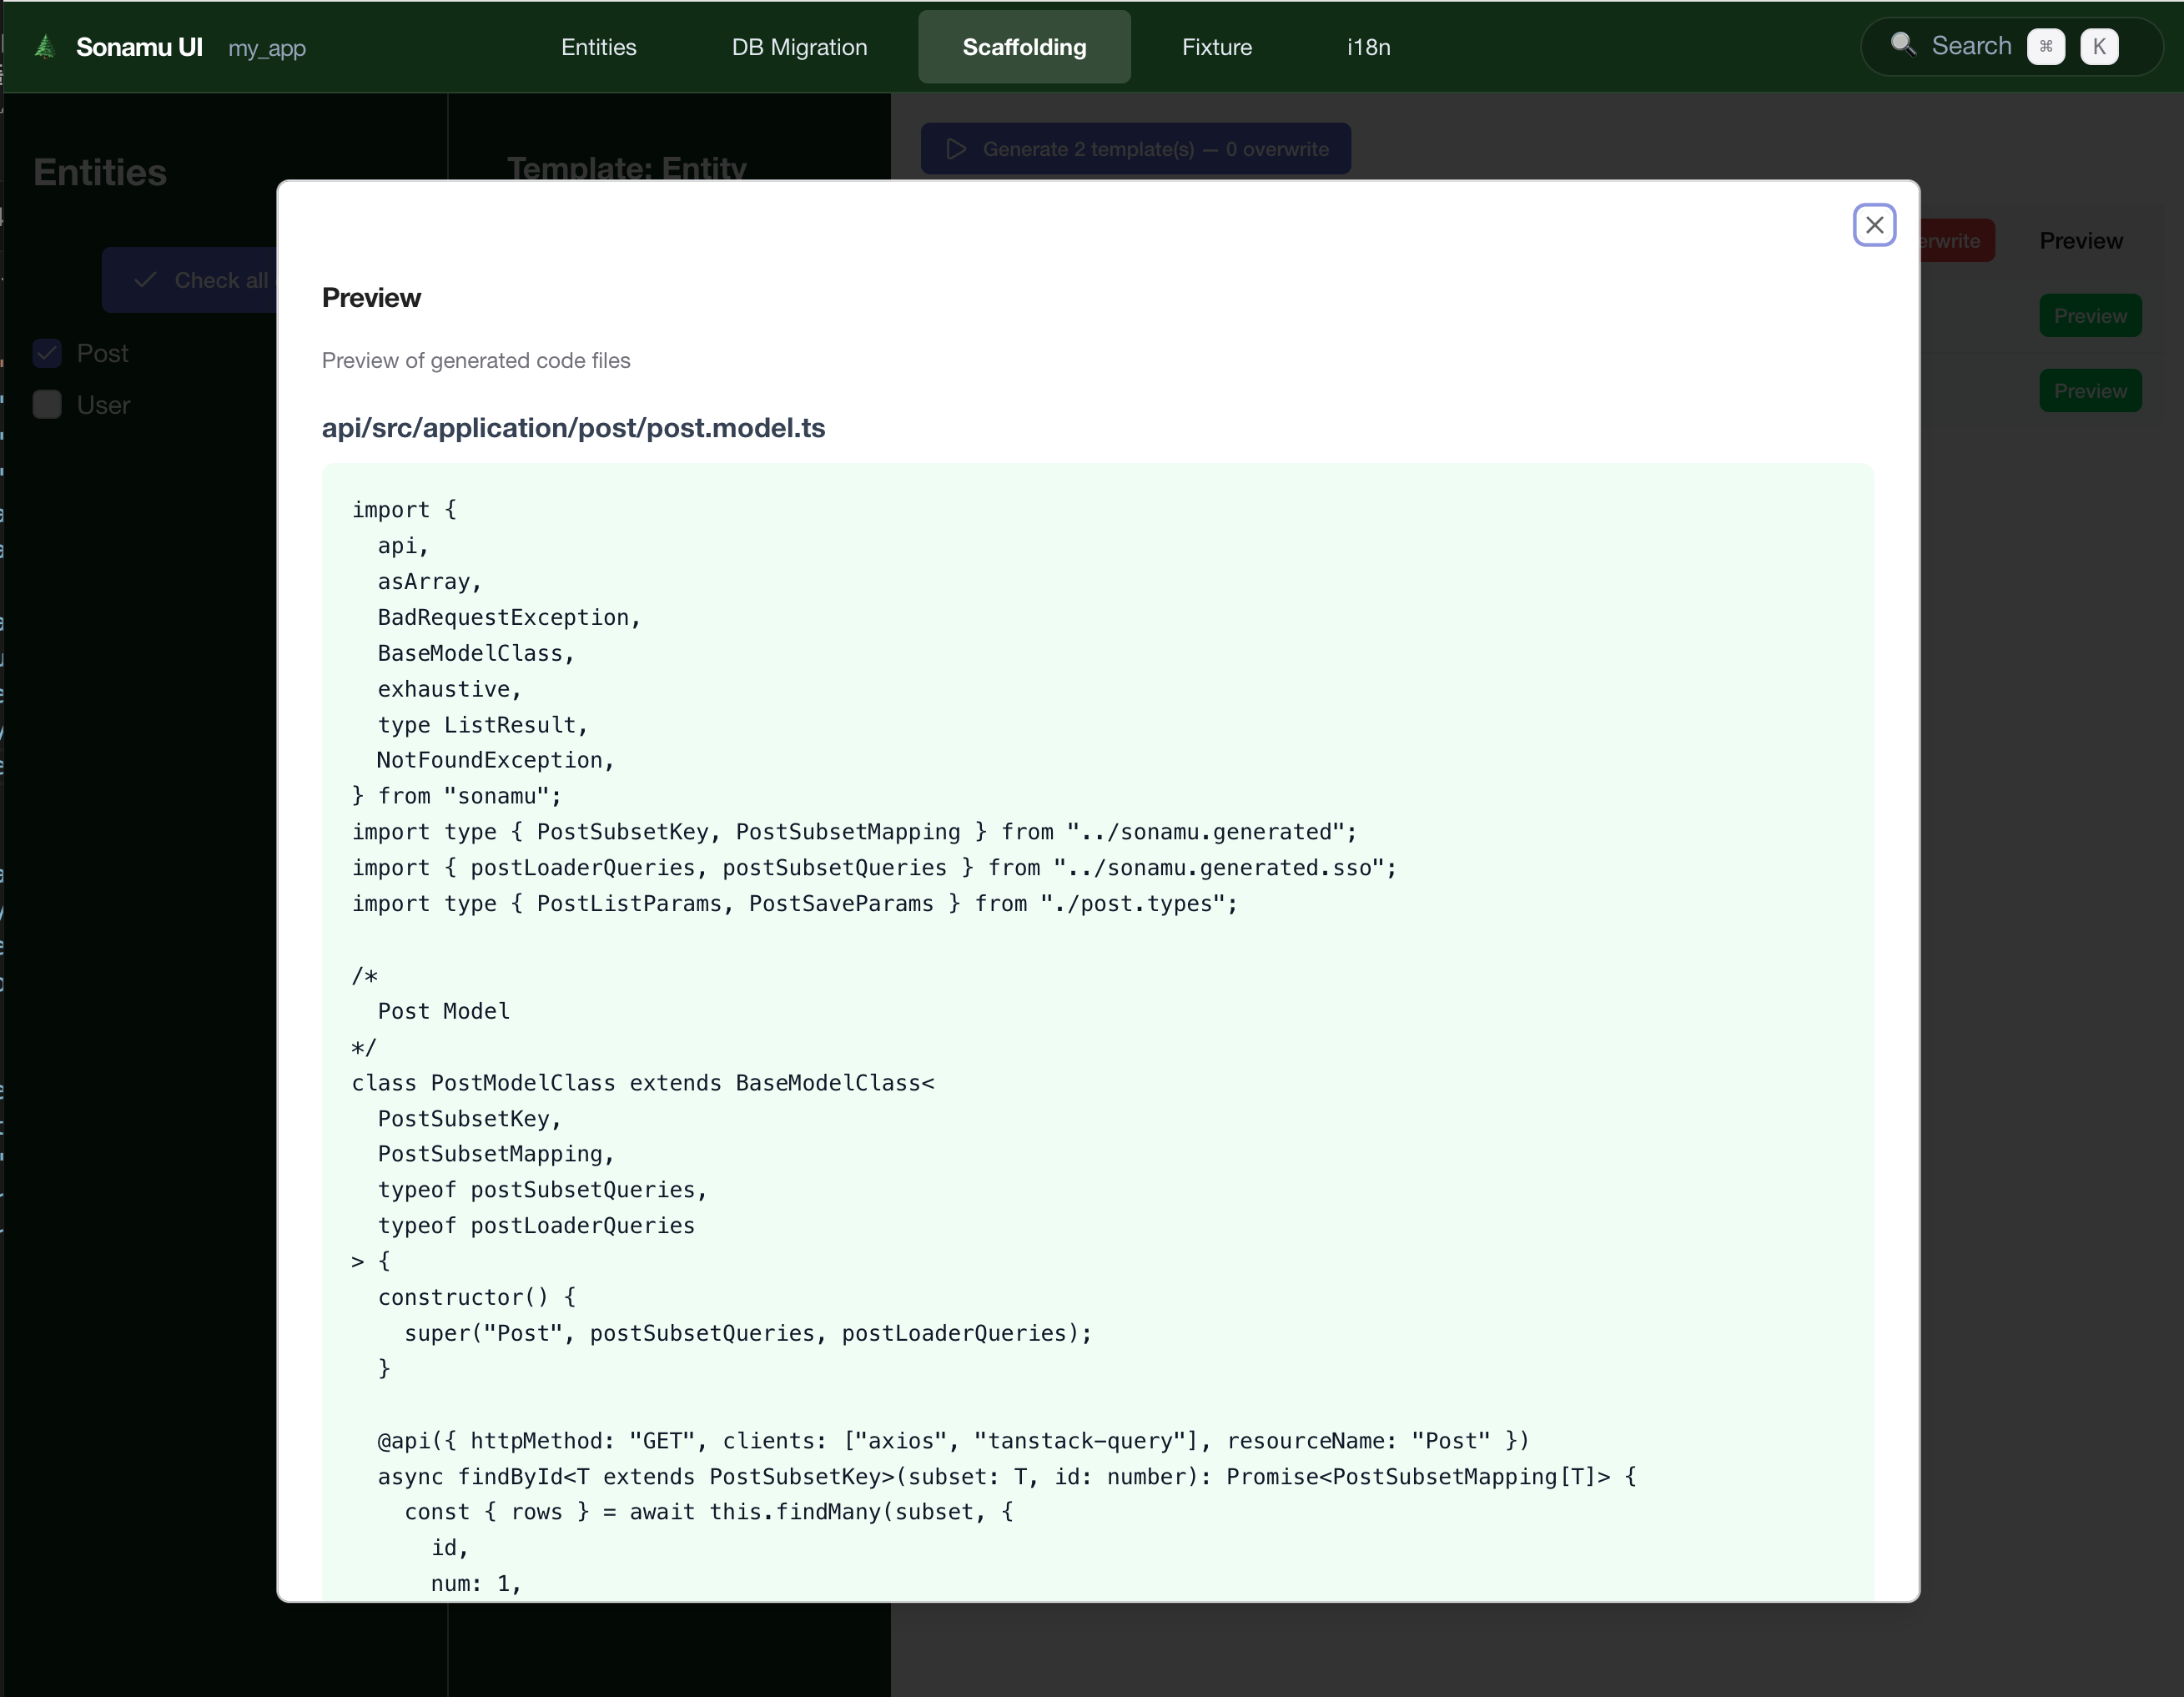
Click the **Preview** button to preview the code that will be generated.
Scaffolding auto-generates template files, so you don't need to write code from scratch. Generated files can be modified to fit your project.
Click the **Preview** button to preview the code that will be generated.
 Click the **Generate** button to create the files.
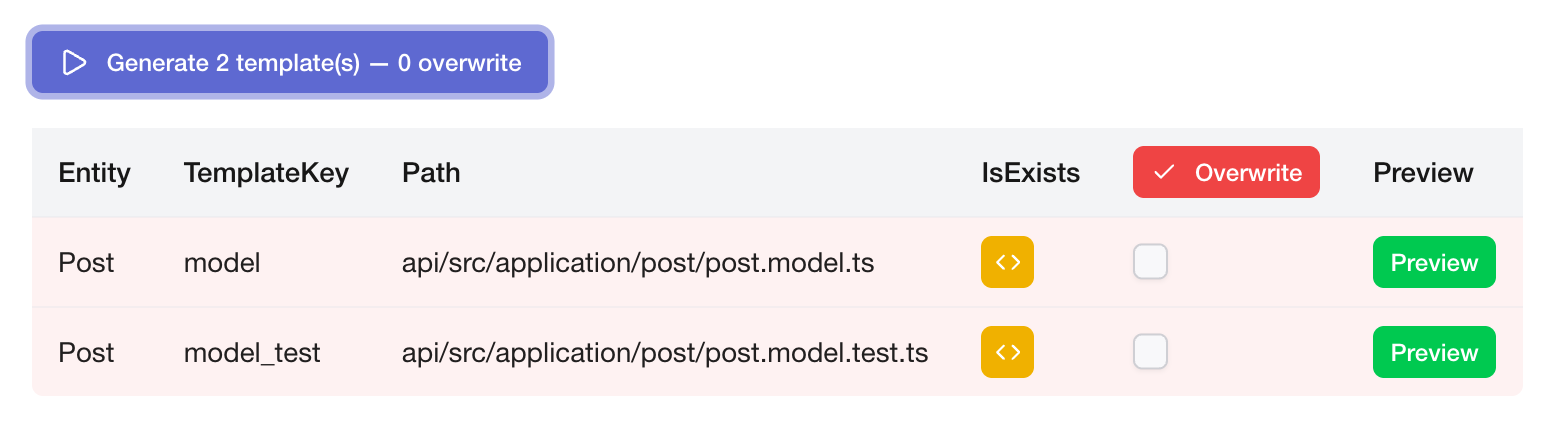 The following files are generated:
* `api/src/application/post/post.model.ts`
* `api/src/application/post/post.model.test.ts`
You can also run this from the terminal:
```bash theme={null}
cd api
pnpm sonamu scaffold model Post
pnpm sonamu scaffold model_test Post
```
## Step 6: Review Generated Model File
Let's check the `post.model.ts` file generated by scaffolding:
The following files are generated:
* `api/src/application/post/post.model.ts`
* `api/src/application/post/post.model.test.ts`
You can also run this from the terminal:
```bash theme={null}
cd api
pnpm sonamu scaffold model Post
pnpm sonamu scaffold model_test Post
```
## Step 6: Review Generated Model File
Let's check the `post.model.ts` file generated by scaffolding:
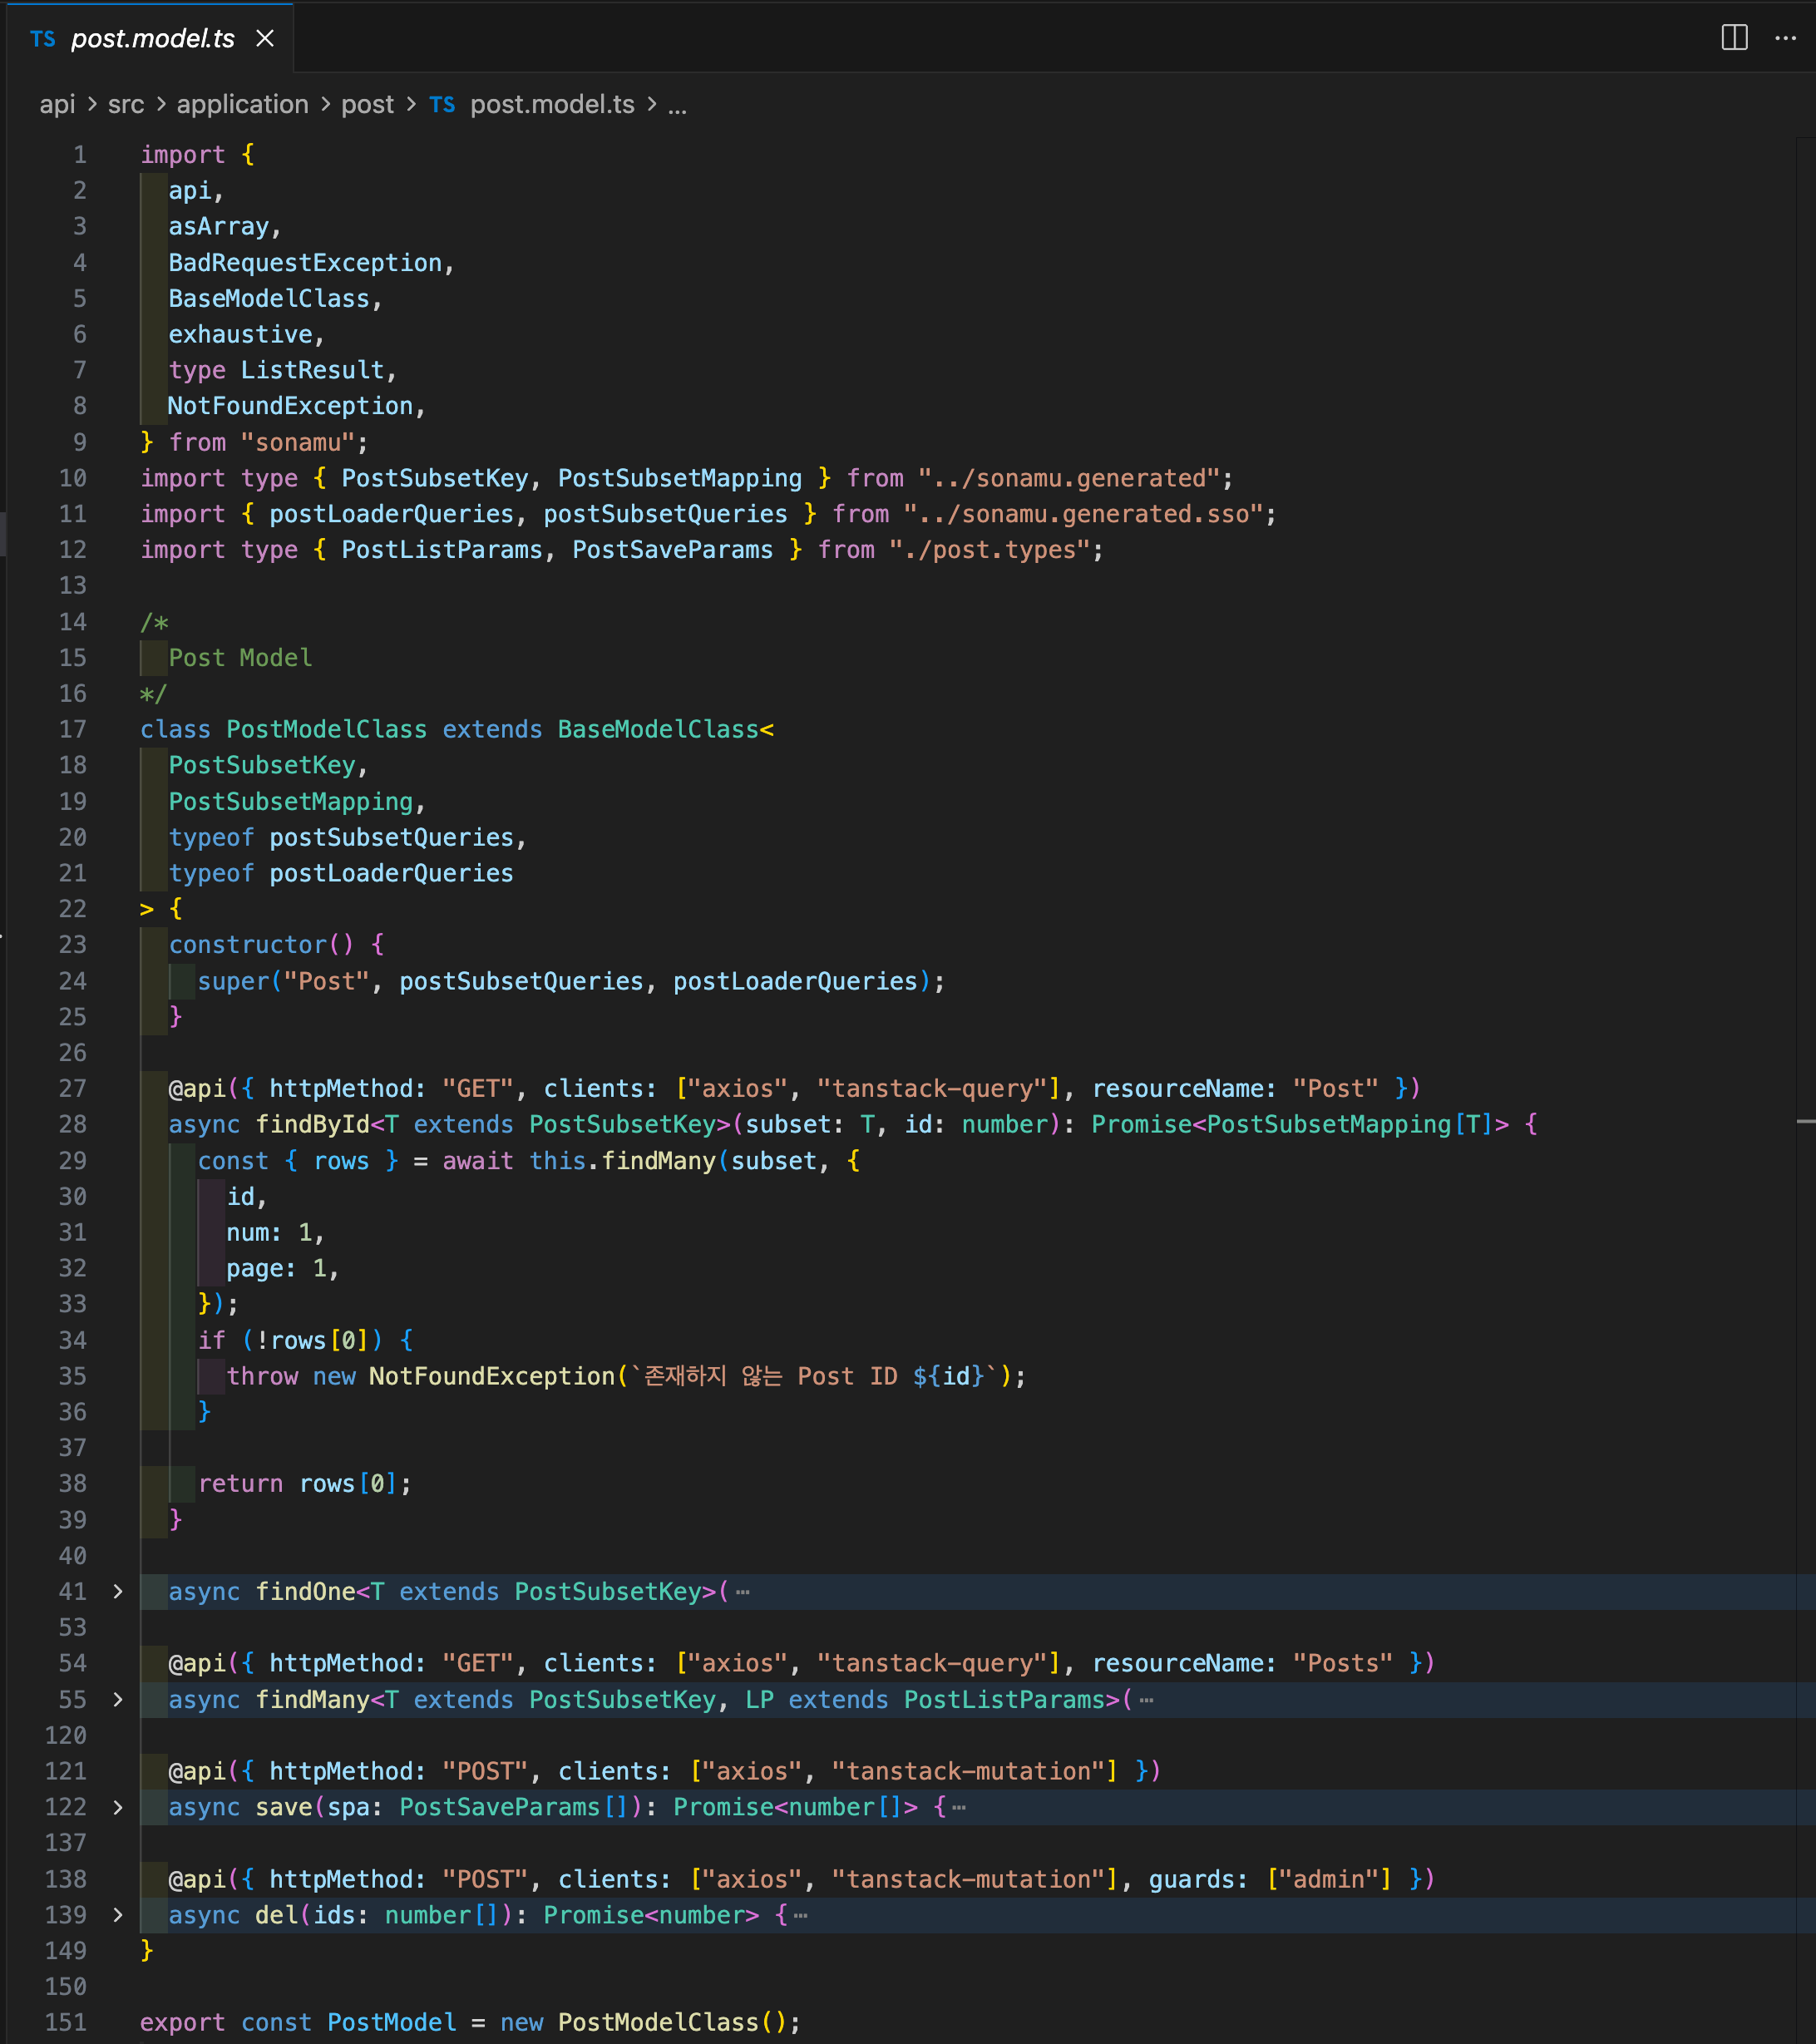 The generated Model file includes basic CRUD APIs. You can add or modify
business logic as needed.
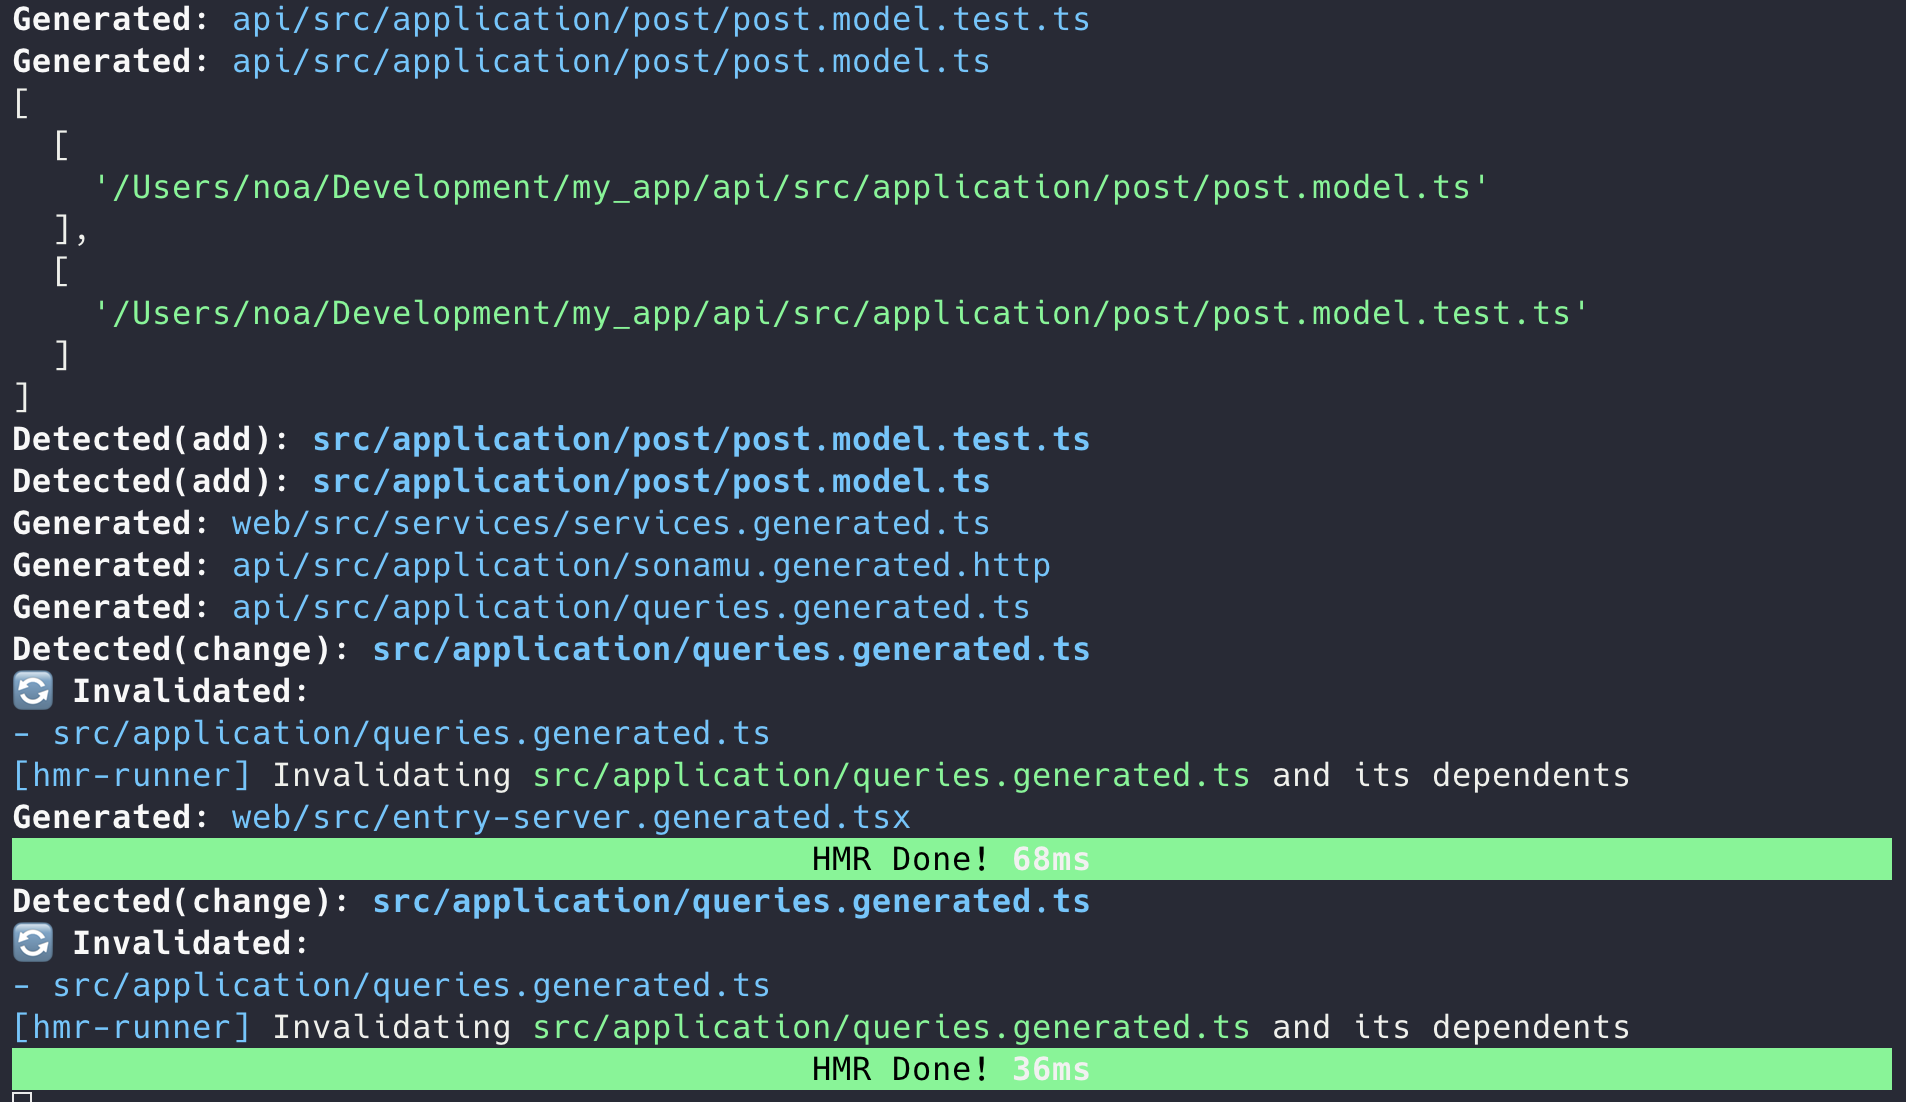
The API server automatically restarts via HMR (Hot Module Replacement):
The generated Model file includes basic CRUD APIs. You can add or modify
business logic as needed.
The API server automatically restarts via HMR (Hot Module Replacement):
 ## Step 7: Auto-Generate Frontend Service
When you write APIs, frontend Service files are automatically generated.
```typescript title="web/src/services/PostService.ts (auto-generated)" theme={null}
export class PostService {
static async findById(subset: PostSubsetKey, id: number) {
const res = await axios.get(`/api/posts/${id}`, {
params: { subset },
});
return res.data;
}
static async findMany(subset: PostSubsetKey, params?: PostListParams) {
const res = await axios.get("/api/posts", {
params: { subset, ...params },
});
return res.data;
}
static async save(params: PostSaveParams) {
const res = await axios.post("/api/posts", params);
return res.data;
}
static async del(id: number) {
await axios.delete(`/api/posts/${id}`);
}
}
```
## Step 8: Test the API
Now let's test if the API is working correctly.
### Test with REST Client
```bash title="Create Post (POST)" theme={null}
curl -X POST http://localhost:34900/api/posts \
-H "Content-Type: application/json" \
-d '{
"title": "First Post",
"content": "This is my first post created with Sonamu.",
"author": "John Doe"
}'
```
```bash title="List Posts (GET)" theme={null}
curl http://localhost:34900/api/posts?subset=C
```
```bash title="Get Post Detail (GET)" theme={null}
curl http://localhost:34900/api/posts/1?subset=A
```
```bash title="Delete Post (DELETE)" theme={null}
curl -X DELETE http://localhost:34900/api/posts/1
```
### Test in Browser
Navigate to [http://localhost:34900/api/posts?subset=C](http://localhost:34900/api/posts?subset=C) to view the JSON response.
## Complete! 🎉
Congratulations! You've successfully created your first entity.
You've completed the following:
* ✅ Defined entity with Sonamu UI
* ✅ Created database table
* ✅ Auto-generated types and schemas
* ✅ Auto-generated Model and Test files with scaffolding
* ✅ Auto-generated REST API
* ✅ Auto-generated frontend Service
* ✅ Tested the API
**Benefits of Scaffolding**
Using scaffolding:
* Basic CRUD APIs are auto-generated without writing Model files from scratch
* Test file templates are generated together, making test writing easier
* Maintains consistent code style across the project
* Generated code can be modified anytime to add business logic
## Next Steps
Understand Sonamu's complete development workflow and learn how to work
efficiently.
Learn how to define relationships between entities and write JOIN queries.
Learn how to write complex database queries with the type-safe query builder.
Learn how to test Model business logic based on the auto-generated test
templates.
## Step 7: Auto-Generate Frontend Service
When you write APIs, frontend Service files are automatically generated.
```typescript title="web/src/services/PostService.ts (auto-generated)" theme={null}
export class PostService {
static async findById(subset: PostSubsetKey, id: number) {
const res = await axios.get(`/api/posts/${id}`, {
params: { subset },
});
return res.data;
}
static async findMany(subset: PostSubsetKey, params?: PostListParams) {
const res = await axios.get("/api/posts", {
params: { subset, ...params },
});
return res.data;
}
static async save(params: PostSaveParams) {
const res = await axios.post("/api/posts", params);
return res.data;
}
static async del(id: number) {
await axios.delete(`/api/posts/${id}`);
}
}
```
## Step 8: Test the API
Now let's test if the API is working correctly.
### Test with REST Client
```bash title="Create Post (POST)" theme={null}
curl -X POST http://localhost:34900/api/posts \
-H "Content-Type: application/json" \
-d '{
"title": "First Post",
"content": "This is my first post created with Sonamu.",
"author": "John Doe"
}'
```
```bash title="List Posts (GET)" theme={null}
curl http://localhost:34900/api/posts?subset=C
```
```bash title="Get Post Detail (GET)" theme={null}
curl http://localhost:34900/api/posts/1?subset=A
```
```bash title="Delete Post (DELETE)" theme={null}
curl -X DELETE http://localhost:34900/api/posts/1
```
### Test in Browser
Navigate to [http://localhost:34900/api/posts?subset=C](http://localhost:34900/api/posts?subset=C) to view the JSON response.
## Complete! 🎉
Congratulations! You've successfully created your first entity.
You've completed the following:
* ✅ Defined entity with Sonamu UI
* ✅ Created database table
* ✅ Auto-generated types and schemas
* ✅ Auto-generated Model and Test files with scaffolding
* ✅ Auto-generated REST API
* ✅ Auto-generated frontend Service
* ✅ Tested the API
**Benefits of Scaffolding**
Using scaffolding:
* Basic CRUD APIs are auto-generated without writing Model files from scratch
* Test file templates are generated together, making test writing easier
* Maintains consistent code style across the project
* Generated code can be modified anytime to add business logic
## Next Steps
Understand Sonamu's complete development workflow and learn how to work
efficiently.
Learn how to define relationships between entities and write JOIN queries.
Learn how to write complex database queries with the type-safe query builder.
Learn how to test Model business logic based on the auto-generated test
templates.