> ## Documentation Index
> Fetch the complete documentation index at: https://sonamu.cartanova.ai/llms.txt
> Use this file to discover all available pages before exploring further.
# Entity Management
> Create, edit, and delete Entities
Sonamu UI's Entity management feature allows you to **easily create and edit Entities through a visual interface**. It's much faster and more intuitive than directly modifying files via CLI.
## Entity Tab Structure
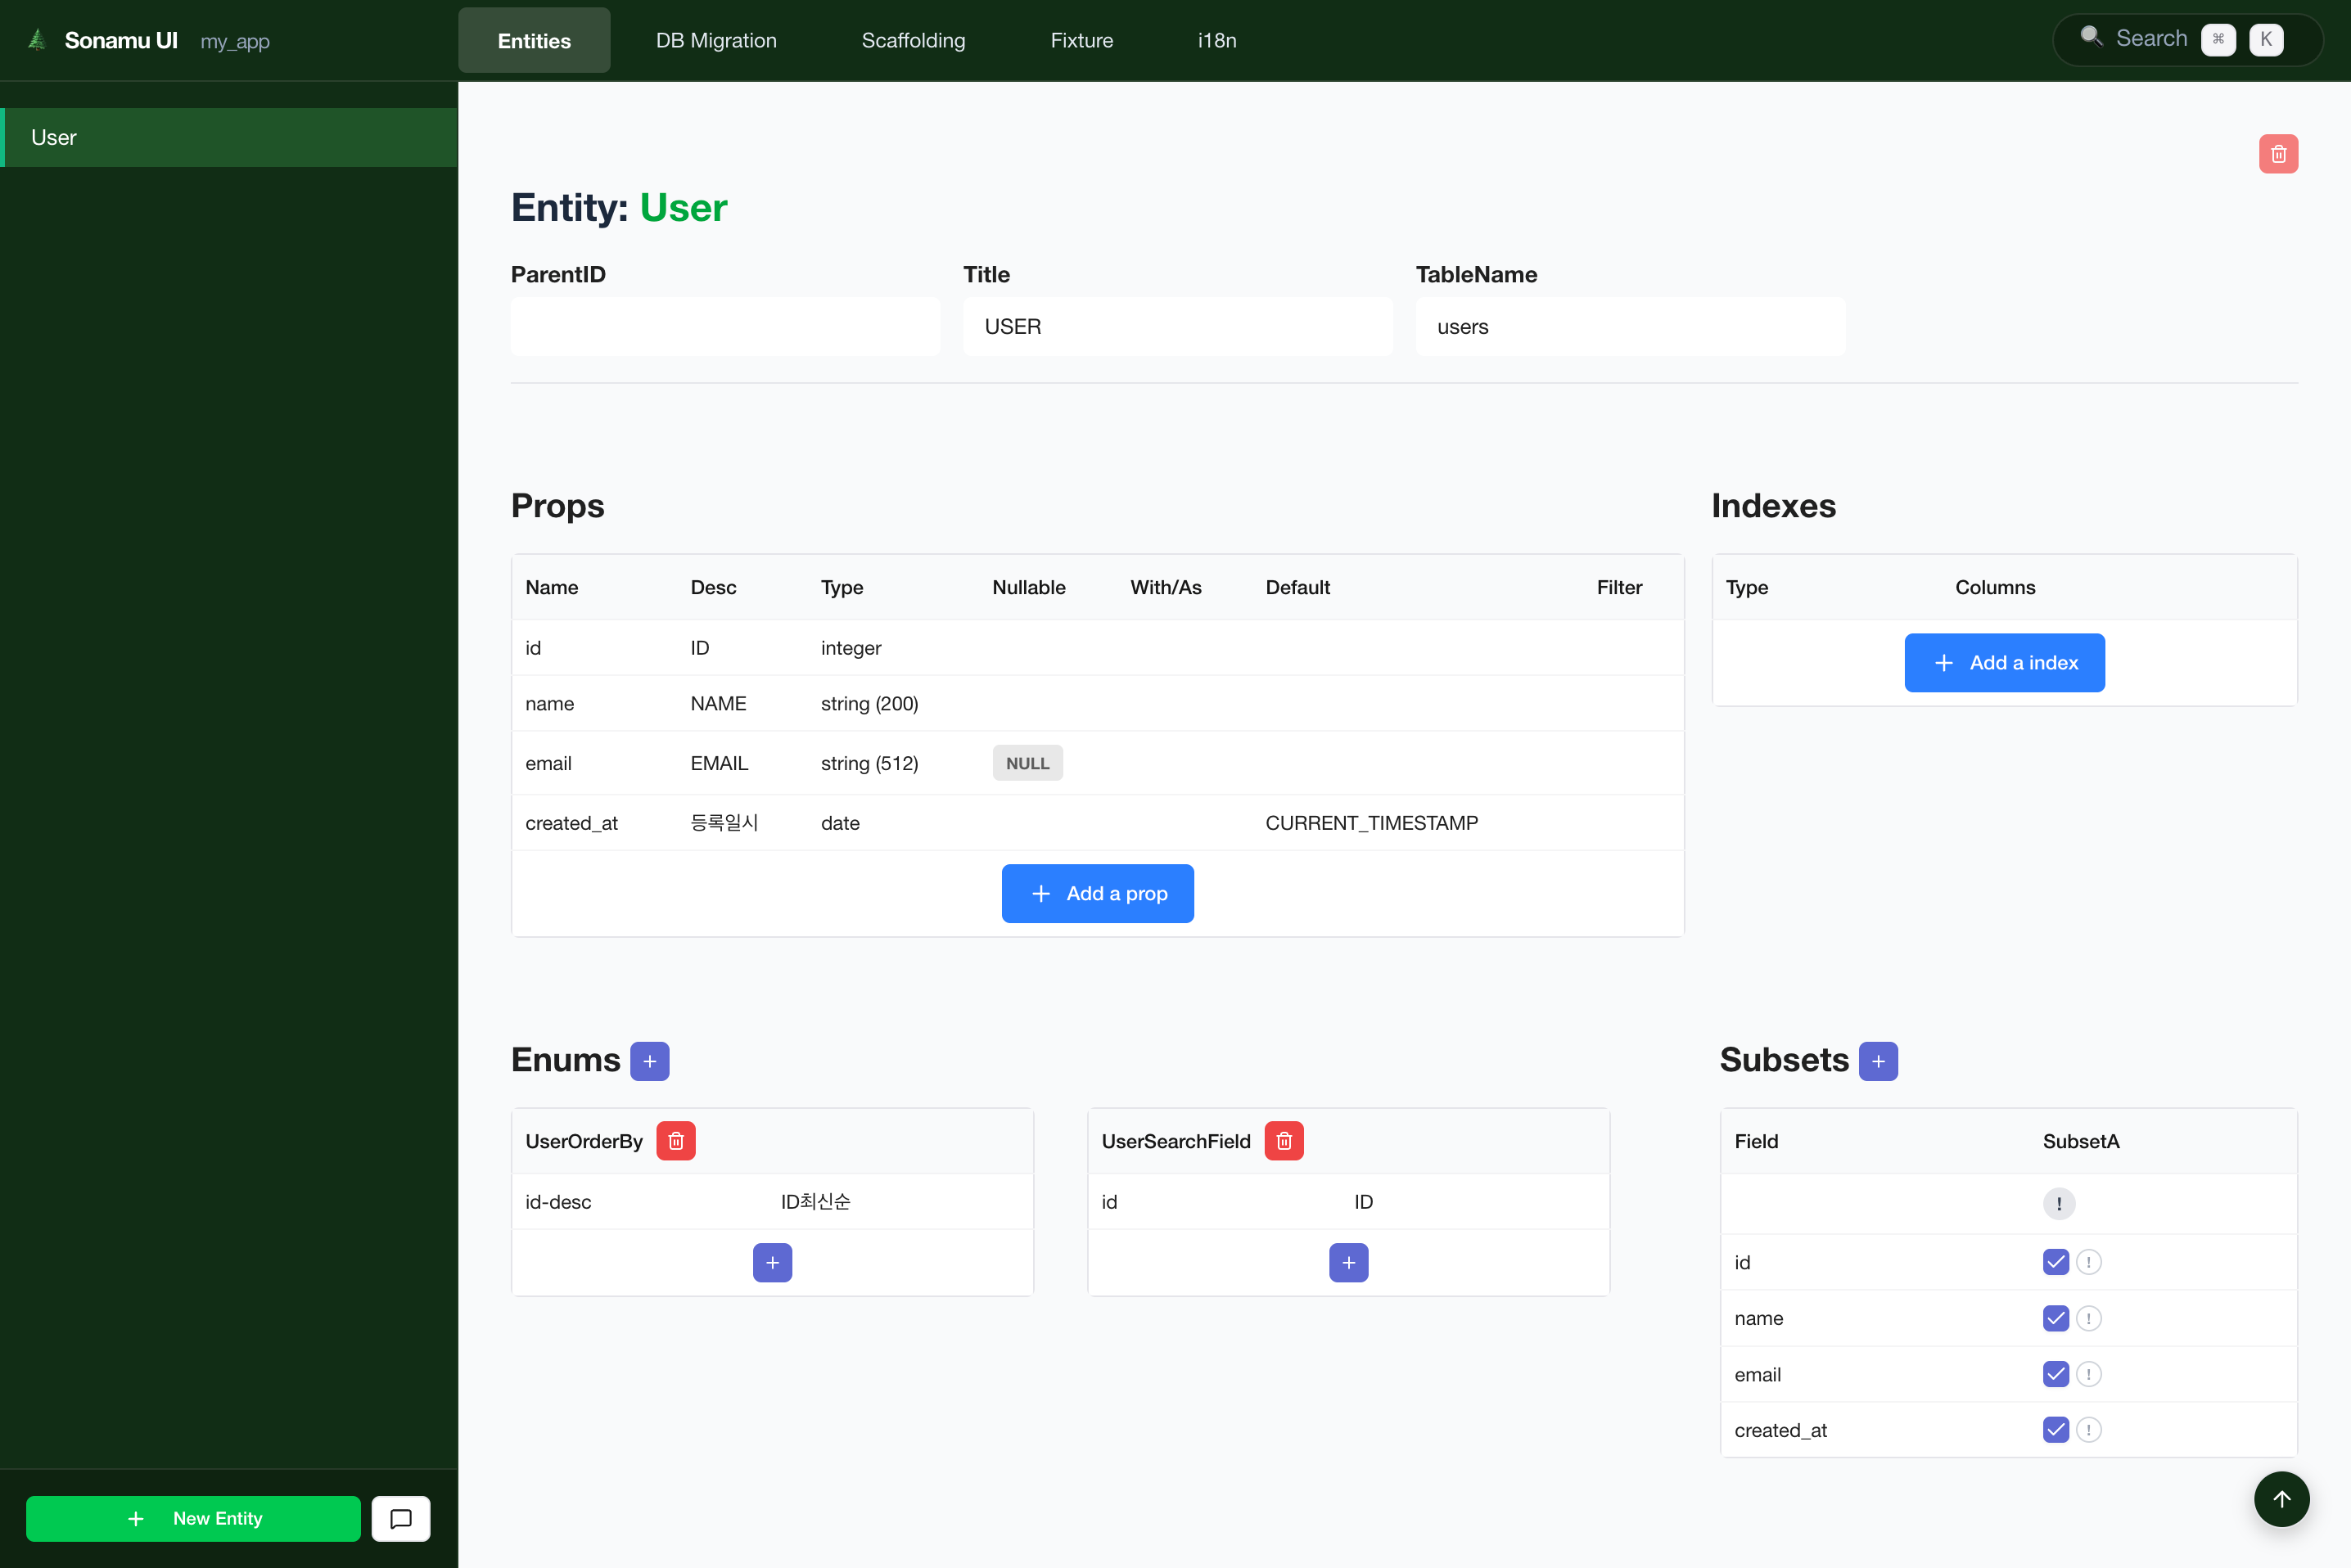 The Entity tab consists of two main areas:
* **Left Sidebar**: Entity list and new Entity add button
* **Right Content**: Selected Entity details (Properties, Indexes, Relations, Subsets, Enums)
## Creating an Entity
### 1. Click New Entity Button
Click the **\[+ New Entity]** button at the bottom of the sidebar.
### 2. Enter Entity Information
When the modal opens, enter the following information:
| Field | Description | Example |
| ----------------- | ------------------------------ | ----------------------- |
| **Entity ID** | Entity identifier (PascalCase) | `Product`, `OrderItem` |
| **Title** | Display title | `Product`, `Order Item` |
| **Parent Entity** | Parent Entity (optional) | `Order` |
If you specify a **Parent Entity**, it becomes a child of that Entity. Example: `Order` →
`OrderItem`
### 3. Add Basic Properties
Created Entities include these basic fields by default:
```typescript theme={null}
{
properties: [
{ name: "id", type: "int", primaryKey: true, autoIncrement: true },
{ name: "title", type: "string", length: 255 },
{ name: "created_at", type: "datetime", default: "CURRENT_TIMESTAMP" },
];
}
```
## Editing Properties
### Adding a Property
1. Click **\[+ Add Property]** button
2. Enter Property information:
| Field | Required | Description | Example |
| ------------ | ----------- | ------------------------ | -------------------------- |
| **Name** | ✅ | Field name (snake\_case) | `email`, `phone_number` |
| **Type** | ✅ | Data type | `string`, `int`, `decimal` |
| **Length** | Conditional | String length | `255` |
| **Nullable** | | Allow NULL | `true` |
| **Default** | | Default value | `0`, `CURRENT_TIMESTAMP` |
| **Comment** | | Description | `User email` |
**Supported data types**:
* **String**: `string`, `text`, `mediumtext`, `longtext`
* **Number**: `int`, `bigint`, `float`, `double`, `decimal`
* **Date**: `date`, `datetime`, `timestamp`
* **Other**: `boolean`, `json`, `enum`
### Editing a Property
1. Click on a Property row to enter edit mode
2. Modify values
3. Click elsewhere or press Enter to save
### Deleting a Property
Click the **\[×]** button on the Property row.
**Data loss warning**: Deleting a Property will delete all data in that column. Make sure to
backup data before running the migration.
## Managing Indexes
### Adding an Index
1. Scroll to the **Indexes** section
2. Click **\[+ Add Index]** button
3. Enter Index information:
| Field | Description | Example |
| ---------- | ----------------------------------------- | ----------------------------- |
| **Fields** | Index target fields (multiple selectable) | `email`, `created_at` |
| **Type** | Index type | `index`, `unique`, `fulltext` |
| **Where** | Raw SQL predicate for partial indexes | `deleted_at IS NULL` |
**Index types**:
* **index**: Regular index (improves search performance)
* **unique**: Unique index (prevents duplicates)
* **fulltext**: Full-text search index (text search)
### Composite Index
Select multiple fields to create a composite index:
```typescript theme={null}
indexes: [
{ fields: ["user_id", "created_at"], type: "index" },
{ fields: ["email"], type: "unique" },
{ fields: ["email"], type: "unique", where: "deleted_at IS NULL" },
];
```
`where` is emitted as a PostgreSQL partial index predicate. Treat it as raw SQL: do not build it from
user input.
## Managing Relations
### belongsTo (N:1 Relationship)
**Meaning**: "This Entity belongs to another Entity"
Example: `Post` belongs to `User`
1. Click **\[+ Add]** button in the **belongsTo** section
2. Enter information:
| Field | Description | Example |
| --------------- | --------------------------------- | ----------- |
| **Entity** | Entity to reference | `User` |
| **As** | Relation alias | `author` |
| **Foreign Key** | Foreign key field name (optional) | `author_id` |
Generated code:
```typescript theme={null}
belongsTo: [{ entityId: "User", as: "author" }];
```
### hasMany (1:N Relationship)
**Meaning**: "This Entity has multiple of another Entity"
Example: `User` has multiple `Posts`
1. Click **\[+ Add]** button in the **hasMany** section
2. Enter information:
| Field | Description | Example |
| ---------- | -------------- | ------- |
| **Entity** | Target Entity | `Post` |
| **As** | Relation alias | `posts` |
Generated code:
```typescript theme={null}
hasMany: [{ entityId: "Post", as: "posts" }];
```
## Managing Enums
Use Enums when a field can only have limited values.
### Adding an Enum
1. Click **\[+ Add Enum]** button in the **Enums** section
2. Enter Enum information:
| Field | Description | Example |
| ---------- | ---------------------------- | -------------------- |
| **Name** | Enum name | `UserRole` |
| **Values** | Value list (comma-separated) | `admin, user, guest` |
Generated code:
```typescript theme={null}
enums: [
{
name: "UserRole",
values: ["admin", "user", "guest"],
},
];
```
Using in Property:
```typescript theme={null}
{
name: "role",
type: "enum",
enum: "UserRole",
default: "user"
}
```
## AI-Assisted Entity Creation
Click the **\[💬 AI]** button at the bottom of the sidebar to open the AI chat interface.
### Create Entity with AI
**Example prompt**:
```
Create a Post Entity for blog posts.
I need title, content, author, creation date, and view count.
```
AI generates the Entity definition and adds it automatically.
### Modify Entity with AI
**Example prompt**:
```
Add a profile image field to the User Entity.
```
AI analyzes the existing Entity and applies the modifications.
**Be specific**: The more clearly you describe field types, constraints, and relationships, the
more accurate results you'll get.
## Practical Example
### E-commerce Product Entity
```typescript theme={null}
export const ProductEntity = {
properties: [
{ name: "id", type: "int", primaryKey: true, autoIncrement: true },
{ name: "title", type: "string", length: 255 },
{ name: "description", type: "text", nullable: true },
{ name: "price", type: "decimal", precision: 10, scale: 2 },
{ name: "stock", type: "int", default: 0 },
{ name: "category_id", type: "int" },
{ name: "status", type: "enum", enum: "ProductStatus" },
{ name: "created_at", type: "datetime", default: "CURRENT_TIMESTAMP" },
{ name: "updated_at", type: "datetime", onUpdate: "CURRENT_TIMESTAMP" },
],
indexes: [
{ fields: ["category_id"] },
{ fields: ["title"], type: "fulltext" },
{ fields: ["status", "created_at"] },
],
belongsTo: [{ entityId: "Category", as: "category" }],
hasMany: [{ entityId: "Review", as: "reviews" }],
enums: [
{
name: "ProductStatus",
values: ["active", "inactive", "soldout"],
},
],
} satisfies EntityType;
```
## Applying Changes
After modifying an Entity, you need to **create and run a migration** to reflect changes in the database.
### Workflow
1. **Edit Entity**: Modify Entity in the UI
2. **Create Migration**: Generate migration in the Migration tab
3. **Run Migration**: Run migration to apply to DB
4. **Scaffolding**: Generate Model and test code
Entity files (`.entity.ts`) are **automatically saved** when modified in the UI.
## Next Steps
Create and run migrations
Auto-generate Model code
The Entity tab consists of two main areas:
* **Left Sidebar**: Entity list and new Entity add button
* **Right Content**: Selected Entity details (Properties, Indexes, Relations, Subsets, Enums)
## Creating an Entity
### 1. Click New Entity Button
Click the **\[+ New Entity]** button at the bottom of the sidebar.
### 2. Enter Entity Information
When the modal opens, enter the following information:
| Field | Description | Example |
| ----------------- | ------------------------------ | ----------------------- |
| **Entity ID** | Entity identifier (PascalCase) | `Product`, `OrderItem` |
| **Title** | Display title | `Product`, `Order Item` |
| **Parent Entity** | Parent Entity (optional) | `Order` |
If you specify a **Parent Entity**, it becomes a child of that Entity. Example: `Order` →
`OrderItem`
### 3. Add Basic Properties
Created Entities include these basic fields by default:
```typescript theme={null}
{
properties: [
{ name: "id", type: "int", primaryKey: true, autoIncrement: true },
{ name: "title", type: "string", length: 255 },
{ name: "created_at", type: "datetime", default: "CURRENT_TIMESTAMP" },
];
}
```
## Editing Properties
### Adding a Property
1. Click **\[+ Add Property]** button
2. Enter Property information:
| Field | Required | Description | Example |
| ------------ | ----------- | ------------------------ | -------------------------- |
| **Name** | ✅ | Field name (snake\_case) | `email`, `phone_number` |
| **Type** | ✅ | Data type | `string`, `int`, `decimal` |
| **Length** | Conditional | String length | `255` |
| **Nullable** | | Allow NULL | `true` |
| **Default** | | Default value | `0`, `CURRENT_TIMESTAMP` |
| **Comment** | | Description | `User email` |
**Supported data types**:
* **String**: `string`, `text`, `mediumtext`, `longtext`
* **Number**: `int`, `bigint`, `float`, `double`, `decimal`
* **Date**: `date`, `datetime`, `timestamp`
* **Other**: `boolean`, `json`, `enum`
### Editing a Property
1. Click on a Property row to enter edit mode
2. Modify values
3. Click elsewhere or press Enter to save
### Deleting a Property
Click the **\[×]** button on the Property row.
**Data loss warning**: Deleting a Property will delete all data in that column. Make sure to
backup data before running the migration.
## Managing Indexes
### Adding an Index
1. Scroll to the **Indexes** section
2. Click **\[+ Add Index]** button
3. Enter Index information:
| Field | Description | Example |
| ---------- | ----------------------------------------- | ----------------------------- |
| **Fields** | Index target fields (multiple selectable) | `email`, `created_at` |
| **Type** | Index type | `index`, `unique`, `fulltext` |
| **Where** | Raw SQL predicate for partial indexes | `deleted_at IS NULL` |
**Index types**:
* **index**: Regular index (improves search performance)
* **unique**: Unique index (prevents duplicates)
* **fulltext**: Full-text search index (text search)
### Composite Index
Select multiple fields to create a composite index:
```typescript theme={null}
indexes: [
{ fields: ["user_id", "created_at"], type: "index" },
{ fields: ["email"], type: "unique" },
{ fields: ["email"], type: "unique", where: "deleted_at IS NULL" },
];
```
`where` is emitted as a PostgreSQL partial index predicate. Treat it as raw SQL: do not build it from
user input.
## Managing Relations
### belongsTo (N:1 Relationship)
**Meaning**: "This Entity belongs to another Entity"
Example: `Post` belongs to `User`
1. Click **\[+ Add]** button in the **belongsTo** section
2. Enter information:
| Field | Description | Example |
| --------------- | --------------------------------- | ----------- |
| **Entity** | Entity to reference | `User` |
| **As** | Relation alias | `author` |
| **Foreign Key** | Foreign key field name (optional) | `author_id` |
Generated code:
```typescript theme={null}
belongsTo: [{ entityId: "User", as: "author" }];
```
### hasMany (1:N Relationship)
**Meaning**: "This Entity has multiple of another Entity"
Example: `User` has multiple `Posts`
1. Click **\[+ Add]** button in the **hasMany** section
2. Enter information:
| Field | Description | Example |
| ---------- | -------------- | ------- |
| **Entity** | Target Entity | `Post` |
| **As** | Relation alias | `posts` |
Generated code:
```typescript theme={null}
hasMany: [{ entityId: "Post", as: "posts" }];
```
## Managing Enums
Use Enums when a field can only have limited values.
### Adding an Enum
1. Click **\[+ Add Enum]** button in the **Enums** section
2. Enter Enum information:
| Field | Description | Example |
| ---------- | ---------------------------- | -------------------- |
| **Name** | Enum name | `UserRole` |
| **Values** | Value list (comma-separated) | `admin, user, guest` |
Generated code:
```typescript theme={null}
enums: [
{
name: "UserRole",
values: ["admin", "user", "guest"],
},
];
```
Using in Property:
```typescript theme={null}
{
name: "role",
type: "enum",
enum: "UserRole",
default: "user"
}
```
## AI-Assisted Entity Creation
Click the **\[💬 AI]** button at the bottom of the sidebar to open the AI chat interface.
### Create Entity with AI
**Example prompt**:
```
Create a Post Entity for blog posts.
I need title, content, author, creation date, and view count.
```
AI generates the Entity definition and adds it automatically.
### Modify Entity with AI
**Example prompt**:
```
Add a profile image field to the User Entity.
```
AI analyzes the existing Entity and applies the modifications.
**Be specific**: The more clearly you describe field types, constraints, and relationships, the
more accurate results you'll get.
## Practical Example
### E-commerce Product Entity
```typescript theme={null}
export const ProductEntity = {
properties: [
{ name: "id", type: "int", primaryKey: true, autoIncrement: true },
{ name: "title", type: "string", length: 255 },
{ name: "description", type: "text", nullable: true },
{ name: "price", type: "decimal", precision: 10, scale: 2 },
{ name: "stock", type: "int", default: 0 },
{ name: "category_id", type: "int" },
{ name: "status", type: "enum", enum: "ProductStatus" },
{ name: "created_at", type: "datetime", default: "CURRENT_TIMESTAMP" },
{ name: "updated_at", type: "datetime", onUpdate: "CURRENT_TIMESTAMP" },
],
indexes: [
{ fields: ["category_id"] },
{ fields: ["title"], type: "fulltext" },
{ fields: ["status", "created_at"] },
],
belongsTo: [{ entityId: "Category", as: "category" }],
hasMany: [{ entityId: "Review", as: "reviews" }],
enums: [
{
name: "ProductStatus",
values: ["active", "inactive", "soldout"],
},
],
} satisfies EntityType;
```
## Applying Changes
After modifying an Entity, you need to **create and run a migration** to reflect changes in the database.
### Workflow
1. **Edit Entity**: Modify Entity in the UI
2. **Create Migration**: Generate migration in the Migration tab
3. **Run Migration**: Run migration to apply to DB
4. **Scaffolding**: Generate Model and test code
Entity files (`.entity.ts`) are **automatically saved** when modified in the UI.
## Next Steps
Create and run migrations
Auto-generate Model code