> ## Documentation Index
> Fetch the complete documentation index at: https://sonamu.cartanova.ai/llms.txt
> Use this file to discover all available pages before exploring further.
# 개발 워크플로우
> Sonamu의 전체 개발 사이클 이해하기
Sonamu는 엔티티 중심의 개발 워크플로우를 제공합니다. 이 가이드에서는 Sonamu 프로젝트에서 기능을 추가하고 수정하는 전체 흐름을 알아봅니다.
## 개발 사이클 개요
Sonamu의 개발은 다음과 같은 사이클로 진행됩니다:
Sonamu UI에서 엔티티 구조를 정의합니다.
데이터베이스에 테이블을 생성하거나 수정합니다.
Model 파일과 테스트 파일을 자동 생성합니다.
생성된 Model 파일에 비즈니스 로직을 추가합니다.
변경사항을 프론트엔드와 동기화합니다.
작성한 코드를 테스트합니다.
자동 생성된 Service를 사용하여 UI를 구현합니다.
## 1단계: 엔티티 설계 및 정의
### Sonamu UI에서 엔티티 생성
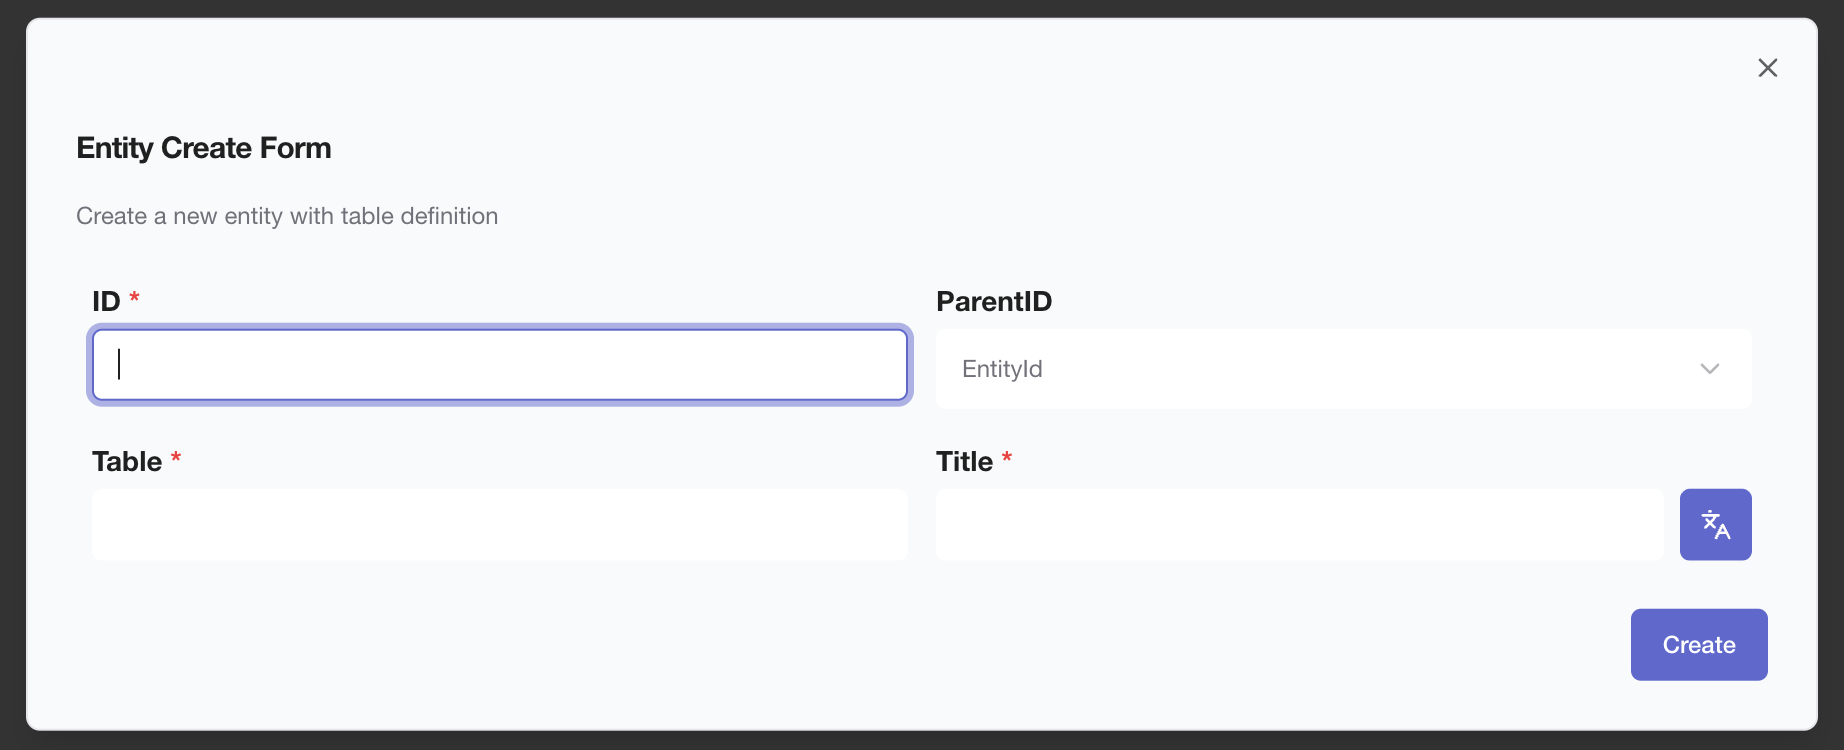
개발은 항상 Sonamu UI에서 엔티티를 정의하는 것으로 시작합니다.
```bash theme={null}
# API 서버 실행 (Sonamu UI 포함)
cd api
pnpm dev
```
브라우저에서 [http://localhost:34900/sonamu-ui](http://localhost:34900/sonamu-ui) 에 접속하여:
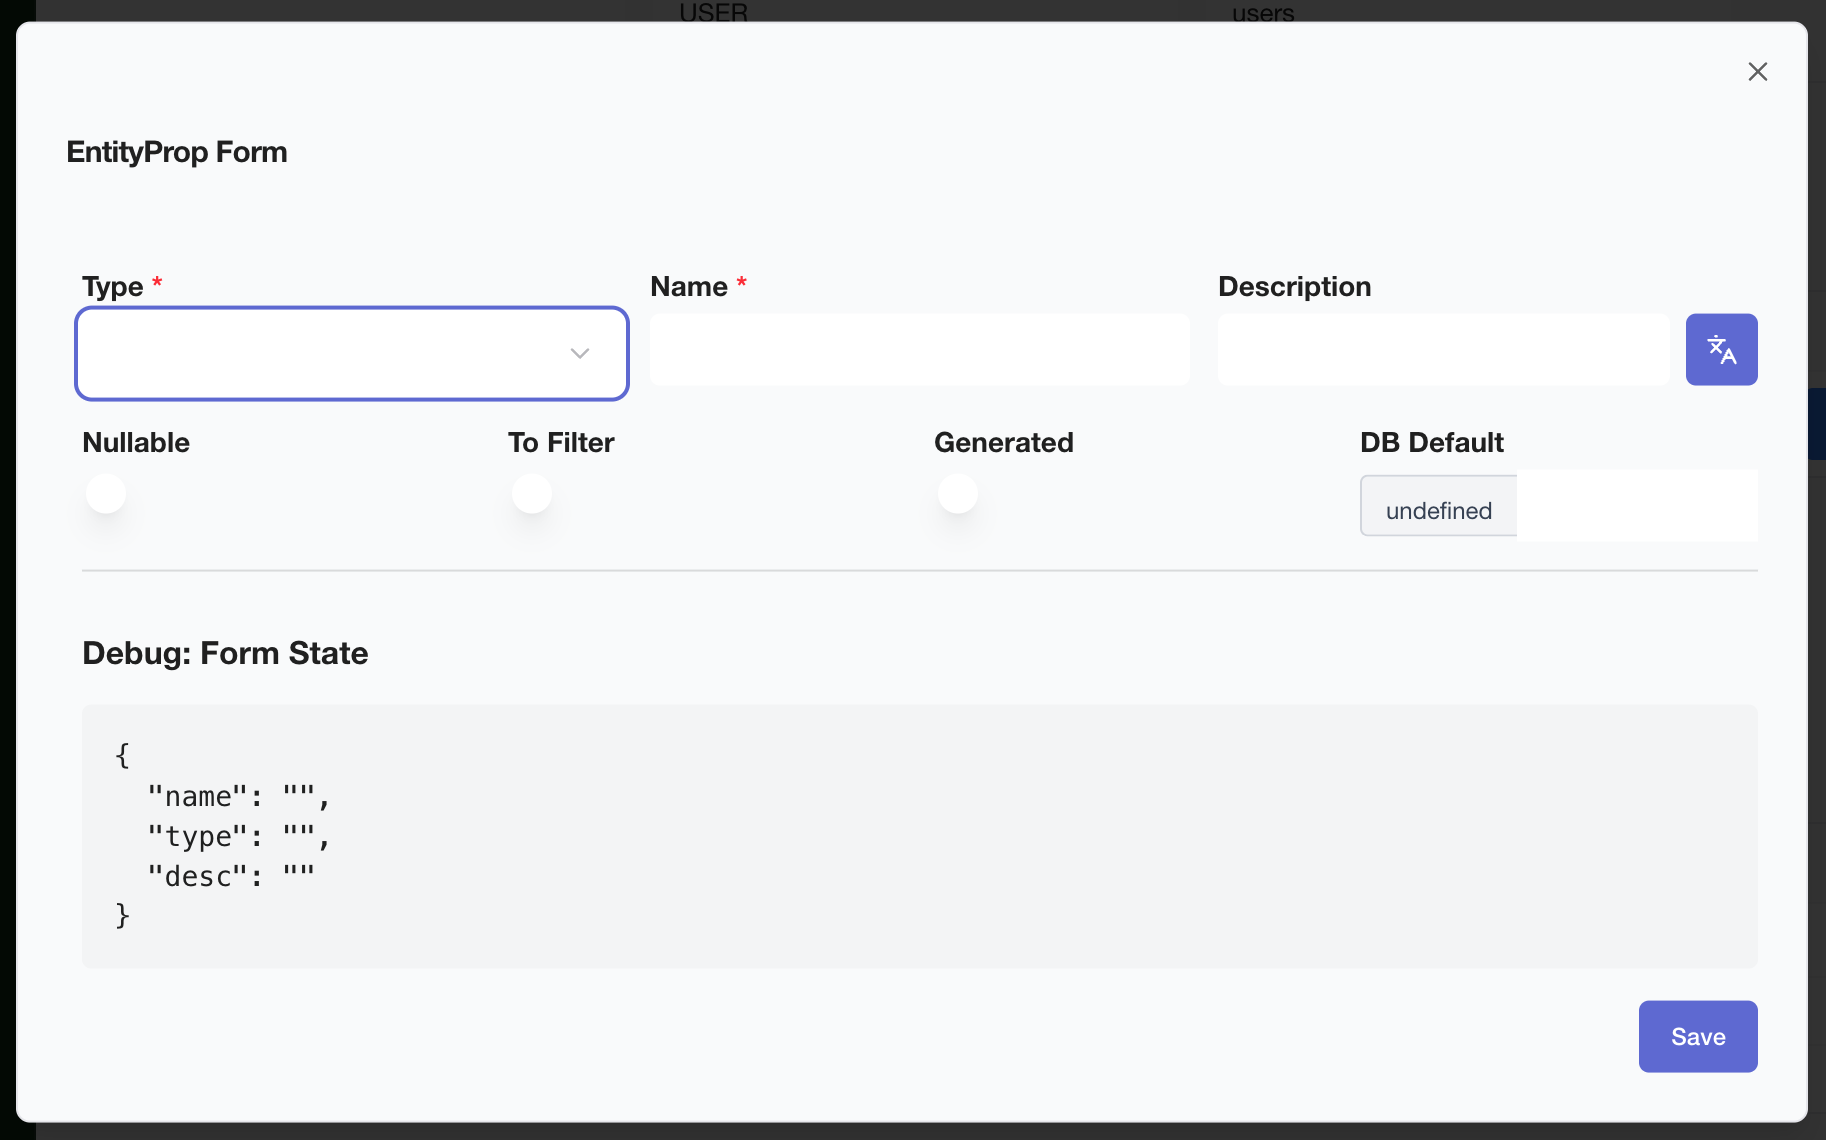
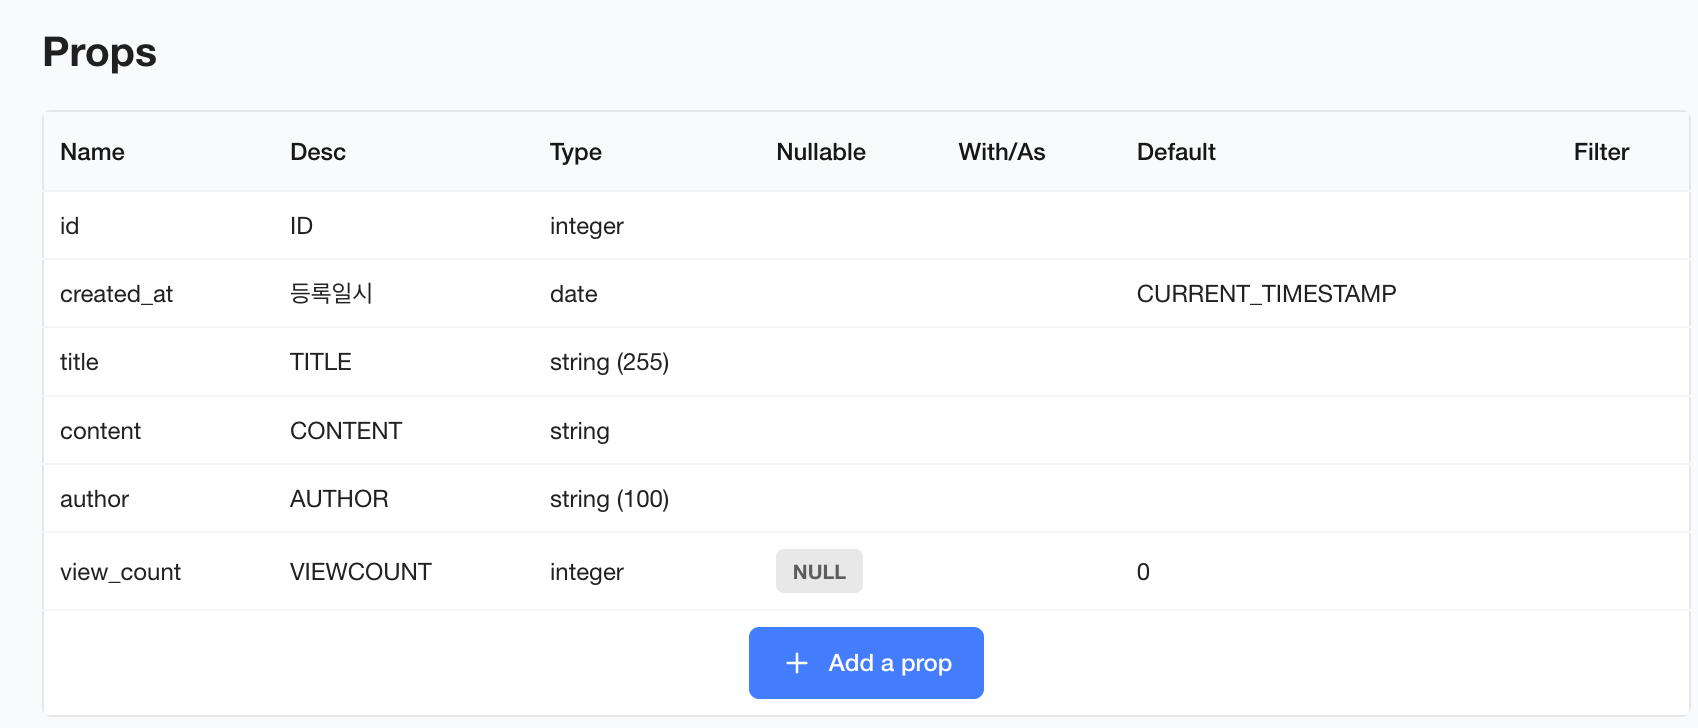
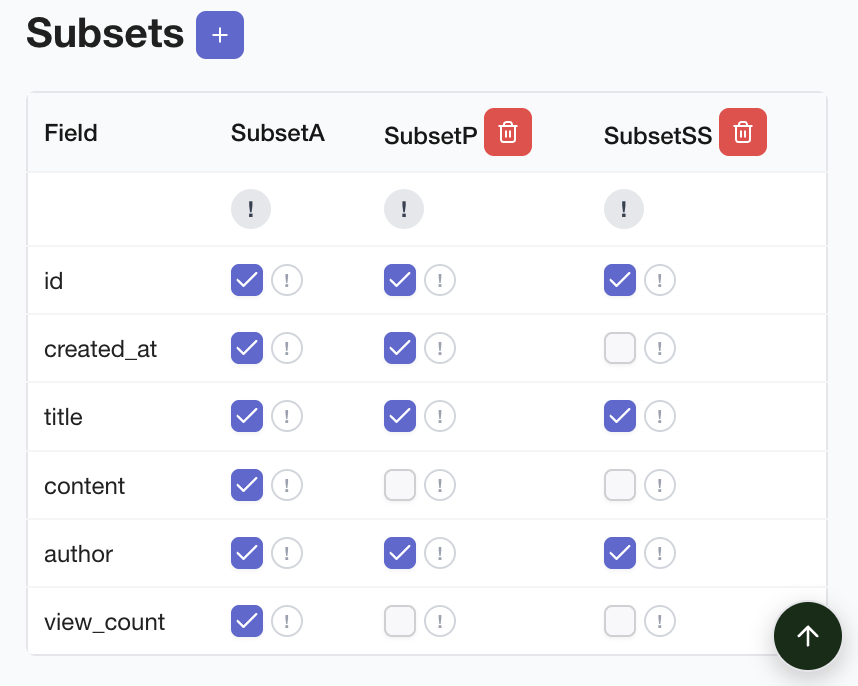
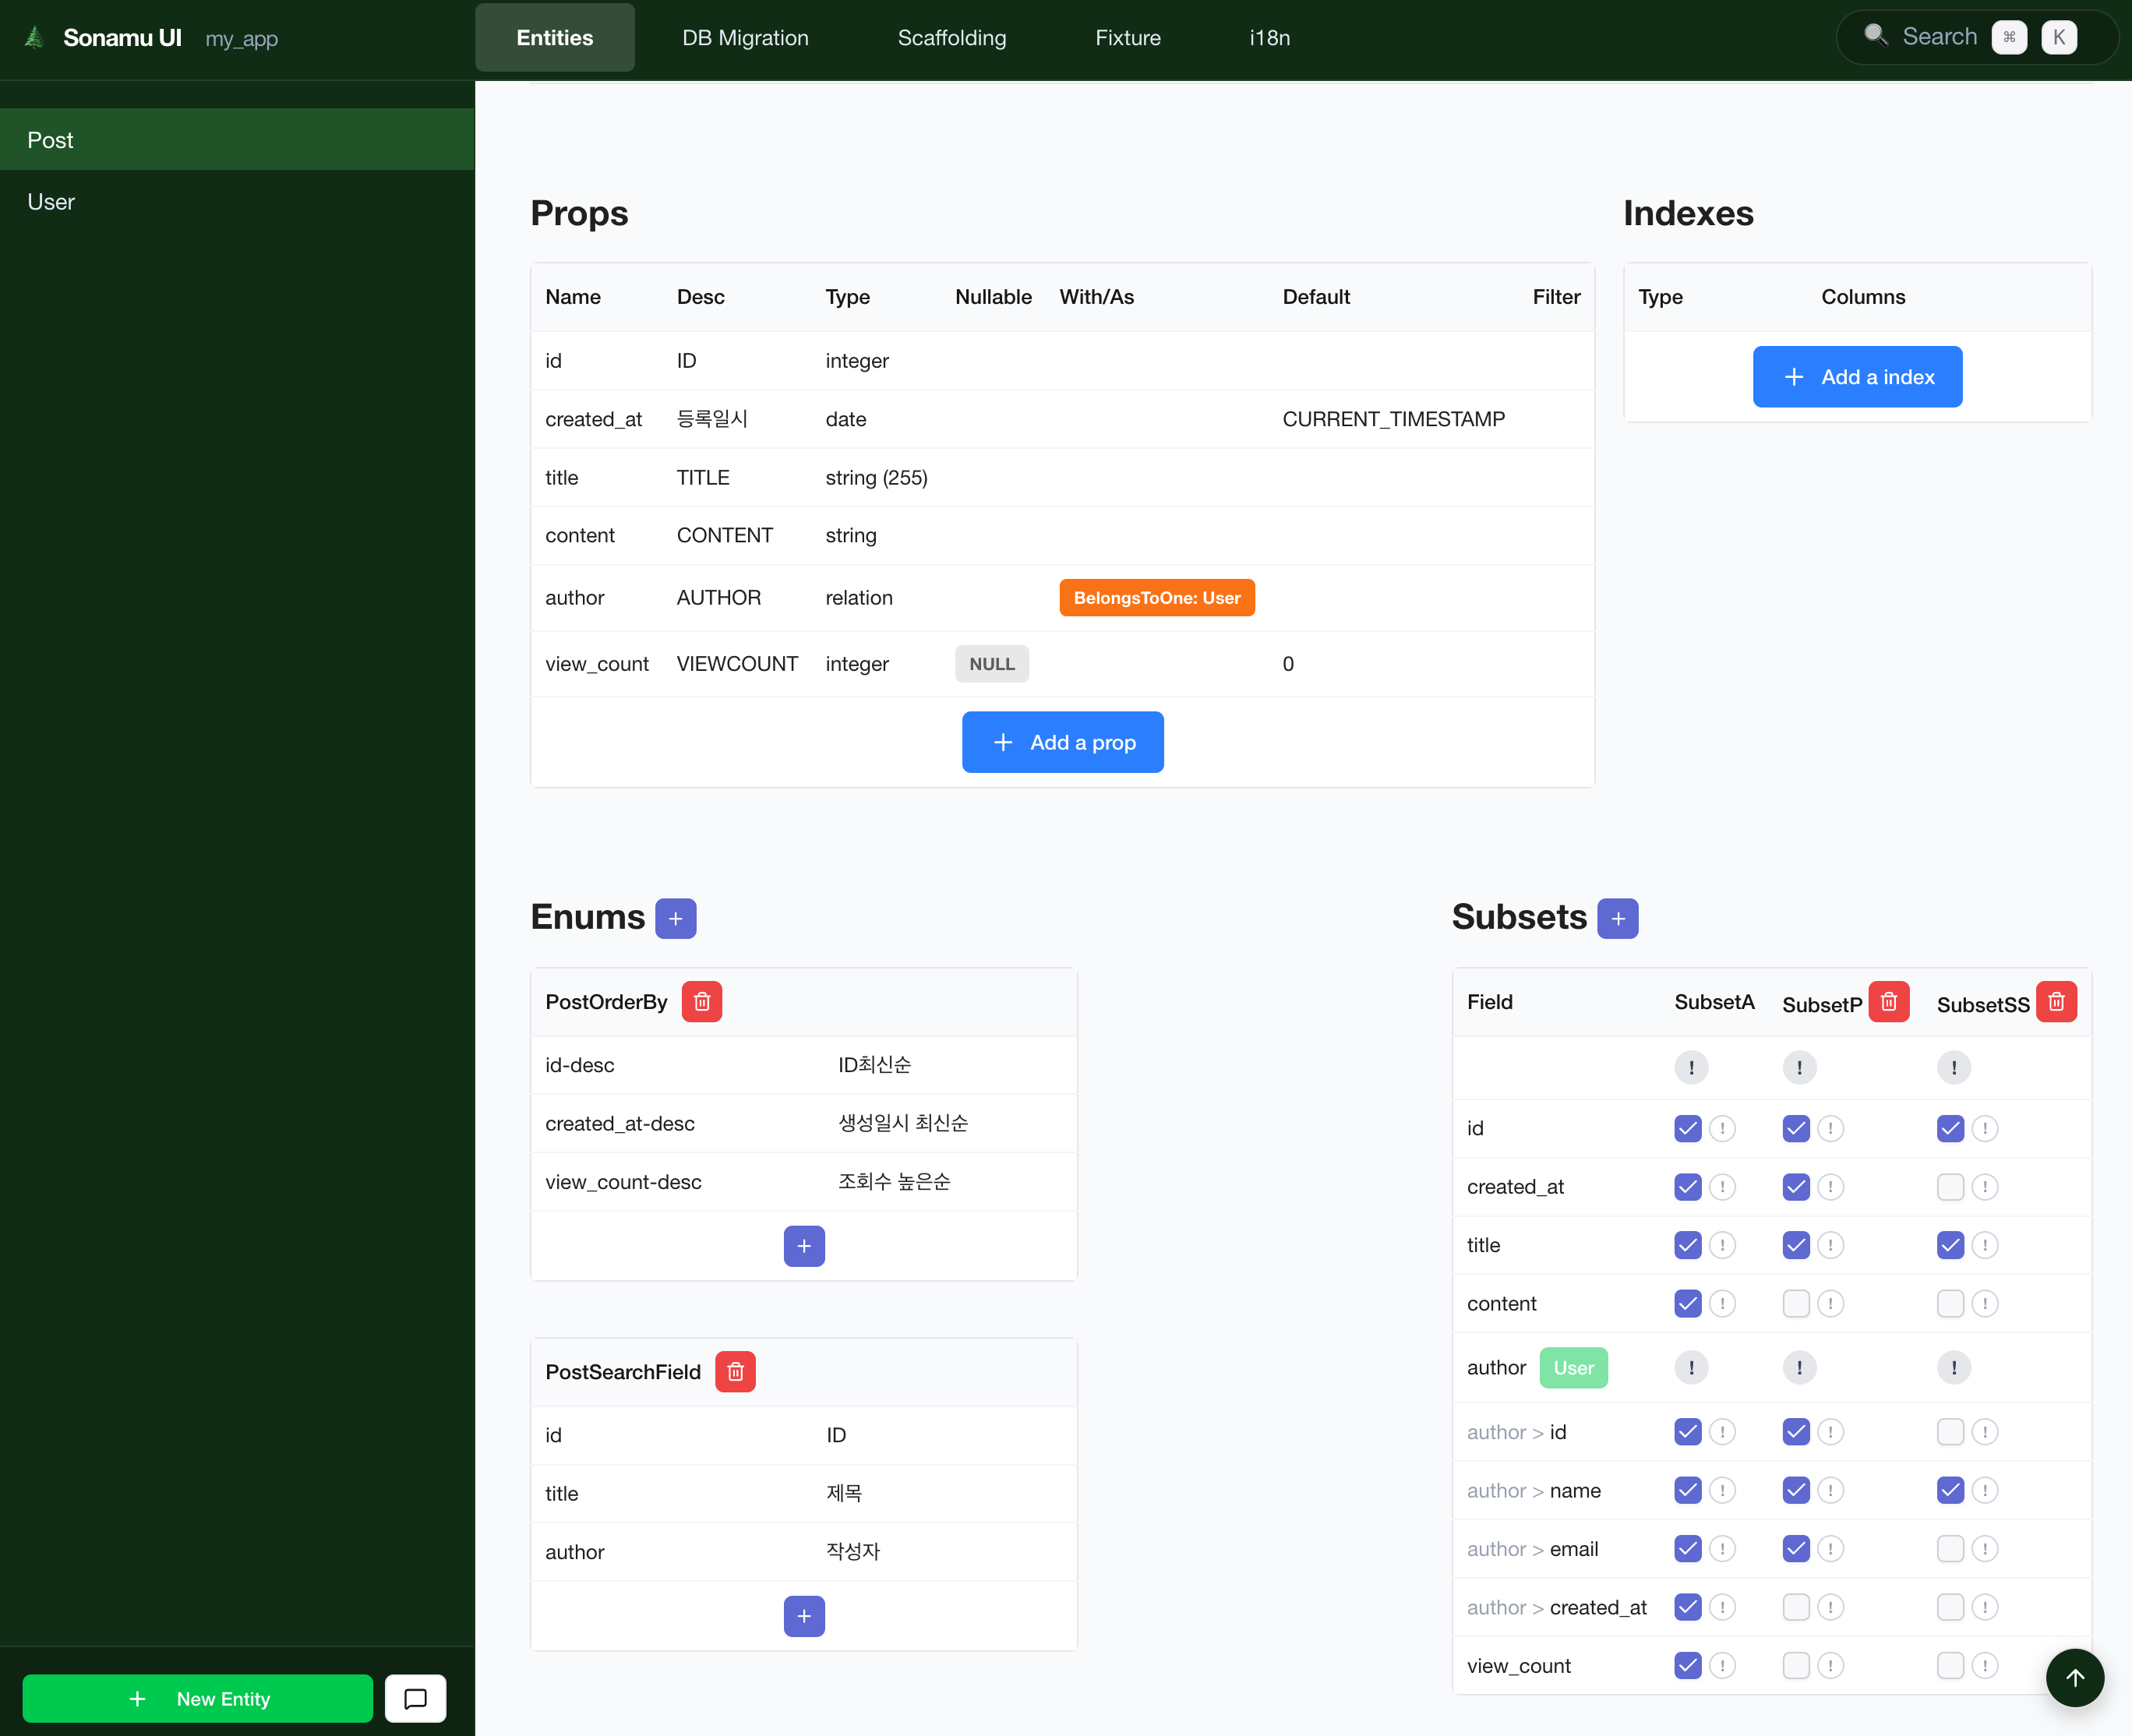
1. **Entity 탭**에서 새 엔티티 추가
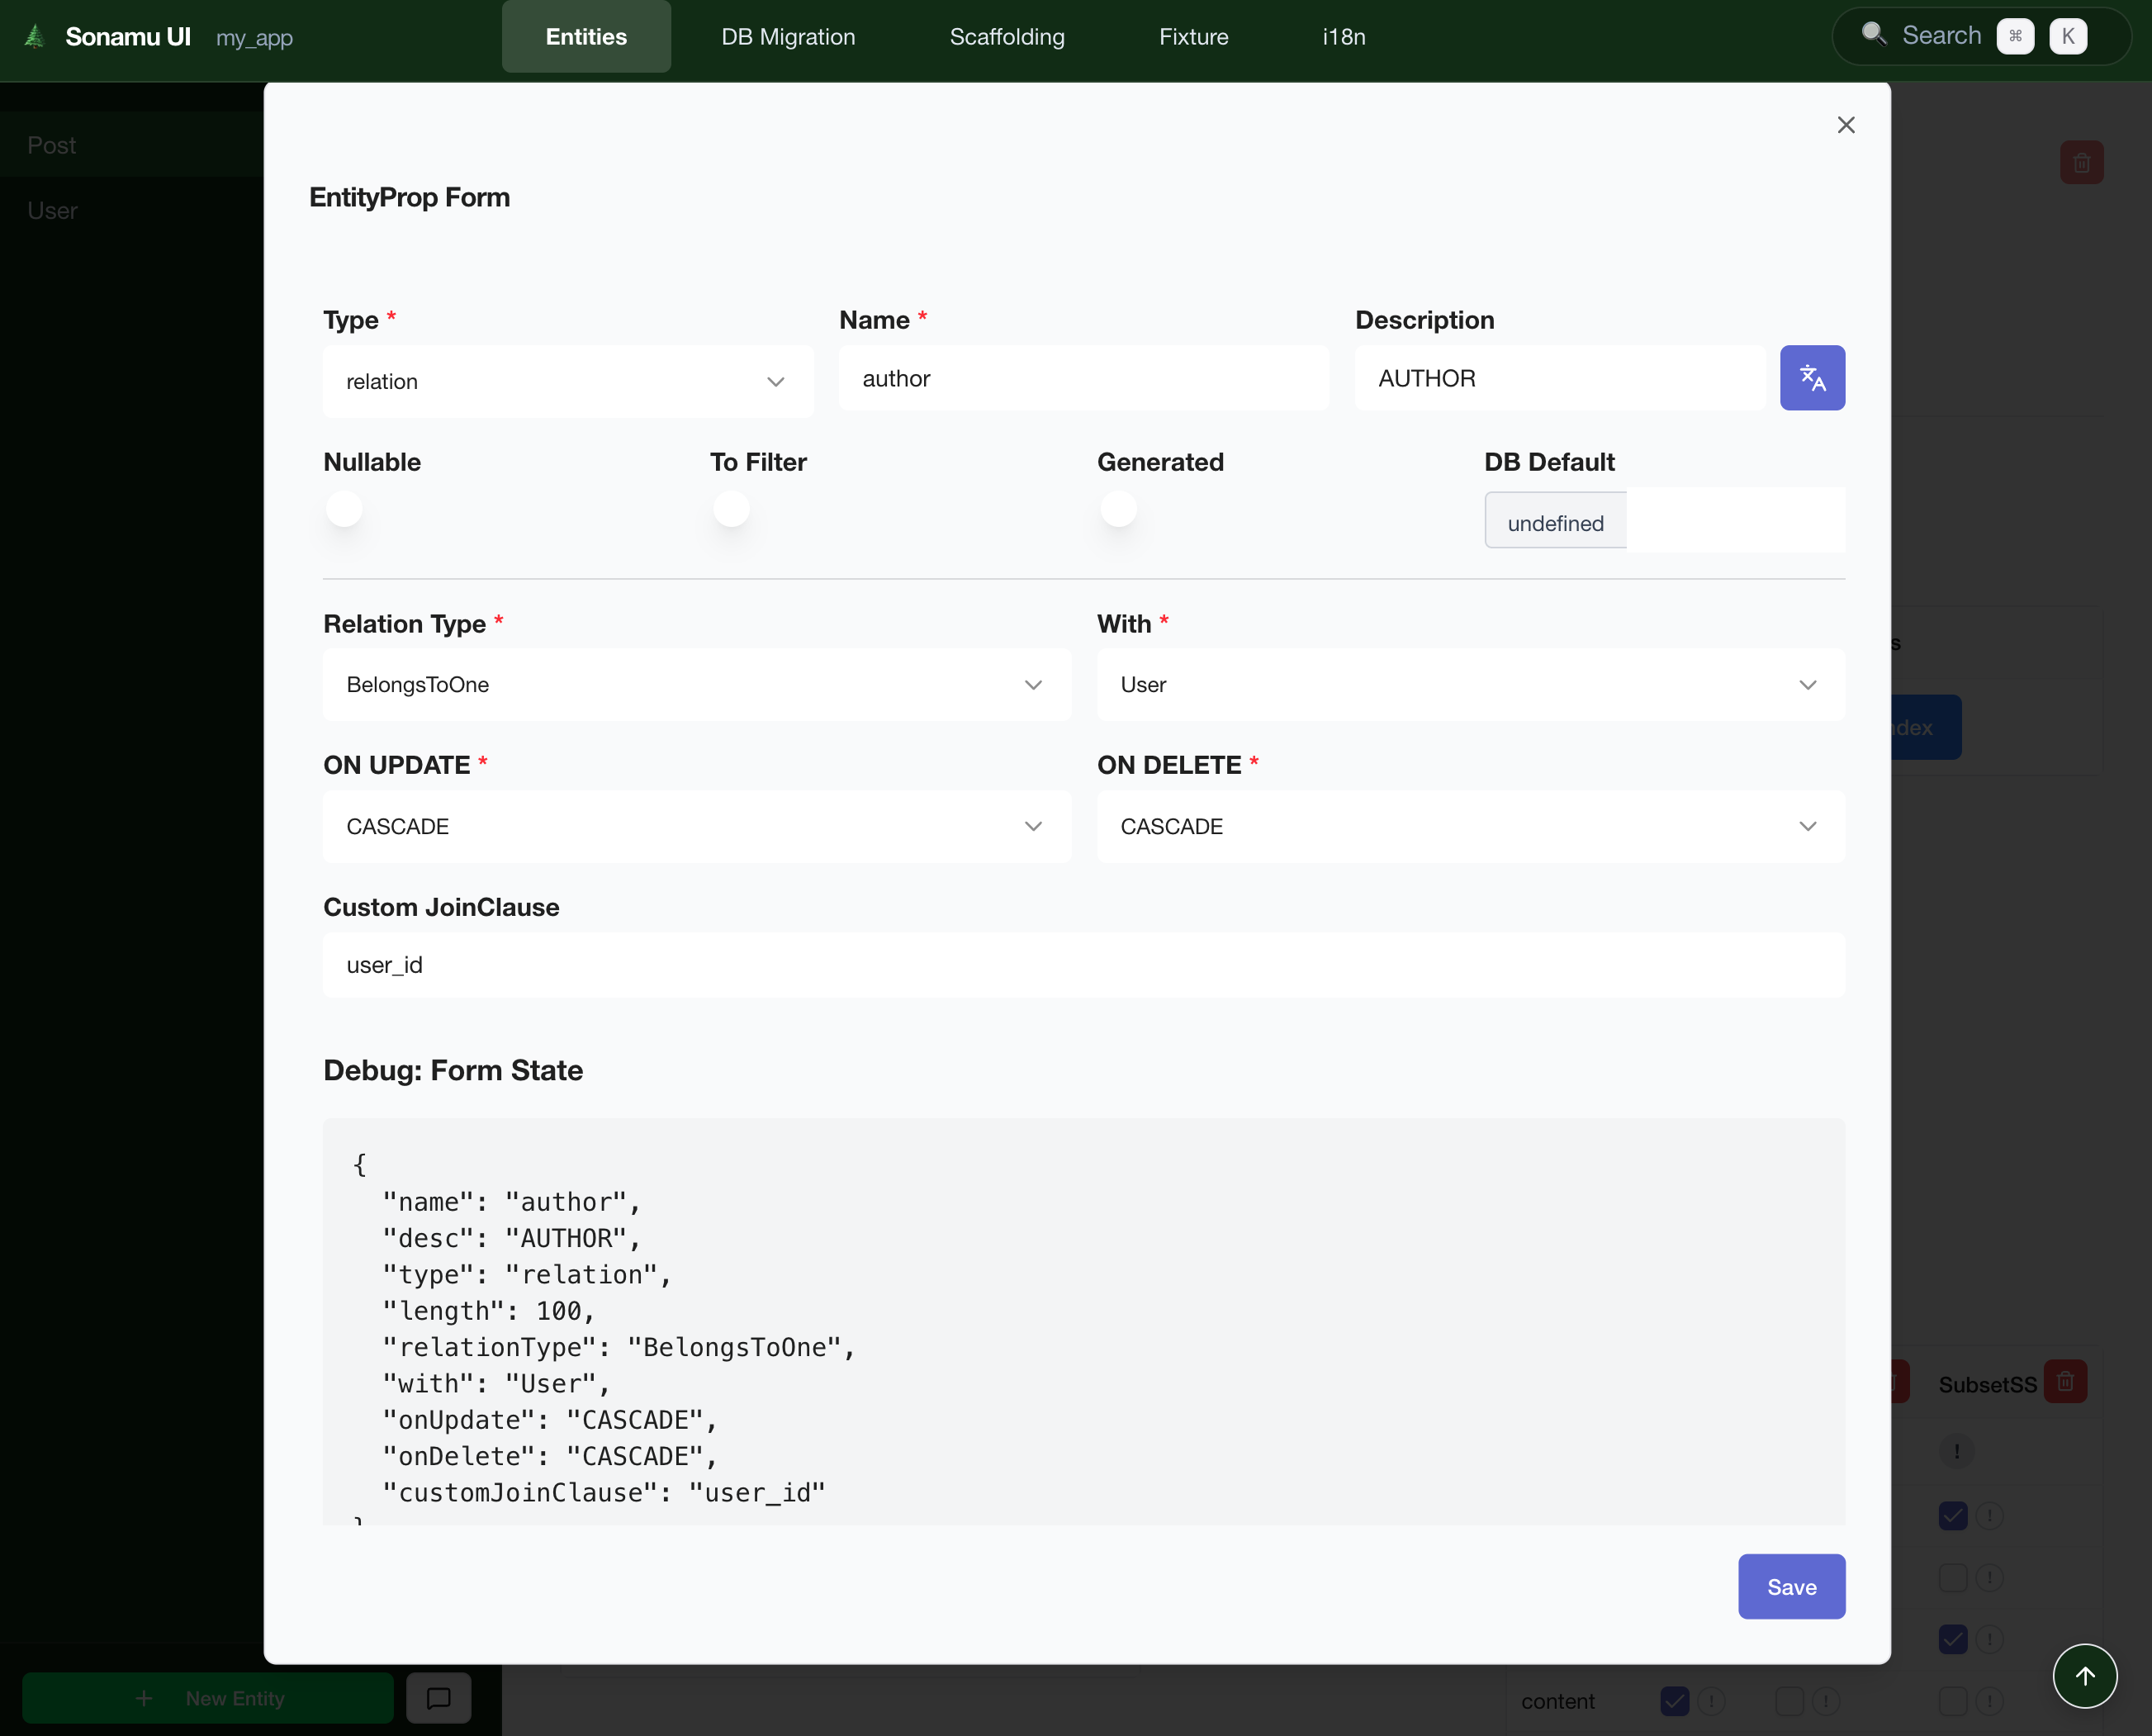
2. **필드 정의** - 타입, 제약조건, 기본값 설정
3. **Subset 정의** - API 응답 형태 정의
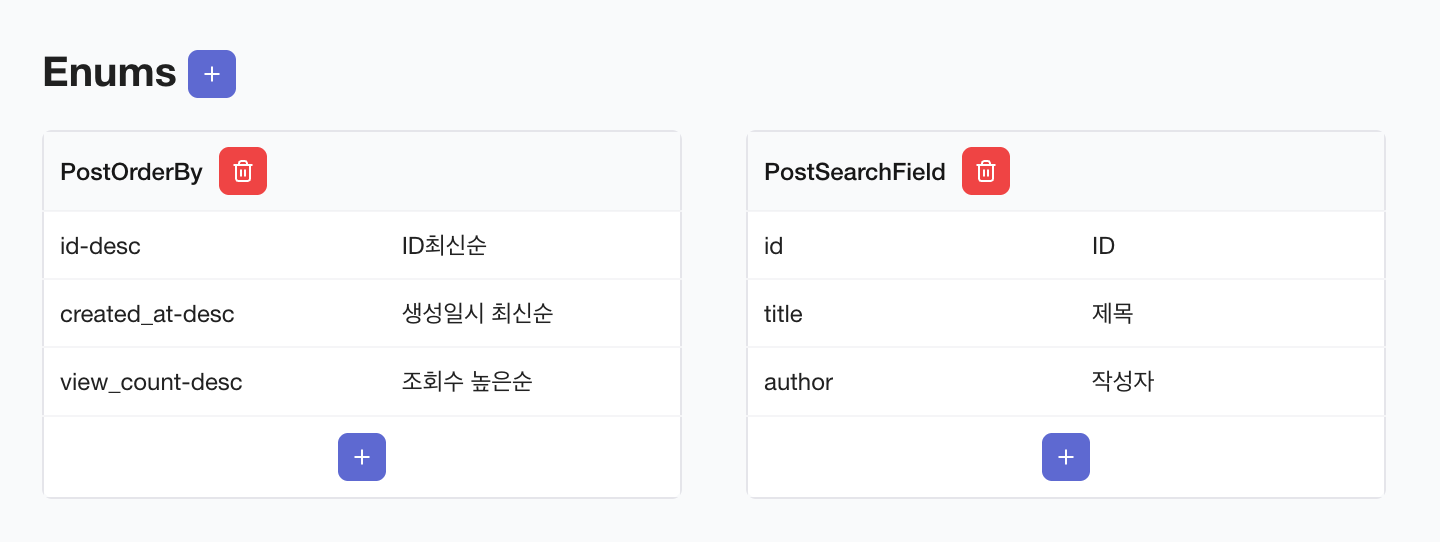
4. **Enum 정의** - 정렬/검색 옵션 정의
5. **Relation 정의** - 다른 엔티티와의 관계 설정
엔티티를 저장하면 다음 파일들이 자동 생성됩니다: - `{entity}.entity.json` - 엔티티 정의 - ` {entity}.types.ts` - TypeScript 타입 및 Zod 스키마 - `sonamu.generated.ts` - Base 스키마 (모든
엔티티)
 ### CLI로 엔티티 생성 (선택사항)
CLI를 사용하여 빈 엔티티를 생성할 수도 있습니다:
```bash theme={null}
pnpm sonamu stub entity User
```
이후 Sonamu UI에서 필드를 추가하고 편집할 수 있습니다.
**더 알아보기** - [엔티티 정의하기](/ko/core-concepts/entity/defining-entities) - 엔티티 구조와
설정 옵션 - [Sonamu UI 사용하기](/ko/core-concepts/entity/using-sonamu-ui) - UI에서 엔티티 관리 -
[필드 타입](/ko/core-concepts/entity/field-types) - 사용 가능한 모든 필드 타입 - [Relation
정의](/ko/core-concepts/entity/relations) - 엔티티 간 관계 설정 - [Enum
정의](/ko/core-concepts/entity/enums) - 열거형 타입 관리 - [Entity
Management](/ko/tools-and-cli/sonamu-ui/entity-management) - Sonamu UI Entity 탭 가이드
## 2단계: 마이그레이션
엔티티 정의를 데이터베이스에 반영합니다.
### Sonamu UI에서 마이그레이션
1. **Migration 탭** 클릭
2. **Generate Migration** - SQL 자동 생성
3. 생성된 SQL 검토
4. **Run Migration** - 데이터베이스에 적용
### CLI로 마이그레이션 (선택사항)
```bash theme={null}
# 마이그레이션 상태 확인
pnpm sonamu migrate status
# 마이그레이션 실행
pnpm sonamu migrate run
```
마이그레이션은 되돌릴 수 없는 작업일 수 있습니다. 프로덕션 환경에서는 특히 주의하세요.
**더 알아보기** - [마이그레이션 작동 원리](/ko/database/migrations/how-migrations-work) -
마이그레이션 시스템 이해 - [마이그레이션 생성하기](/ko/database/migrations/creating-migrations) -
SQL 자동 생성 메커니즘 - [마이그레이션 실행하기](/ko/database/migrations/running-migrations) -
안전한 마이그레이션 실행 - [Migration 탭](/ko/tools-and-cli/sonamu-ui/migration-tab) - Sonamu
UI에서 마이그레이션 관리 - [migrate CLI](/ko/tools-and-cli/sonamu-cli/migrate) - CLI로
마이그레이션 제어
## 3단계: 스캐폴딩
마이그레이션 후 Model 파일과 테스트 파일을 자동 생성합니다.
### Sonamu UI에서 스캐폴딩
1. **Scaffolding 탭** 클릭
2. 엔티티 선택
3. 생성할 템플릿 선택:
* **Model** - 비즈니스 로직 및 API 엔드포인트
* **Model Test** - 테스트 파일
4. **Preview** (선택사항) - 생성될 코드 미리보기
5. **Generate** - 파일 생성
### CLI로 스캐폴딩 (선택사항)
```bash theme={null}
# Model 파일 생성
pnpm sonamu scaffold model User
# 테스트 파일 생성
pnpm sonamu scaffold model_test User
```
**생성되는 파일**
* `{entity}.model.ts` - 기본 CRUD API 포함
* `{entity}.model.test.ts` - 테스트 템플릿
생성된 파일은 언제든지 수정하여 비즈니스 로직을 추가할 수 있습니다.
**더 알아보기** - [Scaffolding 탭](/ko/tools-and-cli/sonamu-ui/scaffolding-tab) - UI에서 코드
생성하기 - [scaffold CLI](/ko/tools-and-cli/sonamu-cli/scaffold) - CLI로 파일 스캐폴딩 - [테스트
스캐폴딩](/ko/testing/writing-tests/scaffolding-tests) - 테스트 파일 자동 생성
## 4단계: 비즈니스 로직 구현
생성된 Model 파일에 비즈니스 로직을 추가합니다.
### Model 파일 구조
```typescript title="user.model.ts" theme={null}
import { api, BaseModelClass, NotFoundException } from "sonamu";
import type { UserSubsetKey, UserSubsetMapping } from "../sonamu.generated";
import { userLoaderQueries, userSubsetQueries } from "../sonamu.generated.sso";
import type { User, UserListParams, UserSaveParams } from "./user.types";
class UserModelClass extends BaseModelClass<
UserSubsetKey,
UserSubsetMapping,
typeof userSubsetQueries,
typeof userLoaderQueries
> {
constructor() {
super("User", userSubsetQueries, userLoaderQueries);
}
@api({ httpMethod: "GET", clients: ["axios", "tanstack-query"] })
async findById(subset: T, id: number): Promise {
// 기본 CRUD 로직 (스캐폴딩으로 생성됨)
}
// 커스텀 비즈니스 로직 추가
@api({ httpMethod: "POST", clients: ["axios"] })
async changePassword(userId: number, newPassword: string): Promise {
// 비밀번호 변경 로직
const hashedPassword = await this.hashPassword(newPassword);
await this.getPuri("w").table("users").where("id", userId).update({ password: hashedPassword });
}
private async hashPassword(password: string): Promise {
// 비밀번호 해싱 로직
return password; // 실제로는 bcrypt 등 사용
}
}
export const UserModel = new UserModelClass();
```
### API 데코레이터
`@api` 데코레이터는 메서드를 REST API 엔드포인트로 자동 등록합니다:
```typescript theme={null}
@api({
httpMethod: "GET" | "POST" | "PUT" | "DELETE",
clients: ["axios", "tanstack-query"], // 생성할 클라이언트 타입
resourceName?: string, // 리소스명 (선택)
})
```
**HMR (Hot Module Replacement)**
Model 파일을 수정하면 API 서버가 자동으로 재시작됩니다. 별도의 서버 재시작이 필요 없습니다!
**더 알아보기** - [Model이란?](/ko/core-concepts/model/what-is-model) - Model의 역할과 구조 -
[@api 데코레이터](/ko/core-concepts/model/api-decorator) - API 엔드포인트 자동 생성 - [비즈니스
로직 작성](/ko/core-concepts/model/business-logic) - Model에서 로직 구현하기 - [BaseModel
메서드](/ko/core-concepts/model/basemodel-methods) - 내장 CRUD 메서드 - [API
만들기](/ko/api-development/creating-apis/api-decorator) - 상세한 API 개발 가이드 - [Puri 쿼리
빌더](/ko/database/puri/basic-queries) - 타입 안전한 쿼리 작성 -
[트랜잭션](/ko/database/transactions/transactional-decorator) - 안전한 데이터 처리
## 5단계: 동기화 (Sync)
변경사항을 프론트엔드와 동기화합니다.
### 자동 동기화 (HMR)
`pnpm dev`로 개발 서버를 실행하면 파일 변경 시 자동으로 동기화됩니다:
* ✅ Model 파일 변경 → Service 파일 자동 재생성
* ✅ Types 파일 변경 → Web 프로젝트로 자동 복사
* ✅ Entity 정의 변경 → 스키마 자동 재생성
### 수동 동기화
필요한 경우 수동으로 동기화할 수 있습니다:
```bash theme={null}
pnpm sync
```
`pnpm sync`는 다음 작업을 수행합니다:
1. **sonamu.shared.ts 복사** - 공통 타입 및 유틸리티를 Web으로 복사
2. **변경 파일 감지** - Checksum 기반으로 변경된 파일 확인
3. **타입 동기화** - `*.types.ts`, `*.generated.ts` 파일을 Web으로 복사
4. **Service 생성** - Model의 API를 기반으로 프론트엔드 Service 생성
5. **Config 동기화** - `.sonamu.env` 파일 업데이트
**Sync 명령어가 필요한 경우**
* 개발 서버를 종료한 상태에서 여러 파일을 수정한 경우
* Git에서 다른 브랜치로 전환한 경우
* 동기화 상태가 꼬였다고 생각될 경우
대부분의 경우 HMR이 자동으로 처리하므로 수동 sync는 드물게 필요합니다.
**더 알아보기** - [Syncer 이해하기](/ko/core-concepts/auto-generation/syncer) - 동기화 메커니즘
상세 - [자동 생성되는 것들](/ko/core-concepts/auto-generation/what-gets-generated) - 어떤 파일이
생성되는지 - [HMR 작동 원리](/ko/tools-and-cli/hmr/how-hmr-works) - Hot Module Replacement 이해
## 6단계: 테스트
작성한 비즈니스 로직을 테스트합니다.
### 테스트 파일 작성
스캐폴딩으로 생성된 테스트 파일에 테스트 케이스를 추가합니다:
```typescript title="user.model.test.ts" theme={null}
import { beforeAll, describe, expect, test } from "vitest";
import { UserModel } from "./user.model";
describe("UserModel", () => {
beforeAll(async () => {
// 테스트 전 초기화
});
test("findById should return user", async () => {
const user = await UserModel.findById("A", 1);
expect(user).toBeDefined();
expect(user.id).toBe(1);
});
test("changePassword should update password", async () => {
await UserModel.changePassword(1, "newPassword123");
// 비밀번호 변경 확인
const user = await UserModel.findById("A", 1);
expect(user.password).not.toBe("oldPassword");
});
});
```
### 테스트 실행
```bash theme={null}
# 모든 테스트 실행
pnpm test
# 특정 파일 테스트
pnpm test user.model.test.ts
# Watch 모드
pnpm test --watch
```
Sonamu는 Vitest를 사용합니다. 자세한 내용은 [테스트
작성하기](/ko/testing/writing-tests/test-structure) 문서를 참고하세요.
**더 알아보기** - [테스트 작성하기](/ko/testing/writing-tests/test-structure) - Vitest 기반 테스트
구조 - [테스트 스캐폴딩](/ko/testing/writing-tests/scaffolding-tests) - 테스트 템플릿 활용 -
[Fixture 만들기](/ko/testing/fixtures/creating-fixtures) - 테스트 데이터 관리 -
[Naite란?](/ko/testing/naite/what-is-naite) - 테스트 로깅 시스템
## 7단계: 프론트엔드 통합
자동 생성된 Service를 사용하여 UI를 구현합니다.
### 생성된 Service 파일
Model에 정의된 API는 자동으로 프론트엔드 Service로 생성됩니다:
```typescript title="web/src/services/UserService.ts (자동 생성)" theme={null}
export class UserService {
static async findById(subset: UserSubsetKey, id: number) {
const res = await axios.get(`/api/users/${id}`, {
params: { subset },
});
return res.data;
}
static async changePassword(userId: number, newPassword: string) {
const res = await axios.post("/api/users/changePassword", {
userId,
newPassword,
});
return res.data;
}
}
```
### React 컴포넌트에서 사용
```tsx title="web/src/pages/UserProfile.tsx" theme={null}
import { useState, useEffect } from "react";
import { UserService } from "@/services/UserService";
import type { User } from "@/services/user.types";
export function UserProfile({ userId }: { userId: number }) {
const [user, setUser] = useState(null);
const [loading, setLoading] = useState(true);
useEffect(() => {
loadUser();
}, [userId]);
async function loadUser() {
try {
const userData = await UserService.findById("A", userId);
setUser(userData);
} catch (error) {
console.error("Failed to load user:", error);
} finally {
setLoading(false);
}
}
async function handlePasswordChange(newPassword: string) {
await UserService.changePassword(userId, newPassword);
alert("Password changed successfully!");
}
if (loading) return
### CLI로 엔티티 생성 (선택사항)
CLI를 사용하여 빈 엔티티를 생성할 수도 있습니다:
```bash theme={null}
pnpm sonamu stub entity User
```
이후 Sonamu UI에서 필드를 추가하고 편집할 수 있습니다.
**더 알아보기** - [엔티티 정의하기](/ko/core-concepts/entity/defining-entities) - 엔티티 구조와
설정 옵션 - [Sonamu UI 사용하기](/ko/core-concepts/entity/using-sonamu-ui) - UI에서 엔티티 관리 -
[필드 타입](/ko/core-concepts/entity/field-types) - 사용 가능한 모든 필드 타입 - [Relation
정의](/ko/core-concepts/entity/relations) - 엔티티 간 관계 설정 - [Enum
정의](/ko/core-concepts/entity/enums) - 열거형 타입 관리 - [Entity
Management](/ko/tools-and-cli/sonamu-ui/entity-management) - Sonamu UI Entity 탭 가이드
## 2단계: 마이그레이션
엔티티 정의를 데이터베이스에 반영합니다.
### Sonamu UI에서 마이그레이션
1. **Migration 탭** 클릭
2. **Generate Migration** - SQL 자동 생성
3. 생성된 SQL 검토
4. **Run Migration** - 데이터베이스에 적용
### CLI로 마이그레이션 (선택사항)
```bash theme={null}
# 마이그레이션 상태 확인
pnpm sonamu migrate status
# 마이그레이션 실행
pnpm sonamu migrate run
```
마이그레이션은 되돌릴 수 없는 작업일 수 있습니다. 프로덕션 환경에서는 특히 주의하세요.
**더 알아보기** - [마이그레이션 작동 원리](/ko/database/migrations/how-migrations-work) -
마이그레이션 시스템 이해 - [마이그레이션 생성하기](/ko/database/migrations/creating-migrations) -
SQL 자동 생성 메커니즘 - [마이그레이션 실행하기](/ko/database/migrations/running-migrations) -
안전한 마이그레이션 실행 - [Migration 탭](/ko/tools-and-cli/sonamu-ui/migration-tab) - Sonamu
UI에서 마이그레이션 관리 - [migrate CLI](/ko/tools-and-cli/sonamu-cli/migrate) - CLI로
마이그레이션 제어
## 3단계: 스캐폴딩
마이그레이션 후 Model 파일과 테스트 파일을 자동 생성합니다.
### Sonamu UI에서 스캐폴딩
1. **Scaffolding 탭** 클릭
2. 엔티티 선택
3. 생성할 템플릿 선택:
* **Model** - 비즈니스 로직 및 API 엔드포인트
* **Model Test** - 테스트 파일
4. **Preview** (선택사항) - 생성될 코드 미리보기
5. **Generate** - 파일 생성
### CLI로 스캐폴딩 (선택사항)
```bash theme={null}
# Model 파일 생성
pnpm sonamu scaffold model User
# 테스트 파일 생성
pnpm sonamu scaffold model_test User
```
**생성되는 파일**
* `{entity}.model.ts` - 기본 CRUD API 포함
* `{entity}.model.test.ts` - 테스트 템플릿
생성된 파일은 언제든지 수정하여 비즈니스 로직을 추가할 수 있습니다.
**더 알아보기** - [Scaffolding 탭](/ko/tools-and-cli/sonamu-ui/scaffolding-tab) - UI에서 코드
생성하기 - [scaffold CLI](/ko/tools-and-cli/sonamu-cli/scaffold) - CLI로 파일 스캐폴딩 - [테스트
스캐폴딩](/ko/testing/writing-tests/scaffolding-tests) - 테스트 파일 자동 생성
## 4단계: 비즈니스 로직 구현
생성된 Model 파일에 비즈니스 로직을 추가합니다.
### Model 파일 구조
```typescript title="user.model.ts" theme={null}
import { api, BaseModelClass, NotFoundException } from "sonamu";
import type { UserSubsetKey, UserSubsetMapping } from "../sonamu.generated";
import { userLoaderQueries, userSubsetQueries } from "../sonamu.generated.sso";
import type { User, UserListParams, UserSaveParams } from "./user.types";
class UserModelClass extends BaseModelClass<
UserSubsetKey,
UserSubsetMapping,
typeof userSubsetQueries,
typeof userLoaderQueries
> {
constructor() {
super("User", userSubsetQueries, userLoaderQueries);
}
@api({ httpMethod: "GET", clients: ["axios", "tanstack-query"] })
async findById(subset: T, id: number): Promise {
// 기본 CRUD 로직 (스캐폴딩으로 생성됨)
}
// 커스텀 비즈니스 로직 추가
@api({ httpMethod: "POST", clients: ["axios"] })
async changePassword(userId: number, newPassword: string): Promise {
// 비밀번호 변경 로직
const hashedPassword = await this.hashPassword(newPassword);
await this.getPuri("w").table("users").where("id", userId).update({ password: hashedPassword });
}
private async hashPassword(password: string): Promise {
// 비밀번호 해싱 로직
return password; // 실제로는 bcrypt 등 사용
}
}
export const UserModel = new UserModelClass();
```
### API 데코레이터
`@api` 데코레이터는 메서드를 REST API 엔드포인트로 자동 등록합니다:
```typescript theme={null}
@api({
httpMethod: "GET" | "POST" | "PUT" | "DELETE",
clients: ["axios", "tanstack-query"], // 생성할 클라이언트 타입
resourceName?: string, // 리소스명 (선택)
})
```
**HMR (Hot Module Replacement)**
Model 파일을 수정하면 API 서버가 자동으로 재시작됩니다. 별도의 서버 재시작이 필요 없습니다!
**더 알아보기** - [Model이란?](/ko/core-concepts/model/what-is-model) - Model의 역할과 구조 -
[@api 데코레이터](/ko/core-concepts/model/api-decorator) - API 엔드포인트 자동 생성 - [비즈니스
로직 작성](/ko/core-concepts/model/business-logic) - Model에서 로직 구현하기 - [BaseModel
메서드](/ko/core-concepts/model/basemodel-methods) - 내장 CRUD 메서드 - [API
만들기](/ko/api-development/creating-apis/api-decorator) - 상세한 API 개발 가이드 - [Puri 쿼리
빌더](/ko/database/puri/basic-queries) - 타입 안전한 쿼리 작성 -
[트랜잭션](/ko/database/transactions/transactional-decorator) - 안전한 데이터 처리
## 5단계: 동기화 (Sync)
변경사항을 프론트엔드와 동기화합니다.
### 자동 동기화 (HMR)
`pnpm dev`로 개발 서버를 실행하면 파일 변경 시 자동으로 동기화됩니다:
* ✅ Model 파일 변경 → Service 파일 자동 재생성
* ✅ Types 파일 변경 → Web 프로젝트로 자동 복사
* ✅ Entity 정의 변경 → 스키마 자동 재생성
### 수동 동기화
필요한 경우 수동으로 동기화할 수 있습니다:
```bash theme={null}
pnpm sync
```
`pnpm sync`는 다음 작업을 수행합니다:
1. **sonamu.shared.ts 복사** - 공통 타입 및 유틸리티를 Web으로 복사
2. **변경 파일 감지** - Checksum 기반으로 변경된 파일 확인
3. **타입 동기화** - `*.types.ts`, `*.generated.ts` 파일을 Web으로 복사
4. **Service 생성** - Model의 API를 기반으로 프론트엔드 Service 생성
5. **Config 동기화** - `.sonamu.env` 파일 업데이트
**Sync 명령어가 필요한 경우**
* 개발 서버를 종료한 상태에서 여러 파일을 수정한 경우
* Git에서 다른 브랜치로 전환한 경우
* 동기화 상태가 꼬였다고 생각될 경우
대부분의 경우 HMR이 자동으로 처리하므로 수동 sync는 드물게 필요합니다.
**더 알아보기** - [Syncer 이해하기](/ko/core-concepts/auto-generation/syncer) - 동기화 메커니즘
상세 - [자동 생성되는 것들](/ko/core-concepts/auto-generation/what-gets-generated) - 어떤 파일이
생성되는지 - [HMR 작동 원리](/ko/tools-and-cli/hmr/how-hmr-works) - Hot Module Replacement 이해
## 6단계: 테스트
작성한 비즈니스 로직을 테스트합니다.
### 테스트 파일 작성
스캐폴딩으로 생성된 테스트 파일에 테스트 케이스를 추가합니다:
```typescript title="user.model.test.ts" theme={null}
import { beforeAll, describe, expect, test } from "vitest";
import { UserModel } from "./user.model";
describe("UserModel", () => {
beforeAll(async () => {
// 테스트 전 초기화
});
test("findById should return user", async () => {
const user = await UserModel.findById("A", 1);
expect(user).toBeDefined();
expect(user.id).toBe(1);
});
test("changePassword should update password", async () => {
await UserModel.changePassword(1, "newPassword123");
// 비밀번호 변경 확인
const user = await UserModel.findById("A", 1);
expect(user.password).not.toBe("oldPassword");
});
});
```
### 테스트 실행
```bash theme={null}
# 모든 테스트 실행
pnpm test
# 특정 파일 테스트
pnpm test user.model.test.ts
# Watch 모드
pnpm test --watch
```
Sonamu는 Vitest를 사용합니다. 자세한 내용은 [테스트
작성하기](/ko/testing/writing-tests/test-structure) 문서를 참고하세요.
**더 알아보기** - [테스트 작성하기](/ko/testing/writing-tests/test-structure) - Vitest 기반 테스트
구조 - [테스트 스캐폴딩](/ko/testing/writing-tests/scaffolding-tests) - 테스트 템플릿 활용 -
[Fixture 만들기](/ko/testing/fixtures/creating-fixtures) - 테스트 데이터 관리 -
[Naite란?](/ko/testing/naite/what-is-naite) - 테스트 로깅 시스템
## 7단계: 프론트엔드 통합
자동 생성된 Service를 사용하여 UI를 구현합니다.
### 생성된 Service 파일
Model에 정의된 API는 자동으로 프론트엔드 Service로 생성됩니다:
```typescript title="web/src/services/UserService.ts (자동 생성)" theme={null}
export class UserService {
static async findById(subset: UserSubsetKey, id: number) {
const res = await axios.get(`/api/users/${id}`, {
params: { subset },
});
return res.data;
}
static async changePassword(userId: number, newPassword: string) {
const res = await axios.post("/api/users/changePassword", {
userId,
newPassword,
});
return res.data;
}
}
```
### React 컴포넌트에서 사용
```tsx title="web/src/pages/UserProfile.tsx" theme={null}
import { useState, useEffect } from "react";
import { UserService } from "@/services/UserService";
import type { User } from "@/services/user.types";
export function UserProfile({ userId }: { userId: number }) {
const [user, setUser] = useState(null);
const [loading, setLoading] = useState(true);
useEffect(() => {
loadUser();
}, [userId]);
async function loadUser() {
try {
const userData = await UserService.findById("A", userId);
setUser(userData);
} catch (error) {
console.error("Failed to load user:", error);
} finally {
setLoading(false);
}
}
async function handlePasswordChange(newPassword: string) {
await UserService.changePassword(userId, newPassword);
alert("Password changed successfully!");
}
if (loading) return Loading...
;
if (!user) return User not found
;
return (
{user.name}
{user.email}
{/* 비밀번호 변경 UI */}
);
}
```
**타입 안전성**
Service와 타입이 백엔드와 자동 동기화되므로, 타입 불일치 오류를 컴파일 타임에 발견할 수 있습니다!
**더 알아보기** - [Service 작동
원리](/ko/frontend-integration/generated-services/how-services-work) - 자동 생성 메커니즘 -
[Service 사용하기](/ko/frontend-integration/generated-services/using-services) - 실전 활용 가이드
* [공유 타입](/ko/frontend-integration/type-safety/shared-types) - 백엔드-프론트엔드 타입 동기화
## 전체 워크플로우 예시
실제 기능을 추가하는 전체 과정을 예시로 살펴봅시다.
### 시나리오: "좋아요" 기능 추가
Post 엔티티에 `like_count` 필드 추가
```json theme={null}
{
"name": "like_count",
"type": "integer",
"desc": "좋아요 수",
"dbDefault": "0"
}
```
`sql ALTER TABLE posts ADD COLUMN like_count INTEGER DEFAULT 0; `
```typescript theme={null}
@api({ httpMethod: "POST", clients: ["axios"] })
async addLike(postId: number): Promise {
await this.getPuri("w")
.where("id", postId)
.increment("like_count", 1);
return await this.findById("A", postId);
}
```
HMR이 자동으로: - `post.types.ts` → Web으로 복사 - `PostService.ts`에 `addLike` 메서드 추가
```tsx theme={null}
async function handleLike() {
await PostService.addLike(post.id);
// UI 업데이트
}
```
```typescript theme={null}
test("addLike should increment like_count", async () => {
const before = await PostModel.findById("A", 1);
await PostModel.addLike(1);
const after = await PostModel.findById("A", 1);
expect(after.like_count).toBe(before.like_count + 1);
});
```
## 개발 팁
### 1. Entity First 원칙
모든 개발은 엔티티 정의에서 시작합니다. 데이터 구조가 명확해야 API와 UI도 명확해집니다.
### 2. Subset 활용
다양한 Subset을 미리 정의해두면 API 응답 크기를 최적화할 수 있습니다:
* **A (All)**: 모든 필드 (상세 페이지)
* **C (Compact)**: 주요 필드만 (목록 페이지)
* **S (Summary)**: 최소 필드 (미리보기)
### 3. 관계(Relation) 설계
엔티티 간 관계를 명확히 정의하면 JOIN 쿼리가 자동으로 생성됩니다.
### 4. 테스트 우선 작성
복잡한 비즈니스 로직은 테스트를 먼저 작성하면 안전하게 개발할 수 있습니다.
### 5. HMR 활용
개발 중에는 `pnpm dev`를 계속 실행해두고, 파일만 수정하면 자동으로 동기화됩니다.
### 6. 문제 발생 시
동기화 상태가 이상하면:
1. 개발 서버 재시작
2. `pnpm sync` 수동 실행
3. `rm sonamu.lock` 후 재시작
## 다음 단계
개발 워크플로우를 이해했다면, 다음 주제를 학습해보세요:
Sonamu의 전체 아키텍처와 작동 원리를 이해하세요.
엔티티의 구조와 설정 옵션을 자세히 알아보세요.
Model 파일 작성과 API 개발 방법을 배워보세요.
Vitest를 사용하여 효과적으로 테스트를 작성하는 방법을 배워보세요.