> ## Documentation Index
> Fetch the complete documentation index at: https://sonamu.cartanova.ai/llms.txt
> Use this file to discover all available pages before exploring further.
# Entity 관리
> Entity 생성, 수정, 삭제하기
Sonamu UI의 Entity 관리 기능을 사용하면 **시각적 인터페이스로 Entity를 쉽게 생성하고 편집**할 수 있습니다. CLI로 파일을 직접 수정하는 것보다 훨씬 빠르고 직관적입니다.
## Entity 탭 구조
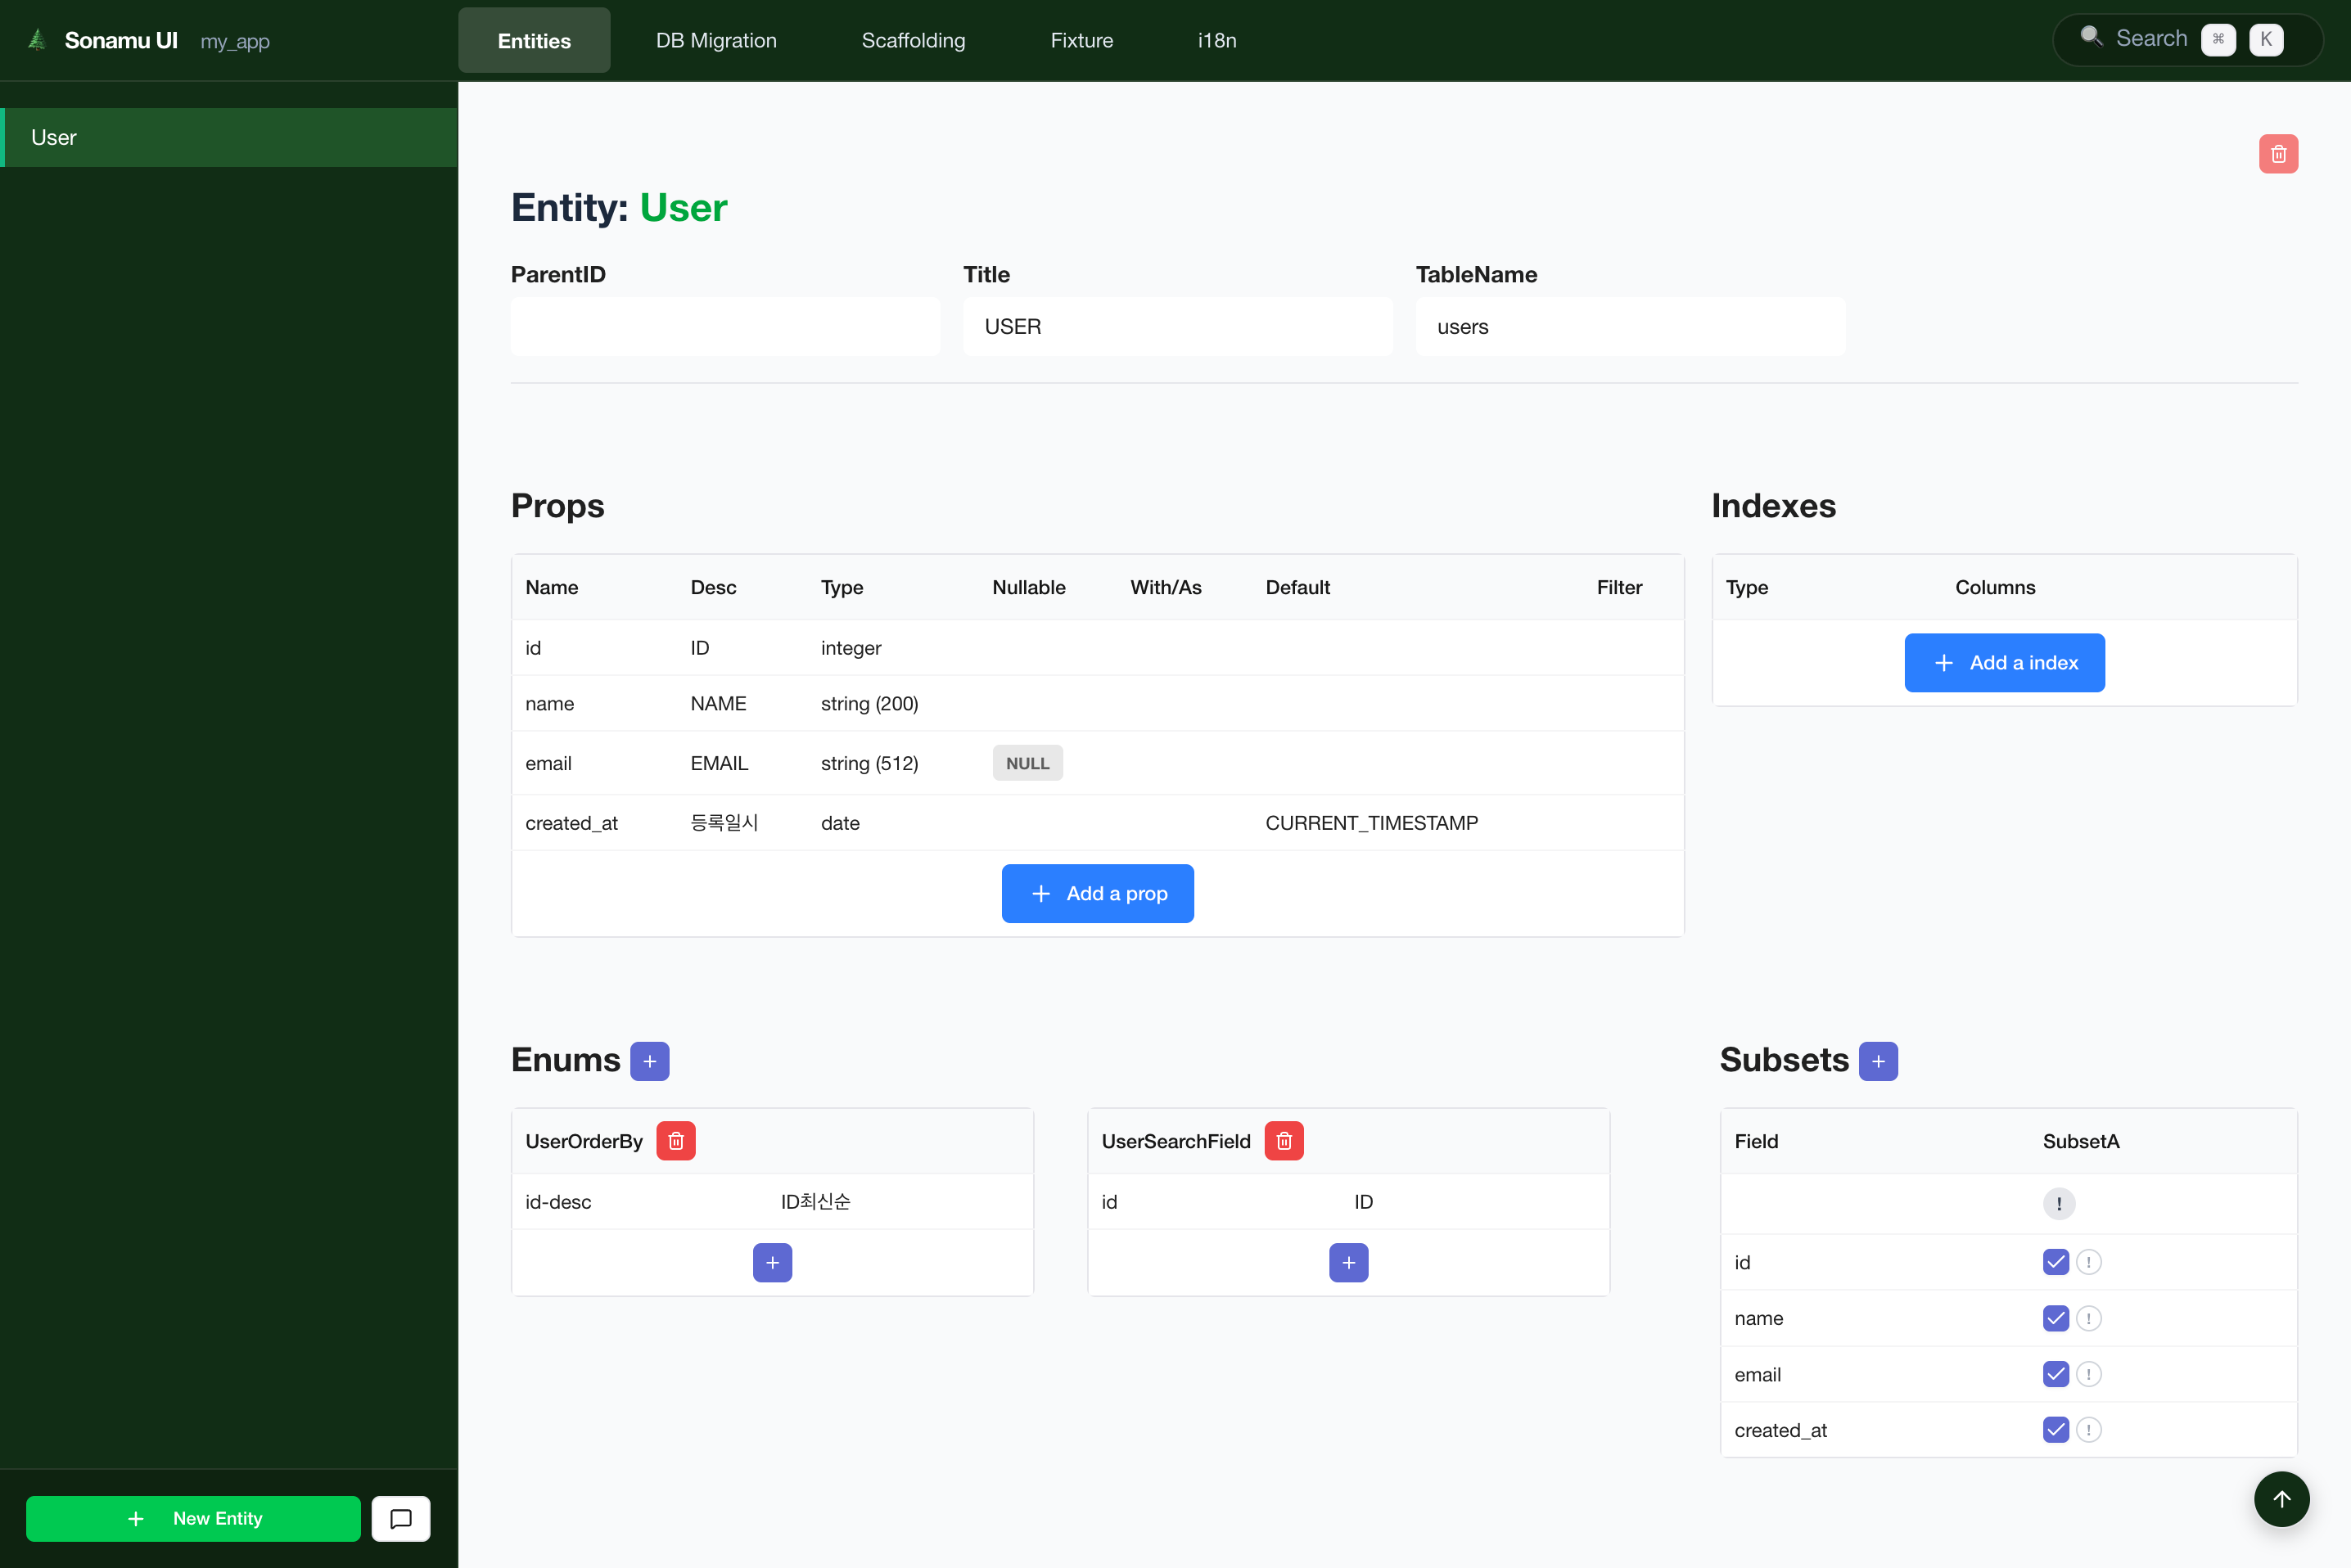 Entity 탭은 두 가지 주요 영역으로 구성됩니다:
* **왼쪽 Sidebar**: Entity 목록과 새 Entity 추가 버튼
* **오른쪽 Content**: 선택한 Entity의 상세 정보 (Properties, Indexes, Relations, Subsets, Enums)
## Entity 생성하기
### 1. New Entity 버튼 클릭
사이드바 하단의 **\[+ New Entity]** 버튼을 클릭합니다.
### 2. Entity 정보 입력
모달이 열리면 다음 정보를 입력합니다:
| 필드 | 설명 | 예시 |
| ----------------- | ----------------------- | ---------------------- |
| **Entity ID** | Entity 식별자 (PascalCase) | `Product`, `OrderItem` |
| **Title** | 한글 제목 | `상품`, `주문 항목` |
| **Parent Entity** | 부모 Entity (선택) | `Order` |
**Parent Entity**를 지정하면 부모 Entity의 하위 Entity가 됩니다. 예: `Order` → `OrderItem`
### 3. 기본 Properties 추가
생성된 Entity는 기본적으로 다음 필드를 포함합니다:
```typescript theme={null}
{
properties: [
{ name: "id", type: "int", primaryKey: true, autoIncrement: true },
{ name: "title", type: "string", length: 255 },
{ name: "created_at", type: "datetime", default: "CURRENT_TIMESTAMP" },
];
}
```
## Properties 편집
### Property 추가
1. **\[+ Add Property]** 버튼 클릭
2. Property 정보 입력:
| 필드 | 필수 | 설명 | 예시 |
| ------------ | --- | ----------------- | -------------------------- |
| **Name** | ✅ | 필드명 (snake\_case) | `email`, `phone_number` |
| **Type** | ✅ | 데이터 타입 | `string`, `int`, `decimal` |
| **Length** | 조건부 | 문자열 길이 | `255` |
| **Nullable** | | NULL 허용 여부 | `true` |
| **Default** | | 기본값 | `0`, `CURRENT_TIMESTAMP` |
| **Comment** | | 설명 | `사용자 이메일` |
**지원하는 데이터 타입**:
* **문자열**: `string`, `text`, `mediumtext`, `longtext`
* **숫자**: `int`, `bigint`, `float`, `double`, `decimal`
* **날짜**: `date`, `datetime`, `timestamp`
* **기타**: `boolean`, `json`, `enum`
### Property 수정
1. Property 행을 클릭하여 편집 모드로 전환
2. 값을 수정
3. 다른 곳을 클릭하거나 Enter를 눌러 저장
### Property 삭제
Property 행의 **\[×]** 버튼을 클릭합니다.
**데이터 손실 주의**: Property를 삭제하면 해당 컬럼의 모든 데이터가 삭제됩니다. 마이그레이션을
실행하기 전에 반드시 데이터를 백업하세요.
## Indexes 관리
### Index 추가
1. **Indexes** 섹션으로 스크롤
2. **\[+ Add Index]** 버튼 클릭
3. Index 정보 입력:
| 필드 | 설명 | 예시 |
| ---------- | -------------------- | ----------------------------- |
| **Fields** | 인덱스 대상 필드 (복수 선택 가능) | `email`, `created_at` |
| **Type** | 인덱스 타입 | `index`, `unique`, `fulltext` |
**Index 타입**:
* **index**: 일반 인덱스 (검색 성능 향상)
* **unique**: 유니크 인덱스 (중복 방지)
* **fulltext**: 전문 검색 인덱스 (텍스트 검색)
### 복합 Index
여러 필드를 선택하여 복합 인덱스를 생성할 수 있습니다:
```typescript theme={null}
indexes: [
{ fields: ["user_id", "created_at"], type: "index" },
{ fields: ["email"], type: "unique" },
];
```
## Relations 관리
### belongsTo (N:1 관계)
**의미**: "이 Entity는 다른 Entity에 속한다"
예시: `Post`는 `User`에 속함
1. **belongsTo** 섹션의 **\[+ Add]** 버튼 클릭
2. 정보 입력:
| 필드 | 설명 | 예시 |
| --------------- | ------------ | ----------- |
| **Entity** | 참조할 Entity | `User` |
| **As** | 관계 별칭 | `author` |
| **Foreign Key** | 외래키 필드명 (선택) | `author_id` |
생성되는 코드:
```typescript theme={null}
belongsTo: [{ entityId: "User", as: "author" }];
```
### hasMany (1:N 관계)
**의미**: "이 Entity는 여러 개의 다른 Entity를 가진다"
예시: `User`는 여러 `Post`를 가짐
1. **hasMany** 섹션의 **\[+ Add]** 버튼 클릭
2. 정보 입력:
| 필드 | 설명 | 예시 |
| ---------- | --------- | ------- |
| **Entity** | 대상 Entity | `Post` |
| **As** | 관계 별칭 | `posts` |
생성되는 코드:
```typescript theme={null}
hasMany: [{ entityId: "Post", as: "posts" }];
```
## Enums 관리
특정 필드가 제한된 값만 가질 수 있을 때 Enum을 사용합니다.
### Enum 추가
1. **Enums** 섹션의 **\[+ Add Enum]** 버튼 클릭
2. Enum 정보 입력:
| 필드 | 설명 | 예시 |
| ---------- | ------------- | -------------------- |
| **Name** | Enum 이름 | `UserRole` |
| **Values** | 값 목록 (쉼표로 구분) | `admin, user, guest` |
생성되는 코드:
```typescript theme={null}
enums: [
{
name: "UserRole",
values: ["admin", "user", "guest"],
},
];
```
Property에서 사용:
```typescript theme={null}
{
name: "role",
type: "enum",
enum: "UserRole",
default: "user"
}
```
## AI 지원 Entity 생성
사이드바 하단의 **\[💬 AI]** 버튼을 클릭하면 AI 채팅 인터페이스가 열립니다.
### AI로 Entity 생성
**예시 프롬프트**:
```
블로그 게시글을 위한 Post Entity를 만들어줘.
제목, 내용, 작성자, 작성일, 조회수가 필요해.
```
AI가 Entity 정의를 생성하고 자동으로 추가해줍니다.
### AI로 Entity 수정
**예시 프롬프트**:
```
User Entity에 프로필 이미지 필드를 추가해줘.
```
AI가 기존 Entity를 분석하고 수정 사항을 적용합니다.
**구체적으로 요청하세요**: 필드 타입, 제약 조건, 관계 등을 명확히 설명할수록 더 정확한 결과를 얻을
수 있습니다.
## 실전 예제
### 전자상거래 Product Entity
```typescript theme={null}
export const ProductEntity = {
properties: [
{ name: "id", type: "int", primaryKey: true, autoIncrement: true },
{ name: "title", type: "string", length: 255 },
{ name: "description", type: "text", nullable: true },
{ name: "price", type: "decimal", precision: 10, scale: 2 },
{ name: "stock", type: "int", default: 0 },
{ name: "category_id", type: "int" },
{ name: "status", type: "enum", enum: "ProductStatus" },
{ name: "created_at", type: "datetime", default: "CURRENT_TIMESTAMP" },
{ name: "updated_at", type: "datetime", onUpdate: "CURRENT_TIMESTAMP" },
],
indexes: [
{ fields: ["category_id"] },
{ fields: ["title"], type: "fulltext" },
{ fields: ["status", "created_at"] },
],
belongsTo: [{ entityId: "Category", as: "category" }],
hasMany: [{ entityId: "Review", as: "reviews" }],
enums: [
{
name: "ProductStatus",
values: ["active", "inactive", "soldout"],
},
],
} satisfies EntityType;
```
## 변경사항 적용
Entity를 수정한 후에는 **마이그레이션을 생성하고 실행**해야 데이터베이스에 반영됩니다.
### 워크플로우
1. **Entity 편집**: UI에서 Entity 수정
2. **Migration 생성**: Migration 탭에서 마이그레이션 생성
3. **Migration 실행**: 마이그레이션 실행하여 DB 반영
4. **Scaffolding**: Model과 테스트 코드 생성
Entity 파일(`.entity.ts`)은 UI에서 수정 시 **자동으로 저장**됩니다.
## 다음 단계
마이그레이션 생성 및 실행
Model 코드 자동 생성
Entity 탭은 두 가지 주요 영역으로 구성됩니다:
* **왼쪽 Sidebar**: Entity 목록과 새 Entity 추가 버튼
* **오른쪽 Content**: 선택한 Entity의 상세 정보 (Properties, Indexes, Relations, Subsets, Enums)
## Entity 생성하기
### 1. New Entity 버튼 클릭
사이드바 하단의 **\[+ New Entity]** 버튼을 클릭합니다.
### 2. Entity 정보 입력
모달이 열리면 다음 정보를 입력합니다:
| 필드 | 설명 | 예시 |
| ----------------- | ----------------------- | ---------------------- |
| **Entity ID** | Entity 식별자 (PascalCase) | `Product`, `OrderItem` |
| **Title** | 한글 제목 | `상품`, `주문 항목` |
| **Parent Entity** | 부모 Entity (선택) | `Order` |
**Parent Entity**를 지정하면 부모 Entity의 하위 Entity가 됩니다. 예: `Order` → `OrderItem`
### 3. 기본 Properties 추가
생성된 Entity는 기본적으로 다음 필드를 포함합니다:
```typescript theme={null}
{
properties: [
{ name: "id", type: "int", primaryKey: true, autoIncrement: true },
{ name: "title", type: "string", length: 255 },
{ name: "created_at", type: "datetime", default: "CURRENT_TIMESTAMP" },
];
}
```
## Properties 편집
### Property 추가
1. **\[+ Add Property]** 버튼 클릭
2. Property 정보 입력:
| 필드 | 필수 | 설명 | 예시 |
| ------------ | --- | ----------------- | -------------------------- |
| **Name** | ✅ | 필드명 (snake\_case) | `email`, `phone_number` |
| **Type** | ✅ | 데이터 타입 | `string`, `int`, `decimal` |
| **Length** | 조건부 | 문자열 길이 | `255` |
| **Nullable** | | NULL 허용 여부 | `true` |
| **Default** | | 기본값 | `0`, `CURRENT_TIMESTAMP` |
| **Comment** | | 설명 | `사용자 이메일` |
**지원하는 데이터 타입**:
* **문자열**: `string`, `text`, `mediumtext`, `longtext`
* **숫자**: `int`, `bigint`, `float`, `double`, `decimal`
* **날짜**: `date`, `datetime`, `timestamp`
* **기타**: `boolean`, `json`, `enum`
### Property 수정
1. Property 행을 클릭하여 편집 모드로 전환
2. 값을 수정
3. 다른 곳을 클릭하거나 Enter를 눌러 저장
### Property 삭제
Property 행의 **\[×]** 버튼을 클릭합니다.
**데이터 손실 주의**: Property를 삭제하면 해당 컬럼의 모든 데이터가 삭제됩니다. 마이그레이션을
실행하기 전에 반드시 데이터를 백업하세요.
## Indexes 관리
### Index 추가
1. **Indexes** 섹션으로 스크롤
2. **\[+ Add Index]** 버튼 클릭
3. Index 정보 입력:
| 필드 | 설명 | 예시 |
| ---------- | -------------------- | ----------------------------- |
| **Fields** | 인덱스 대상 필드 (복수 선택 가능) | `email`, `created_at` |
| **Type** | 인덱스 타입 | `index`, `unique`, `fulltext` |
**Index 타입**:
* **index**: 일반 인덱스 (검색 성능 향상)
* **unique**: 유니크 인덱스 (중복 방지)
* **fulltext**: 전문 검색 인덱스 (텍스트 검색)
### 복합 Index
여러 필드를 선택하여 복합 인덱스를 생성할 수 있습니다:
```typescript theme={null}
indexes: [
{ fields: ["user_id", "created_at"], type: "index" },
{ fields: ["email"], type: "unique" },
];
```
## Relations 관리
### belongsTo (N:1 관계)
**의미**: "이 Entity는 다른 Entity에 속한다"
예시: `Post`는 `User`에 속함
1. **belongsTo** 섹션의 **\[+ Add]** 버튼 클릭
2. 정보 입력:
| 필드 | 설명 | 예시 |
| --------------- | ------------ | ----------- |
| **Entity** | 참조할 Entity | `User` |
| **As** | 관계 별칭 | `author` |
| **Foreign Key** | 외래키 필드명 (선택) | `author_id` |
생성되는 코드:
```typescript theme={null}
belongsTo: [{ entityId: "User", as: "author" }];
```
### hasMany (1:N 관계)
**의미**: "이 Entity는 여러 개의 다른 Entity를 가진다"
예시: `User`는 여러 `Post`를 가짐
1. **hasMany** 섹션의 **\[+ Add]** 버튼 클릭
2. 정보 입력:
| 필드 | 설명 | 예시 |
| ---------- | --------- | ------- |
| **Entity** | 대상 Entity | `Post` |
| **As** | 관계 별칭 | `posts` |
생성되는 코드:
```typescript theme={null}
hasMany: [{ entityId: "Post", as: "posts" }];
```
## Enums 관리
특정 필드가 제한된 값만 가질 수 있을 때 Enum을 사용합니다.
### Enum 추가
1. **Enums** 섹션의 **\[+ Add Enum]** 버튼 클릭
2. Enum 정보 입력:
| 필드 | 설명 | 예시 |
| ---------- | ------------- | -------------------- |
| **Name** | Enum 이름 | `UserRole` |
| **Values** | 값 목록 (쉼표로 구분) | `admin, user, guest` |
생성되는 코드:
```typescript theme={null}
enums: [
{
name: "UserRole",
values: ["admin", "user", "guest"],
},
];
```
Property에서 사용:
```typescript theme={null}
{
name: "role",
type: "enum",
enum: "UserRole",
default: "user"
}
```
## AI 지원 Entity 생성
사이드바 하단의 **\[💬 AI]** 버튼을 클릭하면 AI 채팅 인터페이스가 열립니다.
### AI로 Entity 생성
**예시 프롬프트**:
```
블로그 게시글을 위한 Post Entity를 만들어줘.
제목, 내용, 작성자, 작성일, 조회수가 필요해.
```
AI가 Entity 정의를 생성하고 자동으로 추가해줍니다.
### AI로 Entity 수정
**예시 프롬프트**:
```
User Entity에 프로필 이미지 필드를 추가해줘.
```
AI가 기존 Entity를 분석하고 수정 사항을 적용합니다.
**구체적으로 요청하세요**: 필드 타입, 제약 조건, 관계 등을 명확히 설명할수록 더 정확한 결과를 얻을
수 있습니다.
## 실전 예제
### 전자상거래 Product Entity
```typescript theme={null}
export const ProductEntity = {
properties: [
{ name: "id", type: "int", primaryKey: true, autoIncrement: true },
{ name: "title", type: "string", length: 255 },
{ name: "description", type: "text", nullable: true },
{ name: "price", type: "decimal", precision: 10, scale: 2 },
{ name: "stock", type: "int", default: 0 },
{ name: "category_id", type: "int" },
{ name: "status", type: "enum", enum: "ProductStatus" },
{ name: "created_at", type: "datetime", default: "CURRENT_TIMESTAMP" },
{ name: "updated_at", type: "datetime", onUpdate: "CURRENT_TIMESTAMP" },
],
indexes: [
{ fields: ["category_id"] },
{ fields: ["title"], type: "fulltext" },
{ fields: ["status", "created_at"] },
],
belongsTo: [{ entityId: "Category", as: "category" }],
hasMany: [{ entityId: "Review", as: "reviews" }],
enums: [
{
name: "ProductStatus",
values: ["active", "inactive", "soldout"],
},
],
} satisfies EntityType;
```
## 변경사항 적용
Entity를 수정한 후에는 **마이그레이션을 생성하고 실행**해야 데이터베이스에 반영됩니다.
### 워크플로우
1. **Entity 편집**: UI에서 Entity 수정
2. **Migration 생성**: Migration 탭에서 마이그레이션 생성
3. **Migration 실행**: 마이그레이션 실행하여 DB 반영
4. **Scaffolding**: Model과 테스트 코드 생성
Entity 파일(`.entity.ts`)은 UI에서 수정 시 **자동으로 저장**됩니다.
## 다음 단계
마이그레이션 생성 및 실행
Model 코드 자동 생성