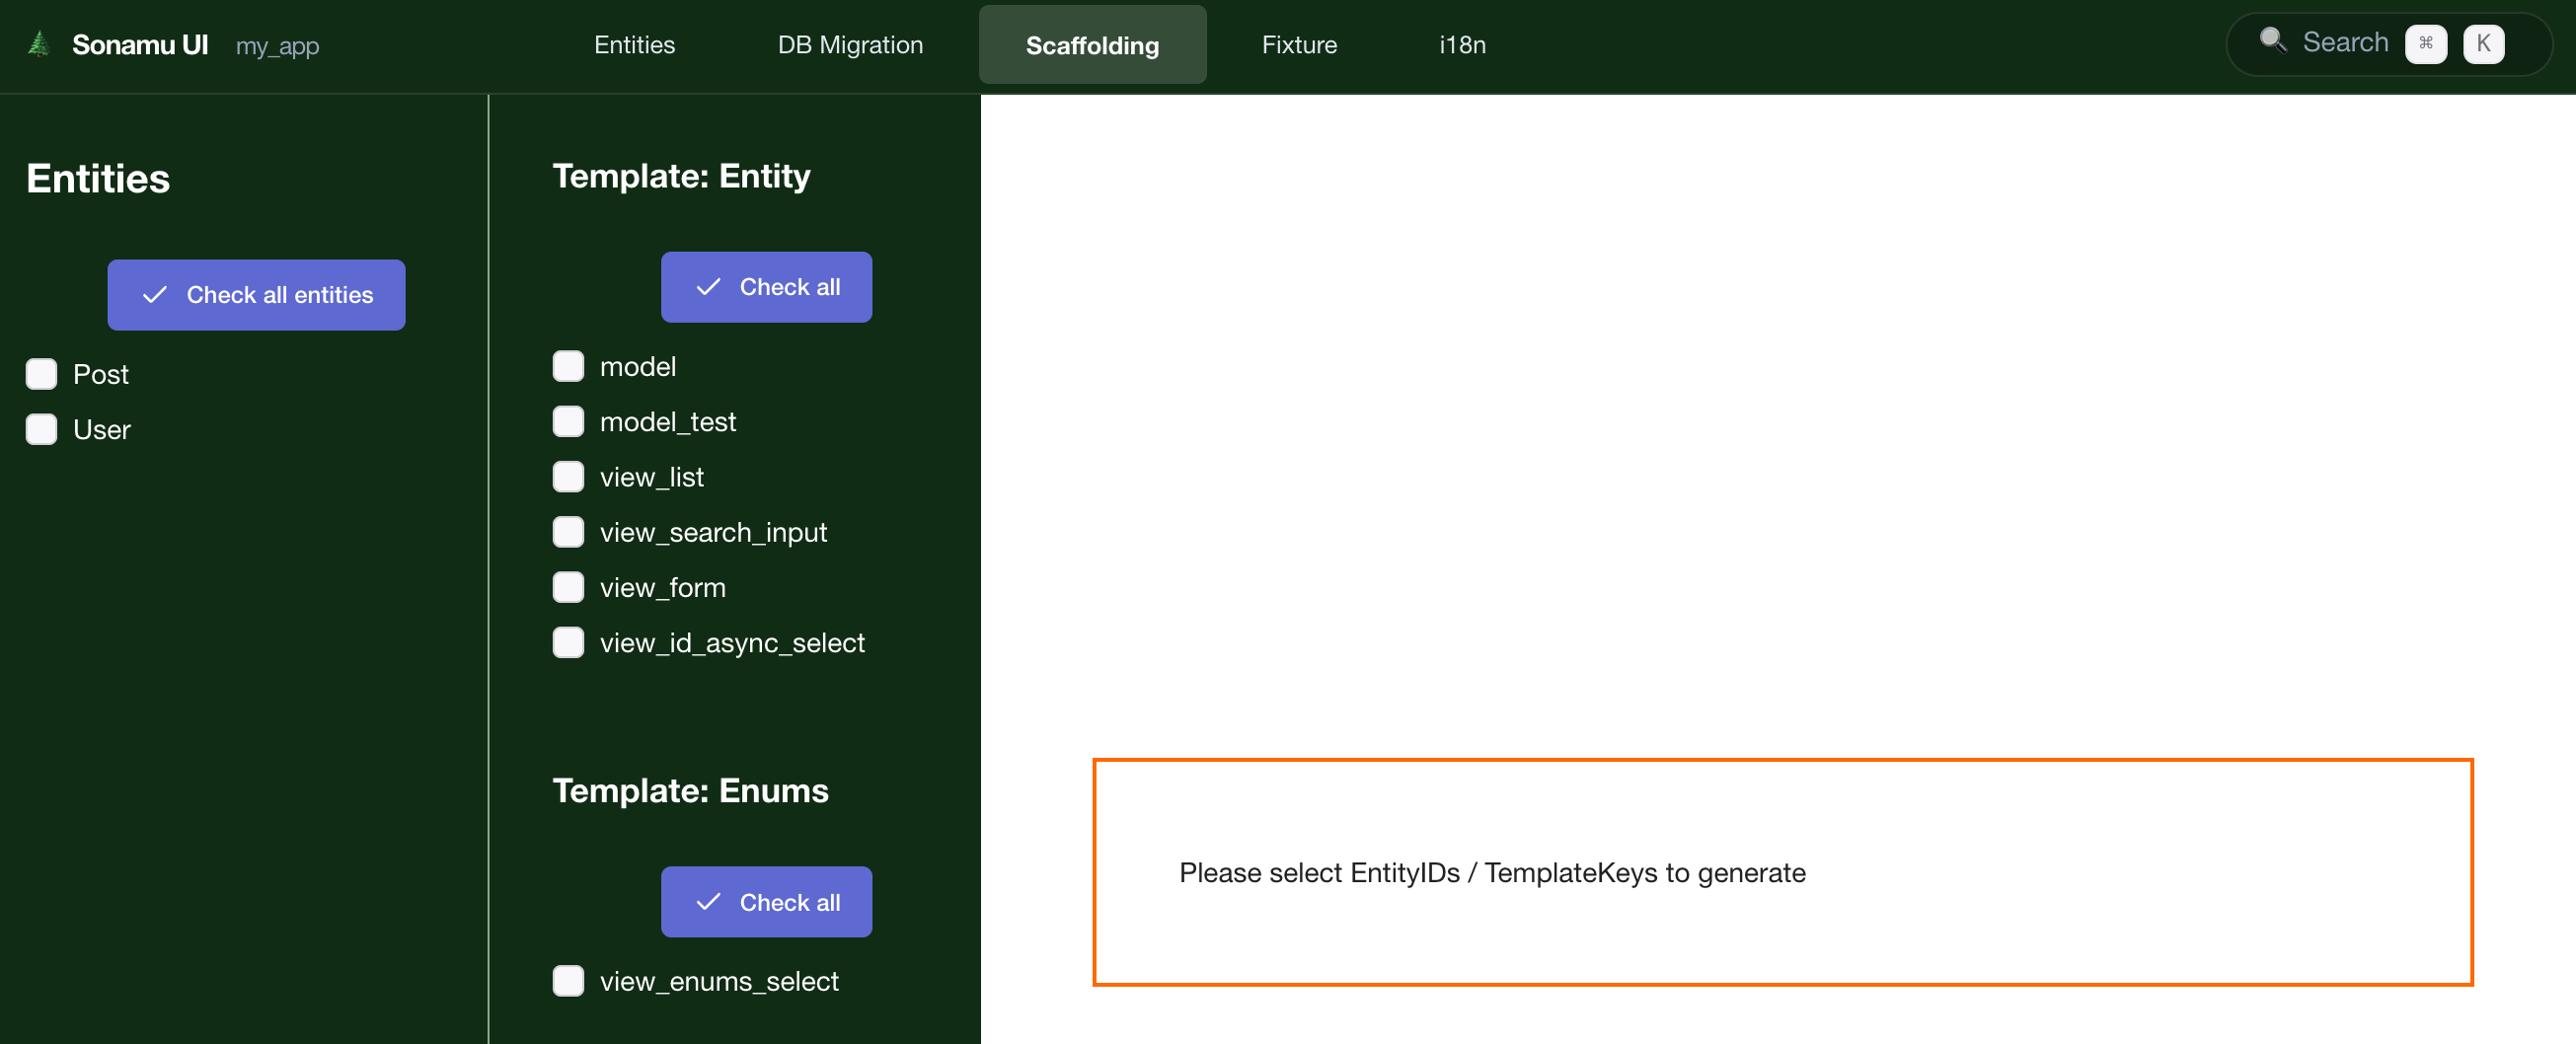
In the Scaffolding tab, you can auto-generate Model and test code based on Entities . It provides the CLI pnpm scaffold command through a visual interface.
Scaffolding Tab Structure The Scaffolding tab consists of two main areas:
Left Sidebar : Entity list and selection checkboxesRight Content : Code generation options (Model Class, Model Test, View)
Available Code Types Code Type Description Status CLI Command Model Class Model class for Entity ✅ Available pnpm scaffold modelModel Test Model test file ✅ Available pnpm scaffold model_testView List List View component 🚧 In Development - View Form Form View component 🚧 In Development -
View component generation is currently under development. You can generate React components
through other Sonamu UI features .
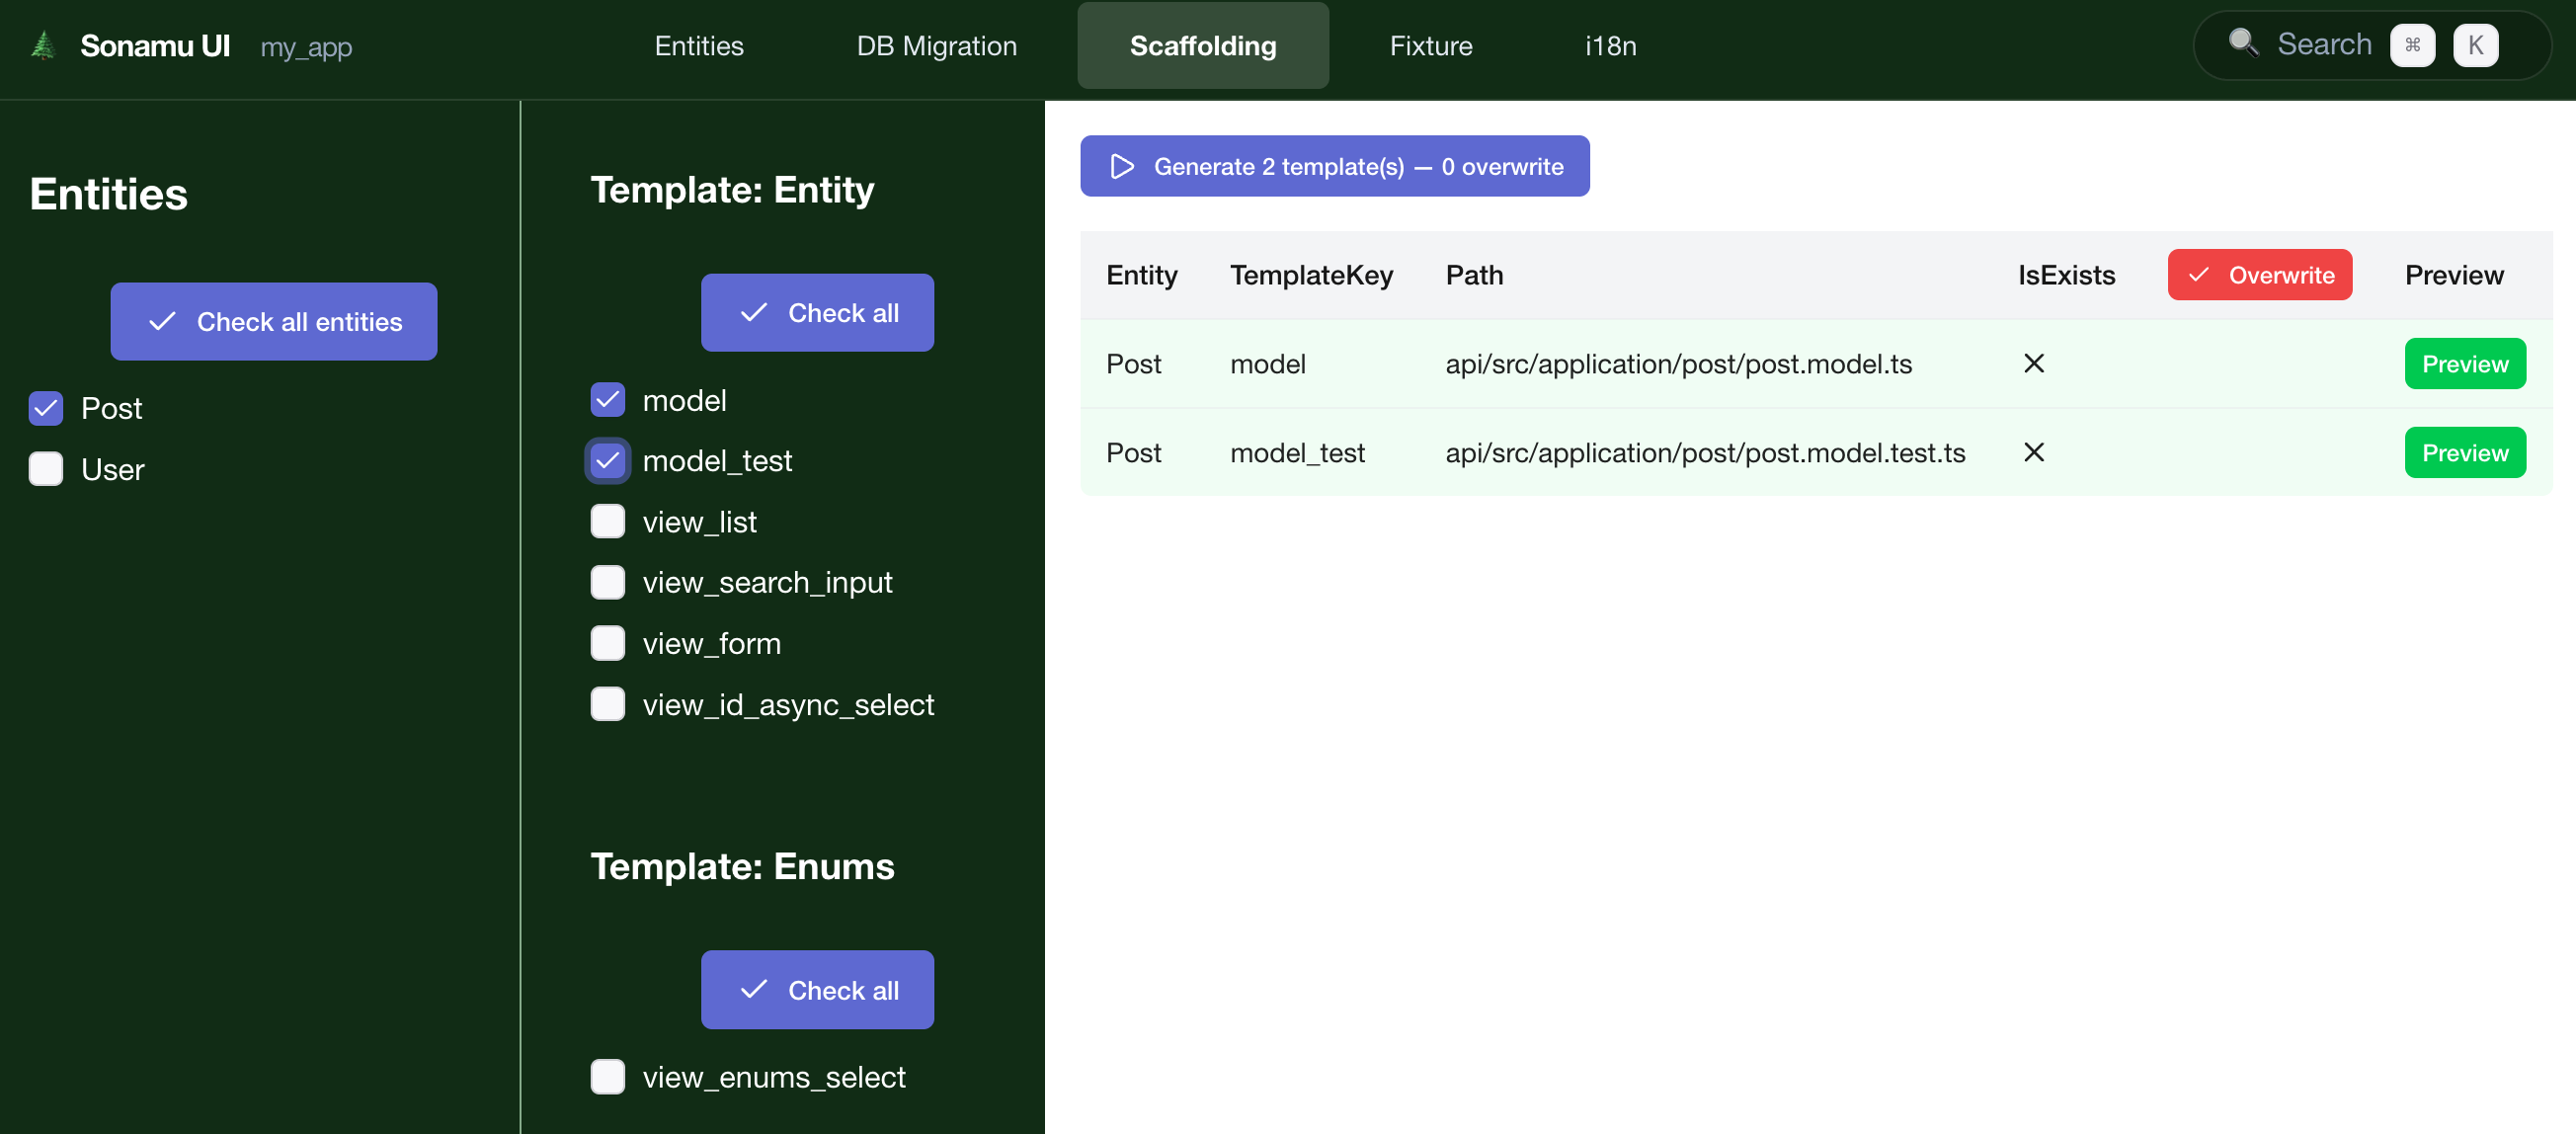
Generating Model Class 1. Select Entity Select the Entity to generate a Model for from the left Entity list.
Single selection :Multiple selection :2. Select Generation Option Check the ☑ Model Class checkbox.
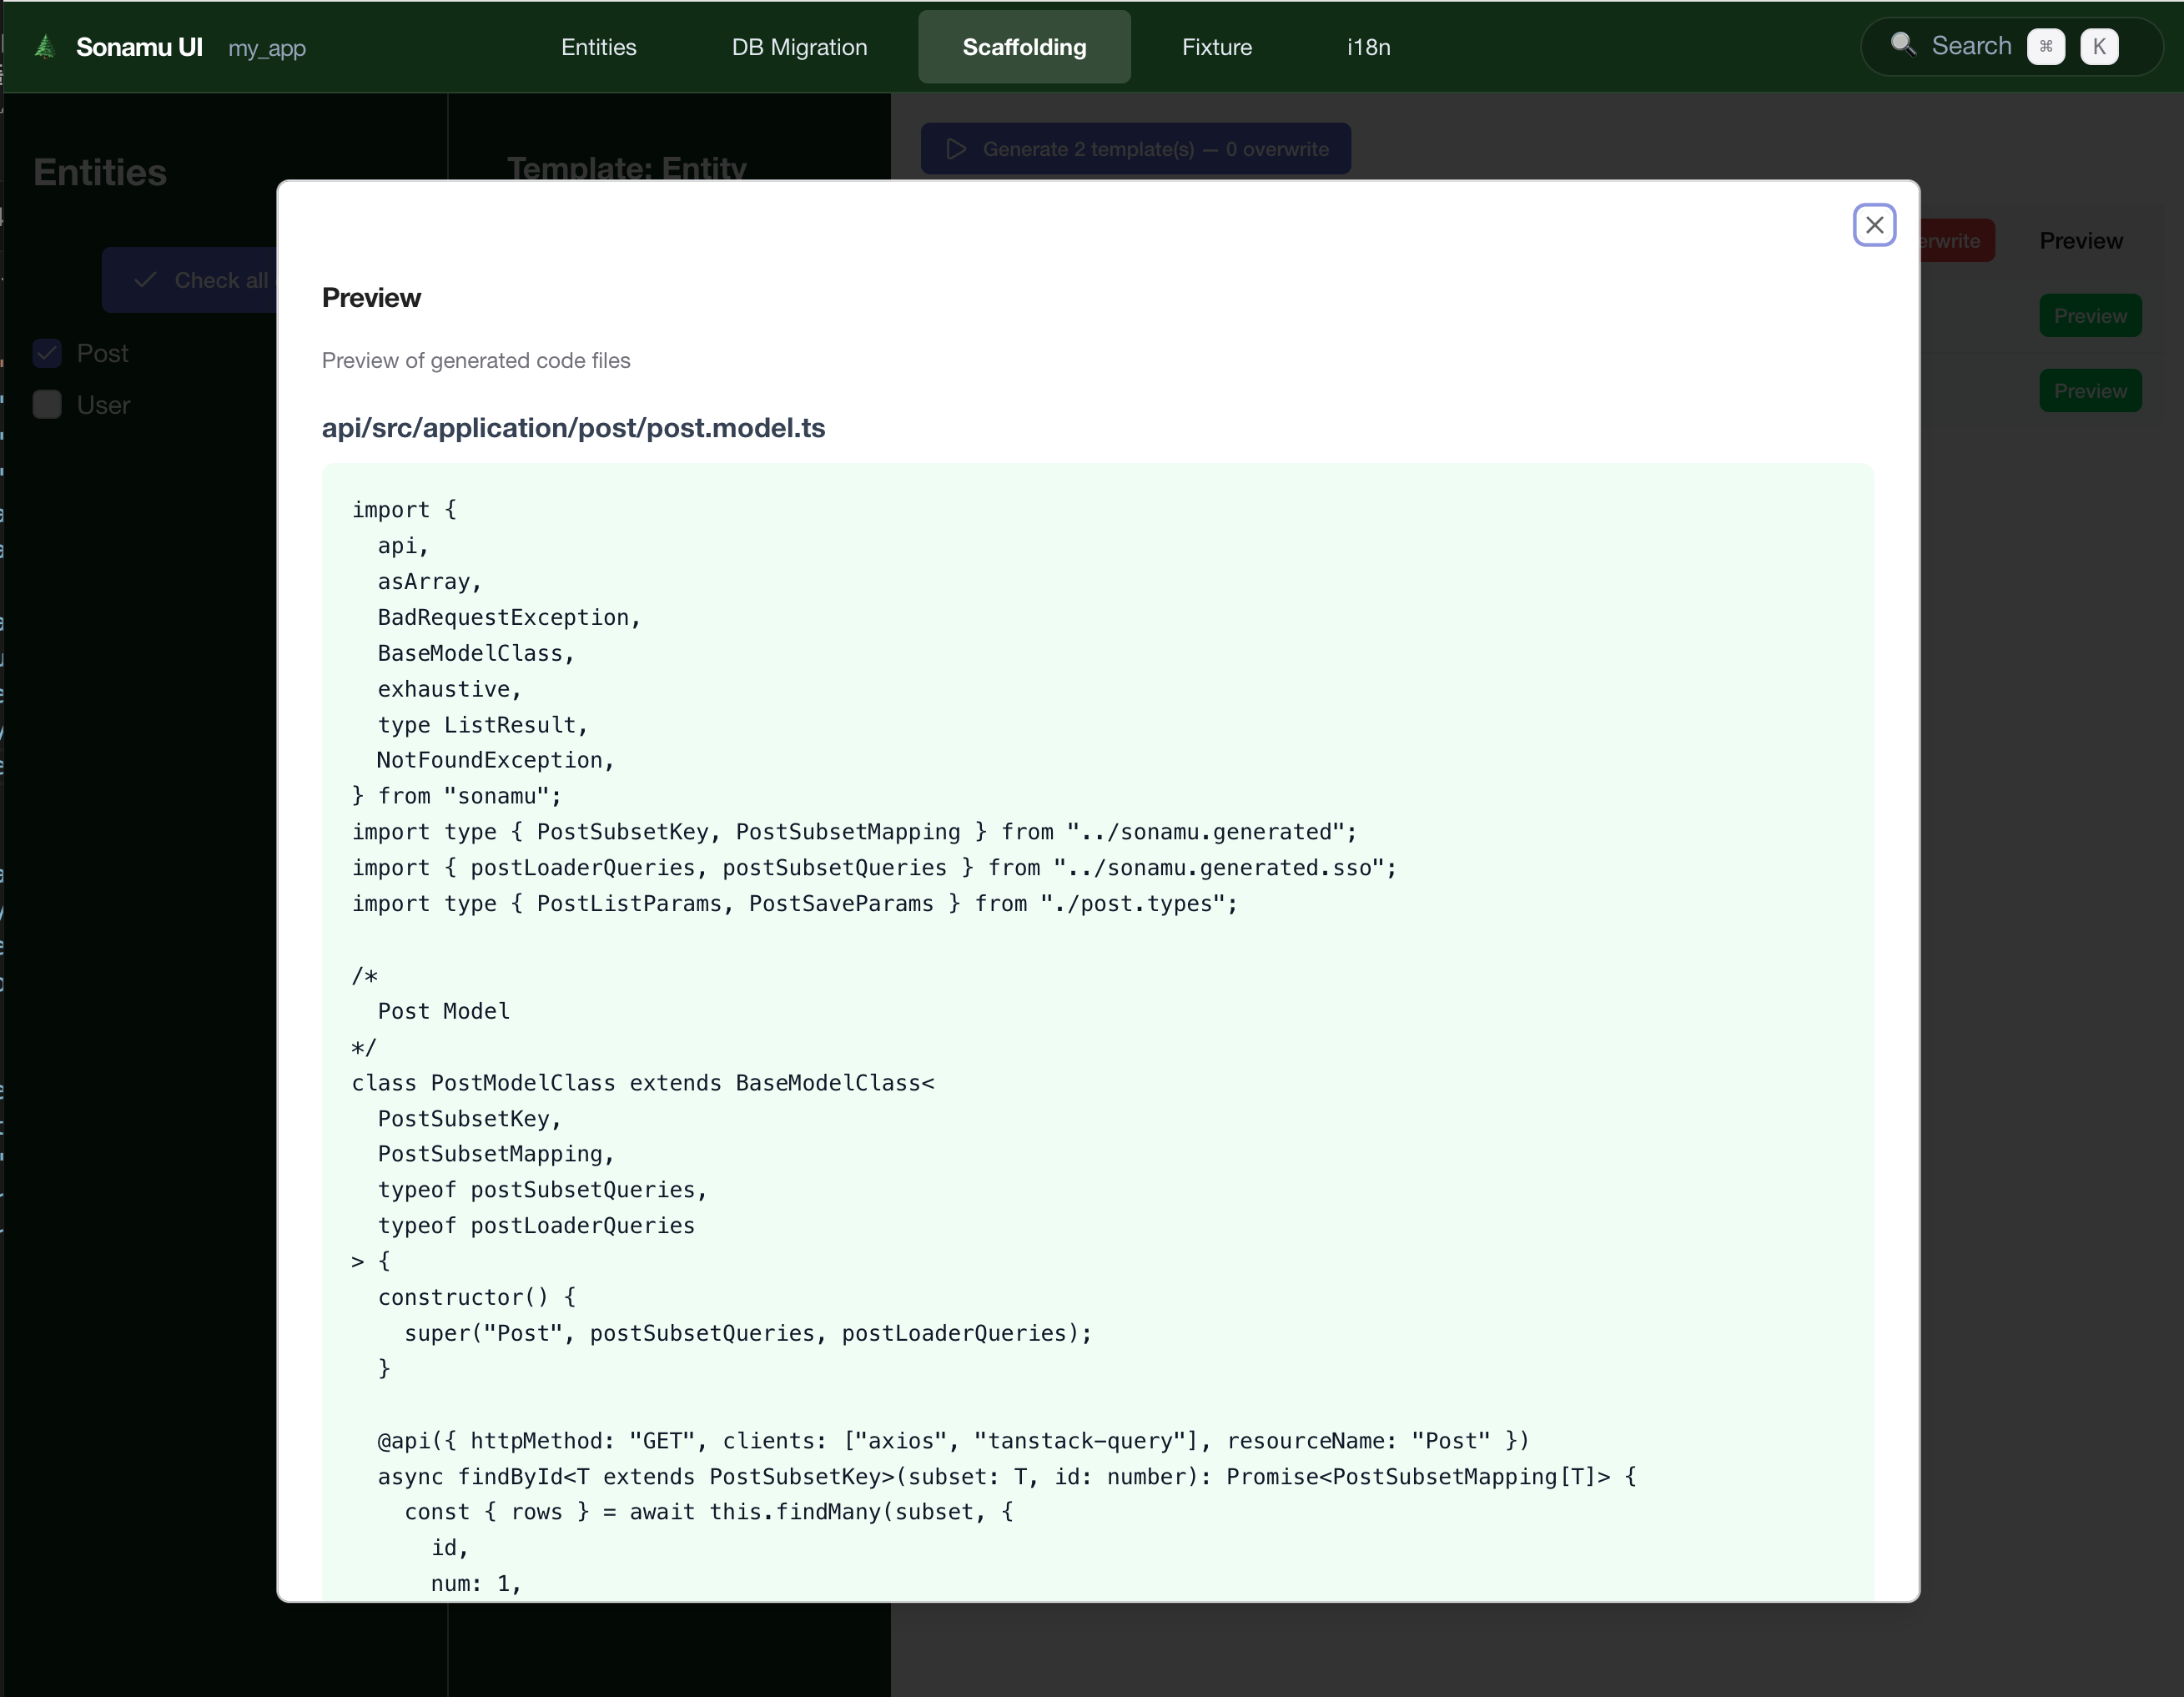
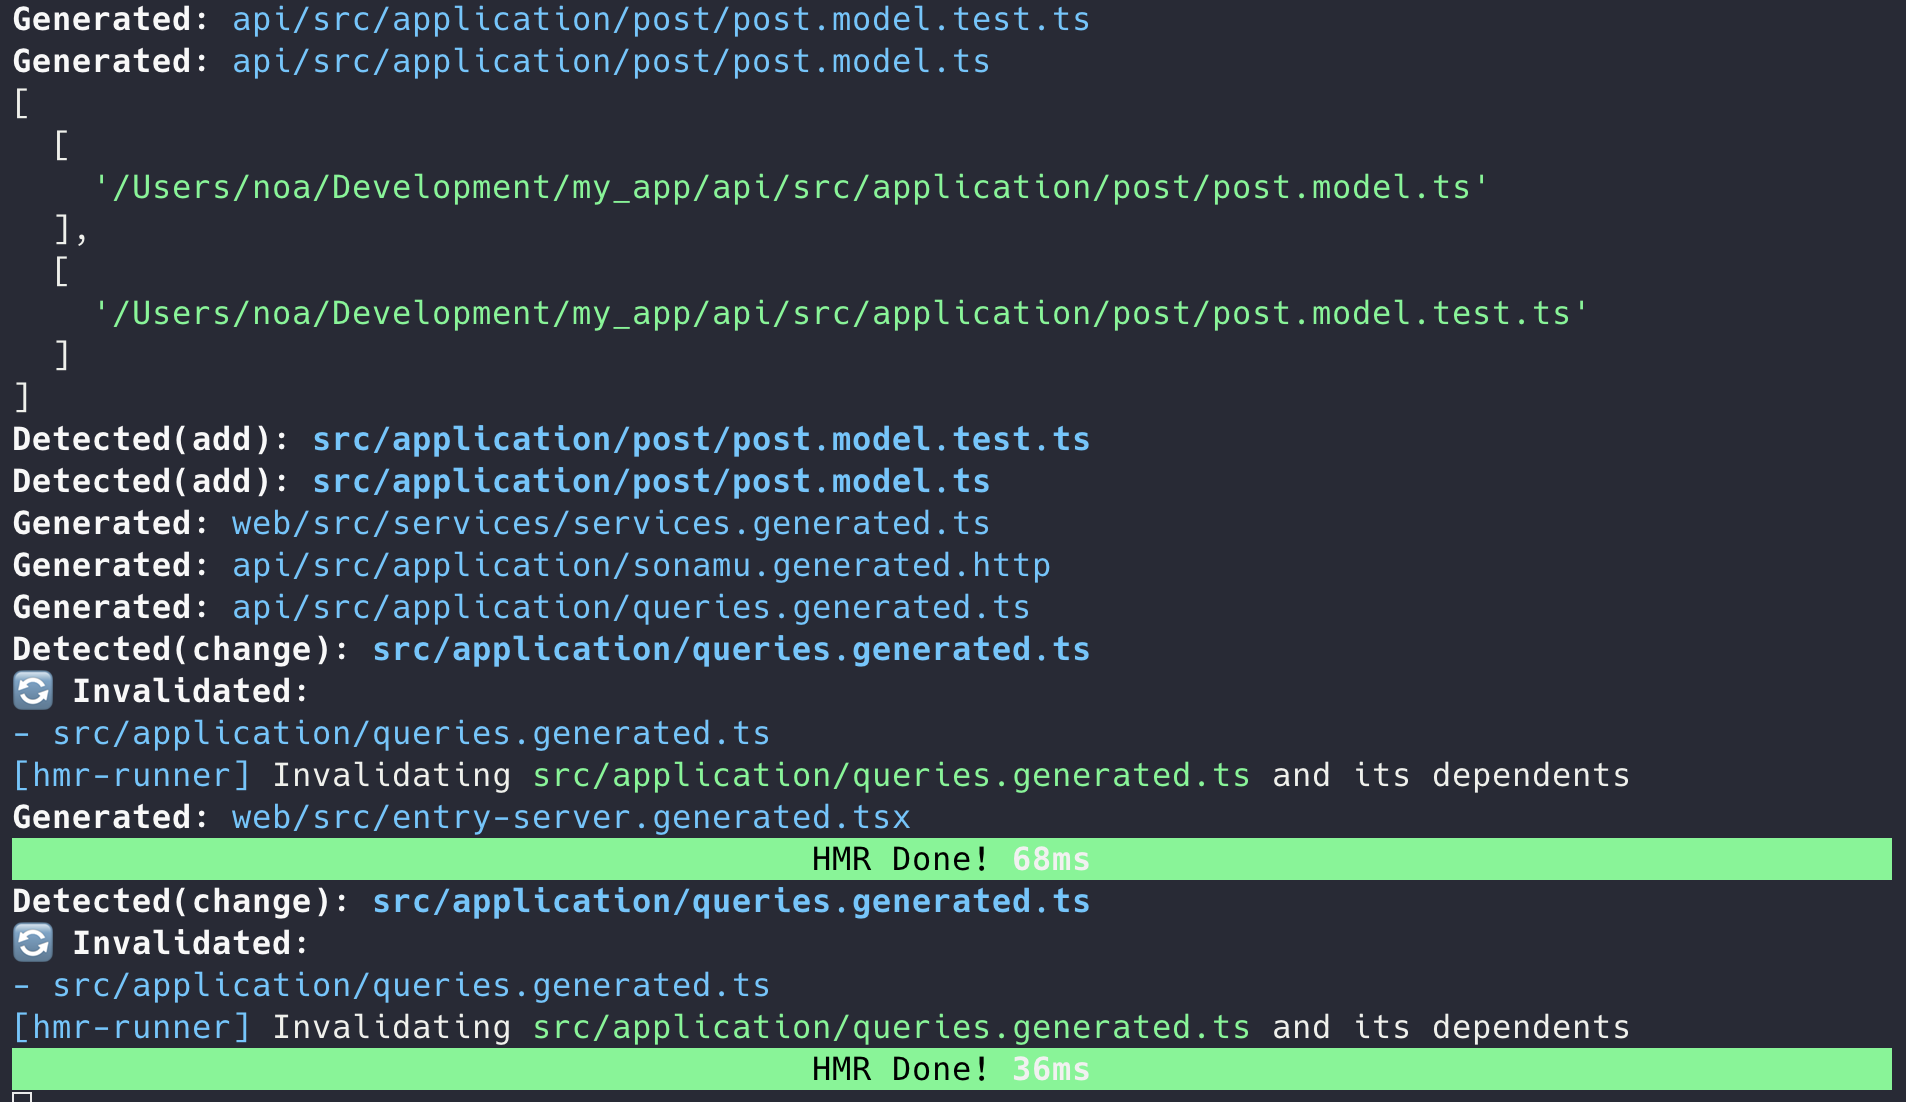
3. Run Generate Click the [Generate] button to create the following file:
Generated Code import { BaseModelClass } from "sonamu" ; import type { InferSelectModel } from "sonamu" ; import { UserEntity } from "../entities/User.entity" ; import type { UserSubsetKey , UserSubsetMapping } from "../sonamu.generated" ; import { userLoaderQueries , userSubsetQueries } from "../sonamu.generated.sso" ; export type User = InferSelectModel < typeof UserEntity >; class UserModelClass extends BaseModelClass < UserSubsetKey , UserSubsetMapping , typeof userSubsetQueries , typeof userLoaderQueries > { constructor () { super ( "User" , userSubsetQueries , userLoaderQueries ); } // TODO: Add Model methods } export const UserModel = new UserModelClass ();
Auto-generated features :
✅ TypeScript type definitions
✅ Entity connection
✅ BaseModel inheritance
✅ Basic CRUD methods
Generating Model Test 1. Select Entity Select Entity same as for Model.
2. Select Generation Option Check the ☑ Model Test checkbox.
Generate Model and Test together : You can select both Model Class and Model Test to generate
them at once.
3. Run Generate Click the [Generate] button to create the following file:
Generated Code src/models/User.model.test.ts
import { beforeAll , describe , test } from "bun:test" ; import { expect } from "@jest/globals" ; import { FixtureManager } from "sonamu/test" ; import { UserModel } from "./User.model" ; describe ( "User Model" , () => { beforeAll ( async () => { await FixtureManager . sync (); }); test ( "findById" , async () => { const user = await UserModel . findById ( 1 ); expect ( user ). toBeDefined (); expect ( user ?. id ). toBe ( 1 ); }); test ( "findMany" , async () => { const users = await UserModel . findMany ({ num: 10 , page: 1 , }); expect ( users . rows . length ). toBeGreaterThan ( 0 ); }); // TODO: Add more tests });
Auto-generated tests :
✅ findById: Query single record by ID
✅ findMany: List query (pagination)
Batch Generation Generate for All Entities
Click [Select All] button
Select generation options
Click [Generate]
Result :✓ User.model.ts created ✓ User.model.test.ts created ✓ Post.model.ts created ✓ Post.model.test.ts created ✓ Comment.model.ts created ✓ Comment.model.test.ts created 6 files generated successfully!
Select Specific Entities Only For all Entities during initial project setup:
☑ User ☑ Post ☑ Comment ☑ Category ☑ Tag [Generate] → 10 files generated
For new Entity only when adding:
□ User (already generated)
□ Post (already generated)
☑ Product (new)

[Generate] → 2 files generated
Checking Generation Results Success Message ✅ Code Generation Complete Generated files: ✓ src/models/User.model.ts ✓ src/models/User.model.test.ts ✓ src/models/Post.model.ts ✓ src/models/Post.model.test.ts Total: 4 files
File Conflict When trying to generate files that already exist, a confirmation modal appears:
⚠️ Files Already Exist

The following files will be overwritten:
  • src/models/User.model.ts
  • src/models/User.model.test.ts

[Cancel] [Backup & Overwrite] [Overwrite]
Options :
Cancel : Cancel generationBackup & Overwrite : Backup existing files as .bak then overwriteOverwrite : Overwrite directly (caution!)
Code loss caution : Overwriting existing files may delete your business logic. Backup or avoid
overwriting customized Models.
View Generation (In Development) View component auto-generation is currently under development.
Alternative: Use Other Sonamu UI Features Currently, you can manage Views through these methods:
Entity-based auto-generation : Basic View templates are provided when creating EntitiesManual writing : Write React components directlyComponent library : Use @sonamu-kit/react-components
This document will be updated when View List and View Form generation features are added.
Post-Generation Workflow 1. Add Model Methods Add business logic to the generated Model:
class UserModelClass extends BaseModelClass < UserSubsetKey , UserSubsetMapping , typeof userSubsetQueries , typeof userLoaderQueries > { constructor () { super ( "User" , userSubsetQueries , userLoaderQueries ); } // Find user by email async findByEmail ( email : string ) : Promise < User | null > { return this . getPuri ( "r" ). table ( "users" ). where ( "email" , email ). first (); } // Find only active users async findActiveUsers () { return this . getPuri ( "r" ). table ( "users" ). where ( "is_active" , true ). where ( "deleted_at" , null ); } }
2. Add Tests Add more tests to the generated test file:
src/models/User.model.test.ts
describe ( "User Model - Extended" , () => { test ( "findByEmail" , async () => { const user = await UserModel . findByEmail ( "user@example.com" ); expect ( user ). toBeDefined (); expect ( user ?. email ). toBe ( "user@example.com" ); }); test ( "findActiveUsers" , async () => { const users = await UserModel . findActiveUsers (); users . forEach (( user ) => { expect ( user . is_active ). toBe ( true ); }); }); });
3. Add API Add API endpoints using the @api decorator on the Model:
class UserModelClass extends BaseModelClass < UserSubsetKey , UserSubsetMapping , typeof userSubsetQueries , typeof userLoaderQueries > { constructor () { super ( "User" , userSubsetQueries , userLoaderQueries ); } @ api ({ httpMethod: "GET" }) async findActiveUsers () { const { qb } = this . getSubsetQueries ( "A" ); qb . where ( "is_active" , true ); return this . executeSubsetQuery ({ subset: "A" , qb , params: { num: 20 , page: 1 }, }); } }
Practical Tips 1. Initial Project Setup 1. Define all Entities ↓ 2. Batch generate in Scaffolding tab - [Select All] - Model Class ☑ - Model Test ☑ - [Generate] ↓ 3. Add business logic to each Model
2. Adding New Entity 1. Create Entity in Entity tab ↓ 2. Run migration in Migration tab ↓ 3. Generate only that Entity in Scaffolding tab ↓ 4. Write business logic and tests
3. When Regeneration is Needed When Entity structure changes significantly and Model needs regeneration:
# Backup existing file
cp src/models/User.model.ts src/models/User.model.ts.bak

# Regenerate in UI
[Backup & Overwrite]

# Restore custom logic from backup file
Next Steps
Model Learn more about Model classes
scaffold CLI Generate code via CLI